An Awesome Rails Tutorial
by Alek Zieba
Part I: The Setup
What We’re Doing
Today we’ll be building the most awesome blog ever from scratch.
We’ll be using the Ruby on Rails web development framework to do so. The purpose of this tutorial is to show you how awesome Rails is and how easy it is to create something very functional very quickly. Rails is quite notorious for being intimidating to beginners, so if you don’t understand something as I walk you through this tutorial, don’t worry, it’ll most likely make sense at the end.
Before we begin, if you don’t already have Rails installed, I would suggest following the instructions on InstallRails.com, since they are very easy to follow and will set up almost everything that you could possibly need for Rails development at the beginning. You’ll also want to install the native application for Postgres (a database platform). If you don’t know whether you have Rails installed, run the following in your computer’s command line:
$> rails -v
NOTE: $> indicates we are in the cmd prompt / terminal in your designated directory
In my case, this returns:
Rails 4.1.4
So if you get anything that doesn’t look like that, you need to go through the installation process. Since you may have a few large downloads, you can start those now and keep reading for a bit – we’re going to discuss some Rails philosophy first.
How We Build Stuff in Rails
We’ll discuss the inner workings of the blog later, but first, we need to know how Rails projects in general are structured and why its creators chose the framework to be that way.
Rails was built around the philosophy of maintaining a Model-View-Controller (MVC) architecture in your project, which means that the code that performs specific tasks must be placed in the appropriate spaces that Rails provides for them – these spaces are the Model, the View, and the Controller. Model code is for database-level tasks such as validation, View code determines what users see in their browsers, and Controller code is what connects the View and the Model. Here’s a diagram that explains this structure:
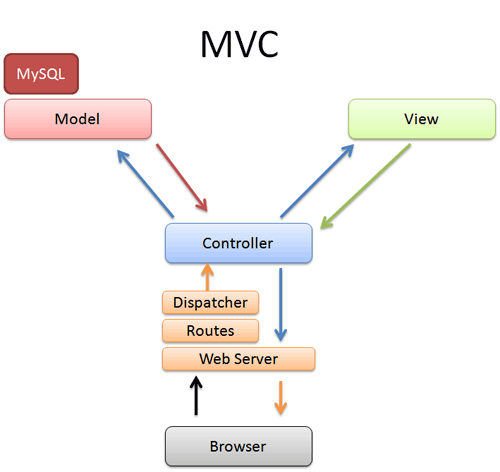
What does keeping everything separated do for us? Trust me, it keeps your code very DRY (stands for Don’t Repeat Yourself) and easier to maintain, since you know exactly where everything is when you need it.
Again, if anything is confusing, don’t worry, everything will make sense as soon as we start writing code and placing it in the correct spots. The bottom line is this: everything in Rails needs to be in a very specific location, and not following the established conventions can cost us a lot of troubleshooting time down the road.
Here’s a rundown of the structure of a Rails project, just so that we’re not scared by it when we create the project – feel free to refer to this at any time:
Blue means used a lot.
Green means handy but not required to make a great project.
Red means off-limits.
Gray means it doesn’t matter if you touch it, it’s not important anyway.
app/ - Where the bulk of your application’s code is stored.
-
assets/ - Javascript, CSS, images, fonts, etc.
-
controllers/ - Where controller code is managed.
-
helpers/ - Where you can define custom methods to generate HTML for your views.
-
mailers/ - Where you manage files that send email from your application.
-
models/ - Where your model validation code is managed.
-
views/ - Where your HTML everything is located.
bin/ - Binaries. Don’t touch this. Ever.
config/ - Where your configuration code is stored. Examples of such configuration is routing (everything having to do with URLs) and database stuff.
config.ru - Leftover from something off which Rails was built. Don’t touch it.
db/ - Information about your database is stored here. Such information includes migration files, the current database schema, and seed data.
Gemfile - Where external dependencies (Gems) are managed.
Gemfile.lock - Don’t touch this. This is managed by bundler (you’ll see this in a bit).
lib/ - Where external Ruby libraries are placed.
log/ - Log files for your application.
public/ - Where static materials that aren’t application assets should be stored.
Rakefile - Leftover from something that Rails is built off of. Don’t touch it.
README.rdoc - Where you put instructions for setting up the application if someone else will be reading your code.
test/ - Where your Rails test suite is managed.
tmp/ - Where temporary assets (cache, cookies, etc.) are managed.
vendor/ - Third-party stuff is supposed to go here, but no one actually uses this folder.
Will you need to know exactly what each of these folders is for? Yes. However, don’t make flashcards just yet, because you’ll remember it through practice – it will become second-nature.
Setting the Stage
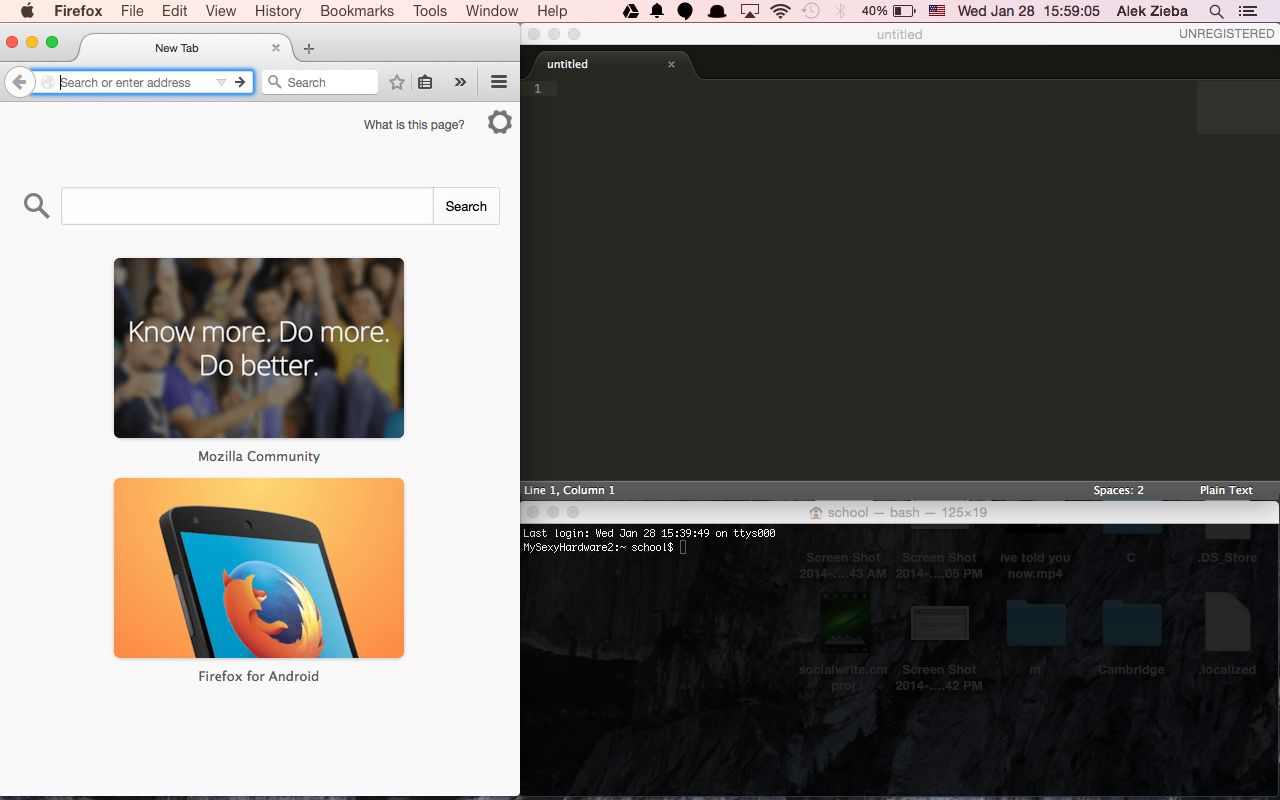
You’re going to want to open a few things: your favorite web browser (preferably Chrome or Firefox), your favorite code editor (I would highly recommend Sublime Text 2), and the command-line. My personal setup looks like this:
Now, let’s begin by making a new Rails project called "blog":
$> rails new blog --database=postgresql
This may take a while, since Rails has to bundle a lot of dependencies. Note that by default Rails uses an SQLite3 database instead of a Postgres one, but most Rails deployment options use Postgres, so we might as well get into the habit of making new projects with it, especially since changing database types becomes more tedious the later we put it off. Once it finishes, change your terminal directory to that of your new project:
$> cd blog
Before we move further, let’s just make sure that our project built correctly. Start Postgres locally (just open the application that came installed with your package, unless you’re on Linux – then it might be more complicated, but if you’re on Linux, you should know how!) and enter one of the following in your command line:
EITHER
$> rails server
OR
$> rails s
The second is merely shorthand for the first ("s" stands for “server”). Point your favorite web browser to http://localhost:3000/ and you should see the following:
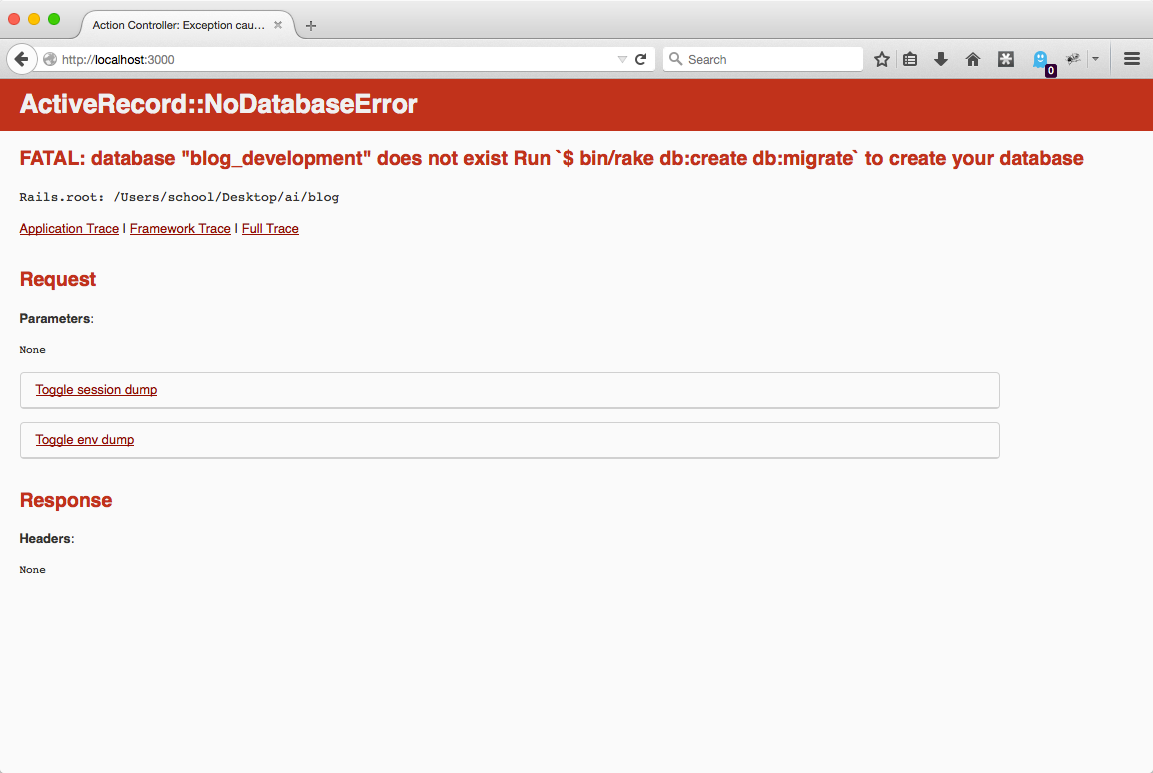
Uh oh, looks like we don’t even have a database to work with yet. Let’s stop the server for a bit by pressing Control-C (feel free to stop the server at any point, but the Rails server needs to be running for the application to display). Let’s do what the error message says and enter the following in the command line, but after you start your newly-installed Postgres server, open its command line (can usually be done by typing psql in any regular command-line prompt), and create a role under your computer account’s name:
$> rake db:create db:migrate
Hopefully our database was created, let’s restart the server:
$> rails s
If we navigate back to http://localhost:3000/, we should see the following:
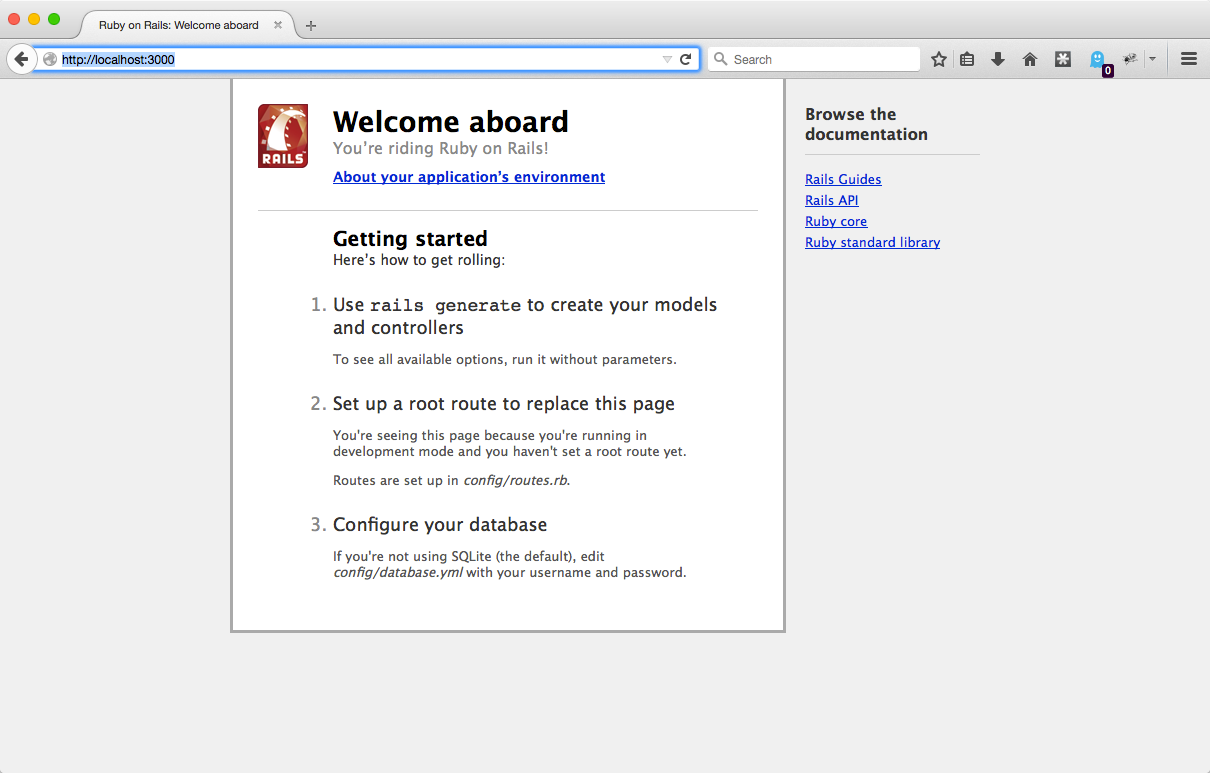
Hallelujah, we got something working this time!
Next, open the file named Gemfile in the project root directory and add the following lines to the bottom of it:
## ./blog/Gemfile
# Link auto detection
gem 'rails_autolink', '~> 1.1.6'
This adds a third-party gem – basically the Ruby version of an external library – to our project, and we’ll be making use of this at some point. Gems are absolutely essential to Rails projects whenever we’re doing extreme work with CSS and HAML, but we’re not going to be using much of those in this tutorial. However, you need to know how to install gems to become a fluid Rails developer. Install the gem by stopping the server and running the following:
EITHER
$> bundle update

$> bundle install
OR
$> bundle
The second option is direct shorthand for the first.
Part II: Getting Down to Town with MVC
The Model
Databases, yay!
In this section, we will configure the database to accept blog post objects and will add some server-side validation to our project so that we have a strong backbone for the rest of our project.
To get started, let’s make a new Model object titled Post with the following command:
$> rails g model Post title content:text views:integer
Here’s what we just said to the computer: Rails, please generate a Model object called Post with a string attribute called title, a text (longer string) attribute called content, and an integer attribute called views. But hold on, how does Rails know that title is a string, when we had to specify the types for the other attributes? It turns out that the default type for a Model object attribute is a string. We could have accomplished the same thing with the following command:
DON’T RUN THIS
$> rails g model Post title:string content:text views:integer
But let’s face it, shorthand is always better. You’ll notice that this command created a few important files in our project, but don’t worry, we’re not going to concern ourselves with all of the files created.
We will edit a few, however, and the first one that we need to visit is db/migrate/*Timestamp*_create_posts.rb. This is a database migration file. Making a database migration file is basically us telling the computer, "Hey Rails, we want to change our database, and how to do it can be found in this new migration file." We then migrate the database to apply these changes.
Let’s take a look at the database migration file. It’s not too bad to read, since it reads mostly like plain English. The contents of this file were generated by the command that we ran earlier; we could have omitted the attributes in the command, but we would have had to write this file entirely by ourselves. Change this line:
Incorrecto
t.integer :views
to this:
Correcto
t.integer :views, default: 0
This is because by default, all posts should have 0 views, not NULL views, and it’s much easier to increment 0 than it is to increment NULL, which will be important in a bit.
Let’s go ahead and push our changes to the database:
$> rake db:migrate
Remember that if you mess anything up (even seasoned developers do) in your migration files, you can undo the last migration by running the following:
ONLY FOR EMERGENCIES
$> rake db:rollback
Now, we need to add some server-side validation logic to our model object. This is to prevent people from entering posts with blank titles, blank content, or anything else annoying and unblog-like that their devious minds could devise.
The file that controls Post validation is app/models/post.rb. Right now, it should look like this:
class Post < ActiveRecord::Base

end
This file is so empty that I almost feel sad for it. Let’s add the following validation code between those two lines:
validates_presence_of :title
validates_presence_of :content
This will make sure that users haven’t entered blank Post titles nor blank Post content.
But let’s consider another scenario: we don’t want people to enter Posts that have beginning or trailing whitespace neither in the titles nor the contents, because that looks tacky. Let’s add the following after the previous validation lines:
before_validation :preval
This tells the Model that before it validates itself, it needs to run the method called preval. Let’s define preval right below that with the following:
private
  def preval
    if self.title
      self.title = self.title.strip
    end
    if self.content
      self.content = self.content.strip
    end
end
The strip method for strings removes beginning and trailing whitespace for a string. We put these inside if statements that check if the attribute exists first so that we don’t risk errors involving trying to manipulate NULL values.
That’s pretty much all that we need to do on the Model side, onto visual things!
The View and The Controller
The reason why the View and the Controller are in the same section is because it’s very difficult to work on one without working on the other. Let’s start by creating an interface where users can interact with blog posts. Run the following command:
$> rails g controller Posts index show
This creates a controller called PostsController with two actions (AKA web pages): index and show. Basically, a controller is a file that allows us to specify how the user will interact with the route that they enter in their address bar. To show this, let’s take a look at app/controllers/posts_controller.rb:
class PostsController < ApplicationController
  def index
  end

  def show
  end
end
How a controller works is this: the project router receives a URL and then calls the corresponding method of the corresponding controller (we’ll take a look at how to set this up this in a second), and then within the methods of a controller’s file. It is our job to establish variables for the view to use, update the database, or whatever else we need the controller to perform to bridge the gap between the HTML Views and the Model.
Don’t worry if that went over your head, it’ll make sense in a second. Change the index method to the following:
def index
  @posts = Post.all.order(created_at: :desc)
end
Now, we have a variable that the view for the Posts index can use to build itself. But wait a second, how can we use this, do we even have an index HTML page? It turns out that we do. Start the server and point your browser to http://localhost:3000/posts/index:
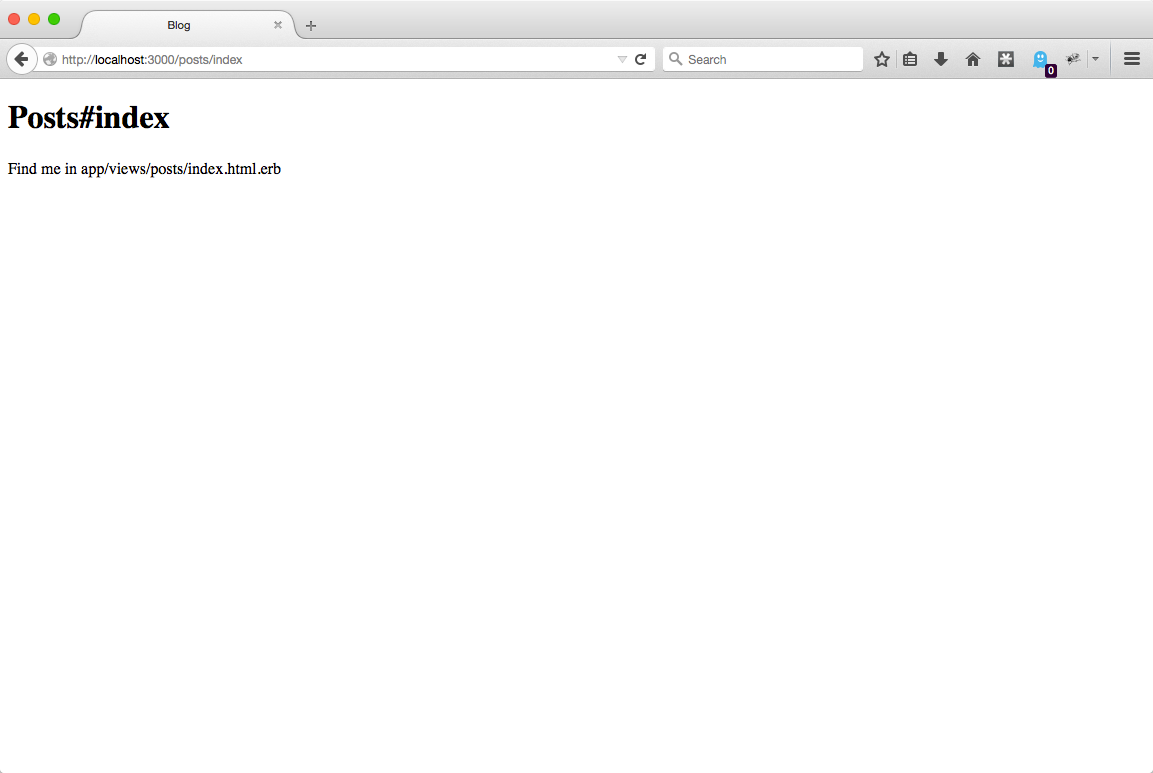
Well that’s neat, I guess, but there’s just boilerplate code there at the moment. Let’s make use of the variable that we defined in the controller method. Change the contents of app/views/posts/index.html.erb to the following:
<h1>The Best Blog Ever</h1>
<br/>
<% if @posts.count > 0 %>
  <% @posts.each do |post| %>
    <h2><%= post.title %></h2>
    <h4><%= post.content %></h4>
  <% end %>
<% else %>
  <h2>Darn, looks like we don’t have anything...</h2>
<% end %>
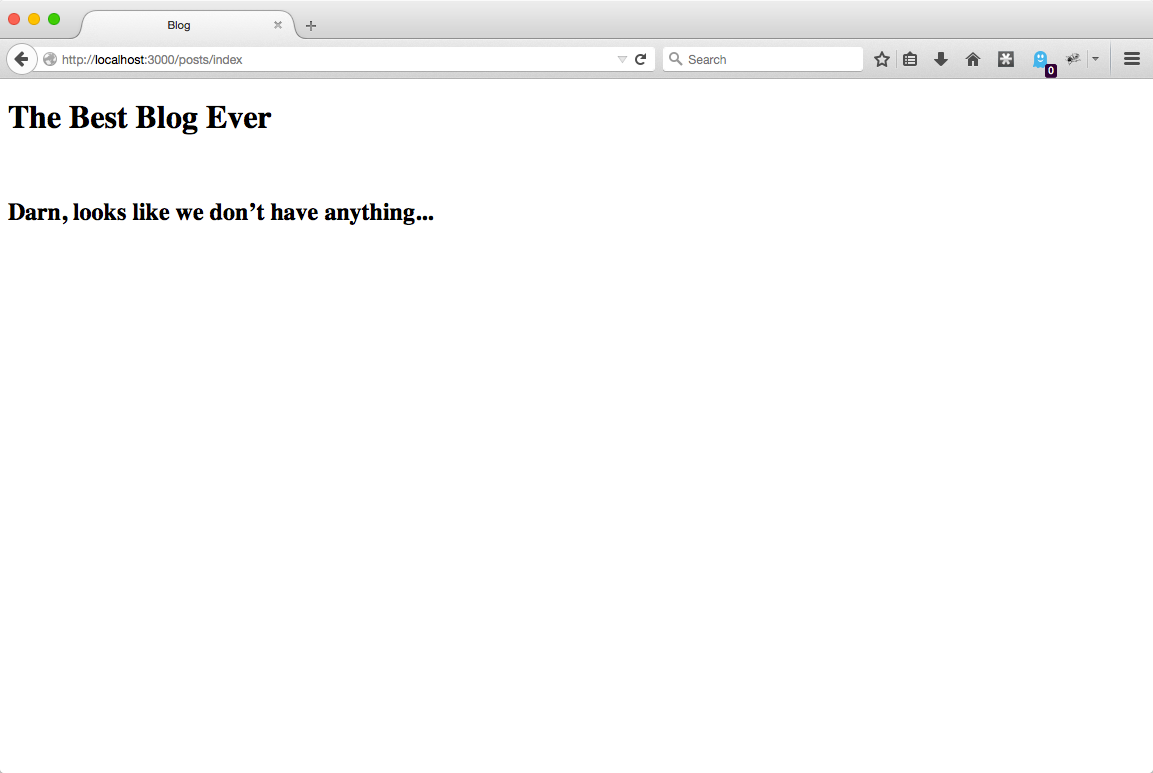
Now, I know what you may be thinking, but first let me say that the .erb appended to the name of this file stands for "Embedded Ruby," meaning that the HTML that this file gives to the browser is built using the Embedded Ruby preprocessor. Everything that is between the braces <% %> is evaluated Ruby code, but nothing is put in the file in its place. Everything between these braces <%= %>, however, is not only evaluated, but also the string representation of what was evaluated is put in the HTML code in its place.
Since we haven’t created any posts yet, we should expect to see a dismayed message if we point our browsers back to http://localhost:3000/posts/index:
Let’s create a way for us to create new posts, look at each post individually, delete posts, etc. (implement CRUD – Create, Read, Update, and Delete – methods). Let’s start with the first. We’re going to put a form for this in a separate view. Let’s create a method in app/controllers/posts_controller.rb for this:
def new

  @post = Post.new

end
Here, the method is called new because we’re making the view in which we can create a new post. Next, create the file app/views/posts/new.html.erb and fill it with the following:
<h1>New Post</h1>
<ul>
  <% @post.errors.full_messages.each do |msg| %>
    <li><%= msg %></li>
  <% end %>
</ul>
<%= form_for @post do |f| %>
  <%= f.text_field :title %>
  <br/>
  <%= f.text_area :content %>
  <br/>
  <%= f.submit %>
<% end %>
Notice the Rails helper method form_for. This is just one of the handy helpers that Rails provides to make Embedded Ruby code to be as condensed and as readable as possible – it’s just Ruby code that generates HTML. Now, you could reasonably expect that pointing your browser to http://localhost:3000/posts/new would bring this up, but because we created our new post interface manually, we also have to define its route manually.
Open config/routes.rb and you should see the following:
Rails.application.routes.draw do

  get 'posts/index'
  get 'posts/show'
  # Lots of comments...

end
When we first made the Posts controller, the actions that we specified with it were automagically added to routes.rb (lines 2 and 3). Just so that we have a little bit more control over our application’s routes, let’s modify routes.rb to be the following:
Rails.application.routes.draw do
  controller :posts do
    get '/new_post' => :new, as: 'new_post'
    get '/post/:id' => :show, as: 'show_post'
  end
  root 'posts#index'
  # Lots of comments...
end
What we’ve done here is defined our routes so that going to http://localhost:3000/ brings us to the index page, http://localhost:3000/new_post brings us to the new post page, etc.. The ‘as’ value of the hash at the end of the first two new routes is the name that we would like for the route to have if we were to refer to it via Ruby it in a file; for example, if we were to make a link to somewhere else on our website, instead of using /post/#{id} or something involving hardcoded strings as the hyperlink reference, we can just use, in our case, show_post_path(id: id). As a reference, the general syntax for what we just did is this:
controller :controller_name do
  [HTTP method name] '/custom_path_name' => :method_name, as: 'name_called_in_programming'
  # Do this however much you want...
end
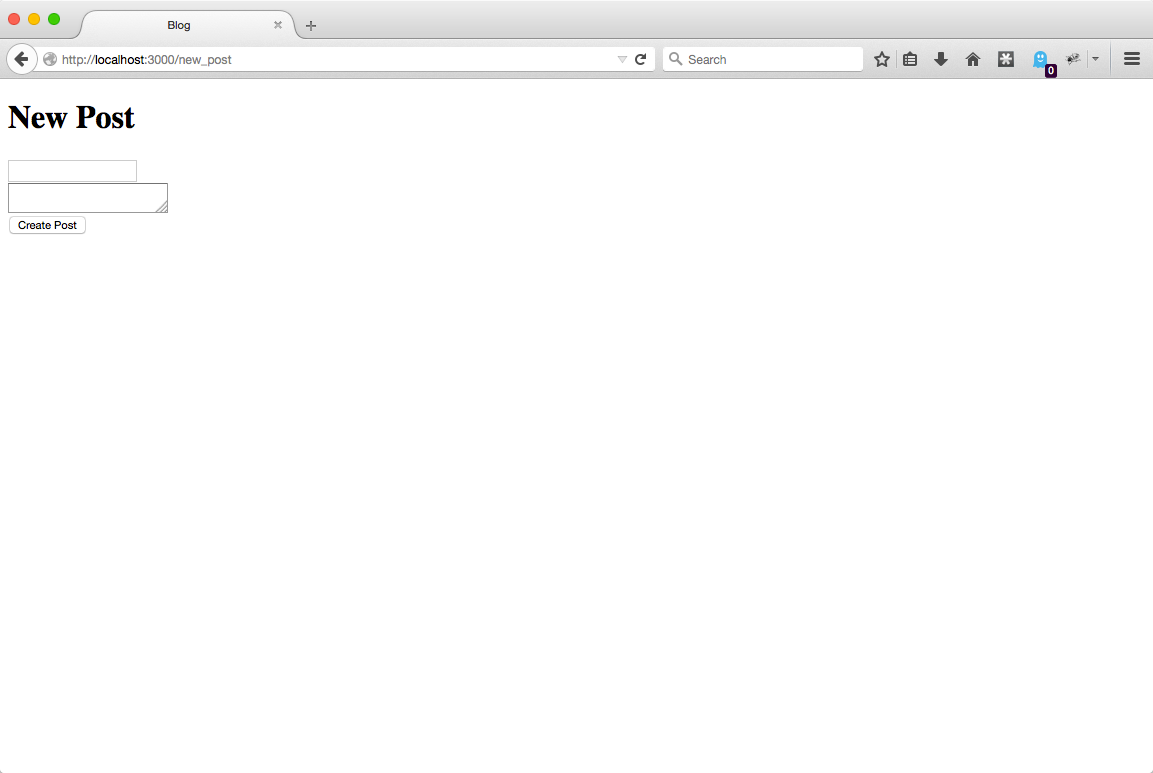
Now, let’s go to http://localhost:3000/new_post. We should see the following:
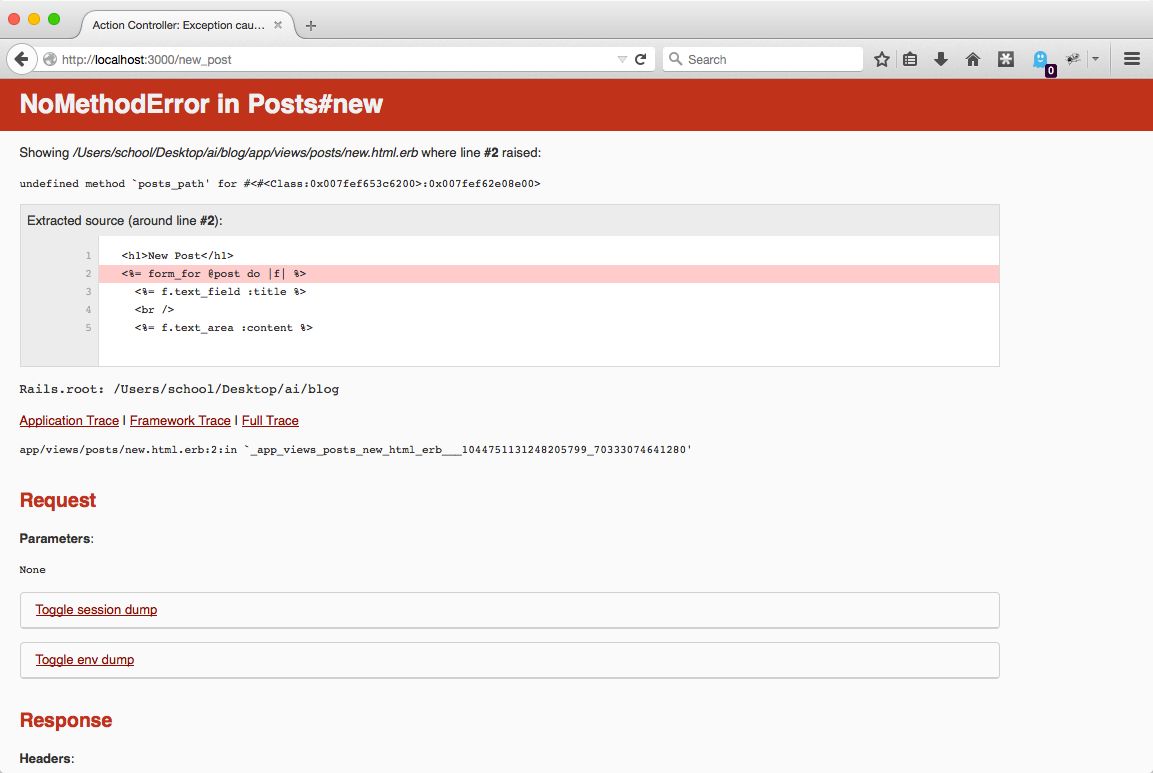
Rails has detected that we have created a form to create something new, but we haven’t defined a method to save it into the database.
Let’s fix this by defining a new method in app/controllers/posts_controller.rb:
def create
  @post = Post.new(title: params[:post][:title], content: params[:post][:content])
  if @post.save
    flash[:notice] = 'Successfully created a new post!'
    redirect_to root_path
  else
    flash[:alert] = 'Something went awry...'
    render :new
  end
end
Notice the use of the flash object. The flash object is omnipresent in Rails and is used to store information that is meant to the flashed to the users (you can easily obtain its contents in a view). Next, let’s add a route for this method like so:
controller :posts do
  # ...
  post '/create_post' => :create, as: 'create_post'
end
Note that we don’t have to create a view for this action, because we’re always either redirecting or rendering another view (look back at create). Also, there is an abundance of the word "post" in this code, let me explain that: “posts” refers to the controller, the first “post” refers to the HTTP method POST (something completely different from a blog post), and then the rest of the line refers back to blog posts.
One last thing that we need to do to get this to work: change the form_for line in the new posts view to the following:
<%= form_for @post, url: create_post_path do |f| %>
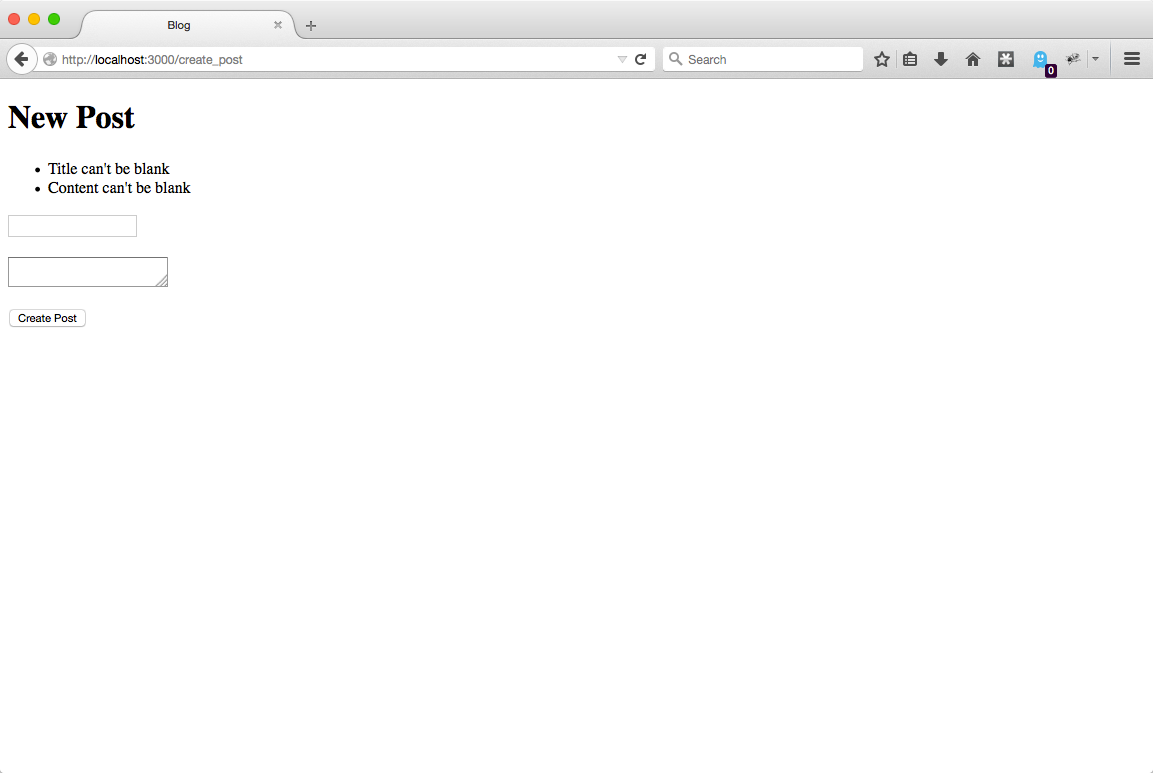
Now, if we go back to http://localhost:3000/new_post, we should see a form:
And if we try to submit it with anything blank, we get error messages:
But wait a second, there was something involving flashing an error message defined in the create method that didn’t appear! We can make this appear in app/views/layouts/application.html.erb. Right now, that file looks like this:
<!DOCTYPE html>
<html>
<head>
  <title>Blog</title>
  <%= stylesheet_link_tag    'application', media: 'all', 'data-turbolinks-track' => true %>
  <%= javascript_include_tag 'application', 'data-turbolinks-track' => true %>
  <%= csrf_meta_tags %>
</head>
<body>
  <%= yield %>
</body>
</html>
This is actually one of the most important files in your entire Rails project because it is common to every one of your pages. The line <%= yield %> means replace that line with whatever HTML is created by the view that you called. We can display application-wide error / notification messages by adding the following lines above the yield line:
<% if flash[:alert] %>
  <p>Alert: <%= flash[:alert] %></p>
<% end %>
<% if flash[:notice] %>
  <p>Notice: <%= flash[:notice] %></p>
<% end %>
Now, let’s try submitting a legitimate post:
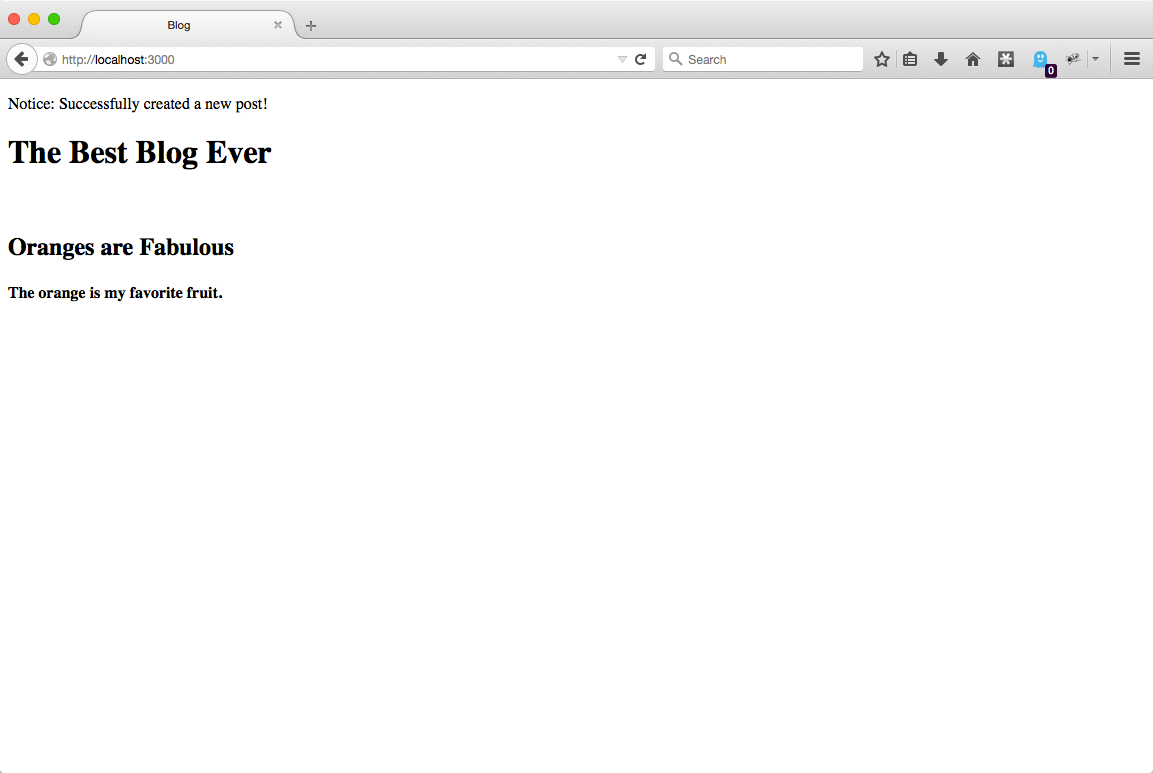
Awesome, not only did our database shenanigans work, but our notice system did, as well!
But, we’ve only completed one of the CRUD operations. Let’s knock out all of the others in one fell swoop, edit routes.rb:
controller :posts do
  # Stuff we already had…
  get '/post/:id/edit' => :edit, as: 'edit_post'
  patch '/post/:id/update' => :update, as: 'update_post'
  delete '/post/:id/delete' => :destroy, as: 'destroy_post'
end
Change the show method in the Posts controller (app/controllers/posts_controller.rb) to the following:
def show
  @post = Post.where(id: params[:id]).first
  if !@post
    redirect_to root_path
  else
    @post.update(views: @post.views+1)
  end
end
And add the following methods to that file, as well:
def edit
  @post = Post.where(id: params[:id]).first
  if !@post
    redirect_to root_path
  end
end
def update
  @post = Post.where(id: params[:id]).first
  if !@post
    redirect_to root_path
  else
    if @post.update(title: params[:post][:title], content: params[:post][:content])
      flash[:notice] = 'Successfully updated the post!'
      redirect_to show_post_path(id: @post.id)
    else
      flash[:alert] = 'Couldn’t edit the post...'
      render :edit
    end
  end
end
def destroy
  @post = Post.where(id: params[:id]).first
  if !@post
    redirect_to root_path
  else
    if @post.destroy
      flash[:notice] = 'Successfully deleted the post!'
      redirect_to root_path
    else
      flash[:alert] = 'Couldn’t delete the post...'
      redirect_to show_post_path(id: @post.id)
    end
  end
end
Next, we need to create views for show and edit, so create app/views/posts/show.html.erb first and put the following inside it:
<h1><%= @post.title %></h1>
<p>Views: <%= @post.views %></p>
<p><%= auto_link(simple_format(@post.content)) %></p>
<%= link_to 'Back to Home', root_path %>
Notice the use of the link_to helper method. This takes the parameters 1) string to display 2) URL/path to point to. In addition, auto_link is not even a helper method provided by Rails – it came from the gem that we installed at the beginning of this tutorial (it detects whether a URL is included in the text it’s given and creates hyperlinks appropriately). (simple_format is a Rails helper method that makes it so that user-inputted line breaks appear.) Now, create app/views/posts/edit.html.erb and put the following inside it:
<h1>Edit Post</h1>
<ul>
  <% @post.errors.full_messages.each do |msg| %>
    <li><%= msg %></li>
  <% end %>
</ul>
<%= form_for @post, url: update_post_path, method: :patch do |f| %>
  <%= f.text_field :title %>
  <br/>
  <%= f.text_area :content %>
  <br/>
  <%= f.submit %>
<% end %>
<%= link_to 'Back to Home', root_path %>
Finally, let’s go back to the index page and change things around a bit, so we have a navigation system for our site:
<h1>The Best Blog Ever</h1>
<%= link_to 'New Post', new_post_path %>
<br/>
<% if @posts.count > 0 %>
  <% @posts.each do |post| %>
    <h2><%= link_to post.title, show_post_path(id: post.id) %></h2>
    <h4><%= truncate post.content, length: 50 %></h4>
    <%= link_to 'Edit Post', edit_post_path(id: post.id) %>
    <%= link_to 'Delete Post', destroy_post_path(id: post.id), method: :delete %>
  <% end %>
<% else %>
  <h2>Darn, looks like we don’t have anything...</h2>
<% end %>
Notice that the past two code snippets have allowed us to change the HTTP method associated with the respective action (PATCH and DELETE) extremely easily. Also, the Rails helper method truncate is used to limit how much the user can see of our posts without clicking on the post itself (50 characters). Now, you should be able to navigate to all parts of the site from the home page and perform all of the CRUD operations associated with blog posts.
The Console
You can run any of the database commands that we used in our controller code without having to go through a view. You can do this by going through the Rails console. To open it, run:
EITHER
$> rails console
OR
$> rails c
The second is shorthand for the first. Once this new terminal opens, you can make a new blog post like so:
$> p = Post.new(title: 'Cakes are Great', content: 'They are floury, sugary goodness from heaven.')
$> p.save
Or you could even destroy all of your posts in one fell swoop:
$> Post.destroy_all
Type quit in the console to exit back to the system command line
Wrapping Up
Although the blog that we’ve created may not be something that we would want our artsy friends to be seeing, we’ve created something that works.
Just so the blog doesn’t look too basic, however, copy and paste the following into the bottom of app/assets/stylesheets/application.css, below the comments (don’t delete the comments, those are important!):
body {
  text-align: center;
  font-family: cursive;
  background: rgba(248,80,50,1);
  background: -moz-linear-gradient(left, rgba(248,80,50,1) 0%, rgba(241,111,92,1) 0%, rgba(231,56,39,1) 100%);
  background: -webkit-gradient(left top, right top, color-stop(0%, rgba(248,80,50,1)), color-stop(0%, rgba(241,111,92,1)), color-stop(100%, rgba(231,56,39,1)));
  background: -webkit-linear-gradient(left, rgba(248,80,50,1) 0%, rgba(241,111,92,1) 0%, rgba(231,56,39,1) 100%);
  background: -o-linear-gradient(left, rgba(248,80,50,1) 0%, rgba(241,111,92,1) 0%, rgba(231,56,39,1) 100%);
  background: -ms-linear-gradient(left, rgba(248,80,50,1) 0%, rgba(241,111,92,1) 0%, rgba(231,56,39,1) 100%);
  background: linear-gradient(to right, rgba(248,80,50,1) 0%, rgba(241,111,92,1) 0%, rgba(231,56,39,1) 100%);
  filter: progid:DXImageTransform.Microsoft.gradient( startColorstr='#f85032', endColorstr='#e73827', GradientType=1 );
}
h1 {
  font-weight: bolder;
  font-size: 4em;
  margin-bottom: 0em;
}
h2 {
  margin-top: 3em;
}
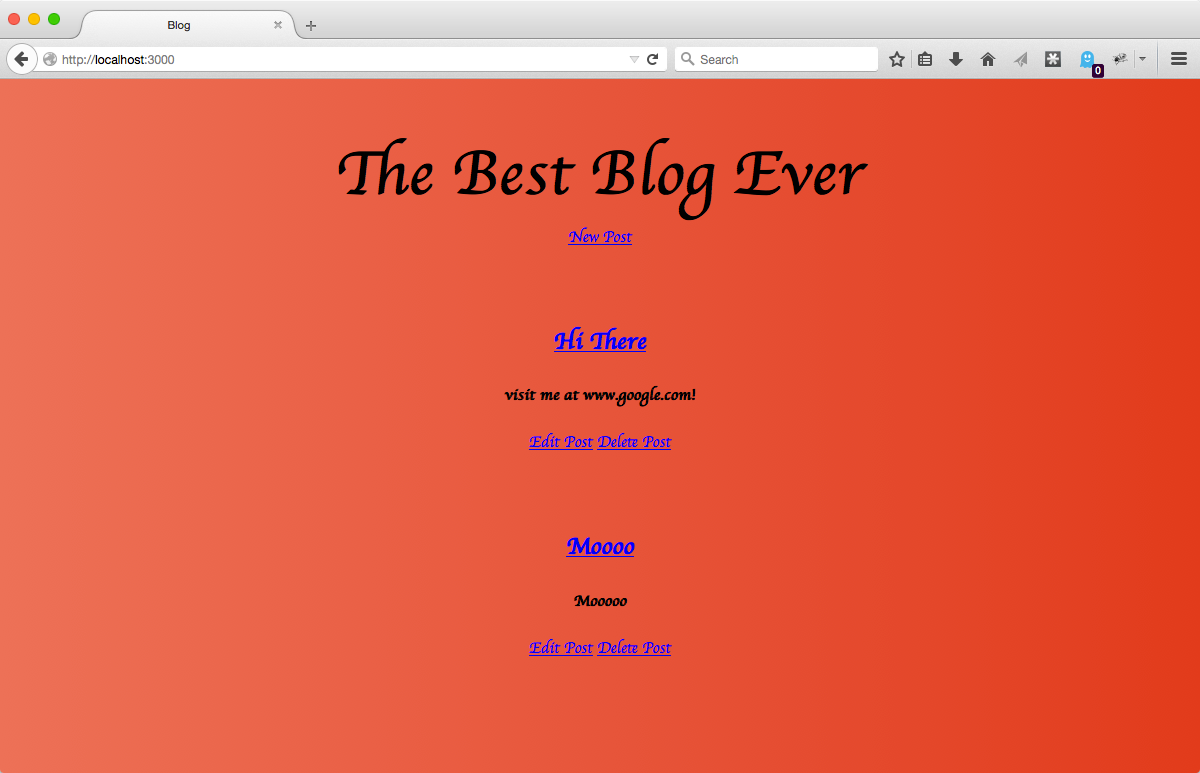
This makes our blog look like this:
In conclusion, the point of this tutorial was to provide you with the tools and terminology required to pursue Rails further. In fact, this tutorial hardly scratches the surface of Rails – for example, there have been books written solely about how to operate the Rails testing suite.
I hope that I’ve given you a glimpse of what’s possible with Rails and how easy it is to do it. I would highly recommend trying to build a commenting system (you might want to read about Rails database associations first, though)!
You can find the code for this project here. If this tutorial made you interested in Rails, I would highly recommend doing the well-thought-out Rails for Zombies course and watching the best video crash-course into Rails that I’ve seen thus far, and if you want to sink your teeth into Rails even more, there isn’t a better learning resource than Agile Web Development with Rails 4.
~ Alek