Make A Pong Game With Unity 2D
Let's Make: PONG
By Will Oldham. Updates by Nick Such and Caleb Cornett.
Note, July 2018: Updated for Unity 2018.1
Today, the name of the game is Pong. We're going to be using Unity 2018.1 or later, and we'll use C# as our coding language. No prior experience with Unity or C# is required. It will only take you about two hours to complete the tutorial, and at the end you'll have made your own version of Pong!
Step Zero: The Design
First, let's think about the pieces and parts of Pong -- the individual "mechanics" (the rules and features of the game) that we'll need to program.
-
You have a Background to play on
-
You have a set of Paddles that go up and down
-
You have a ball that bounces off walls and paddles
-
You have a set of side walls that you hit to score
-
You have a score at which you win
-
You have a reset button so you can play again
Seems simple enough. Let's get started!
Step One: The Setup
First, download this Unity Pong assets file. It contains images and other assets that we'll be using in this tutorial.
Now we can start setting up our project! Open Unity and follow these steps:
-
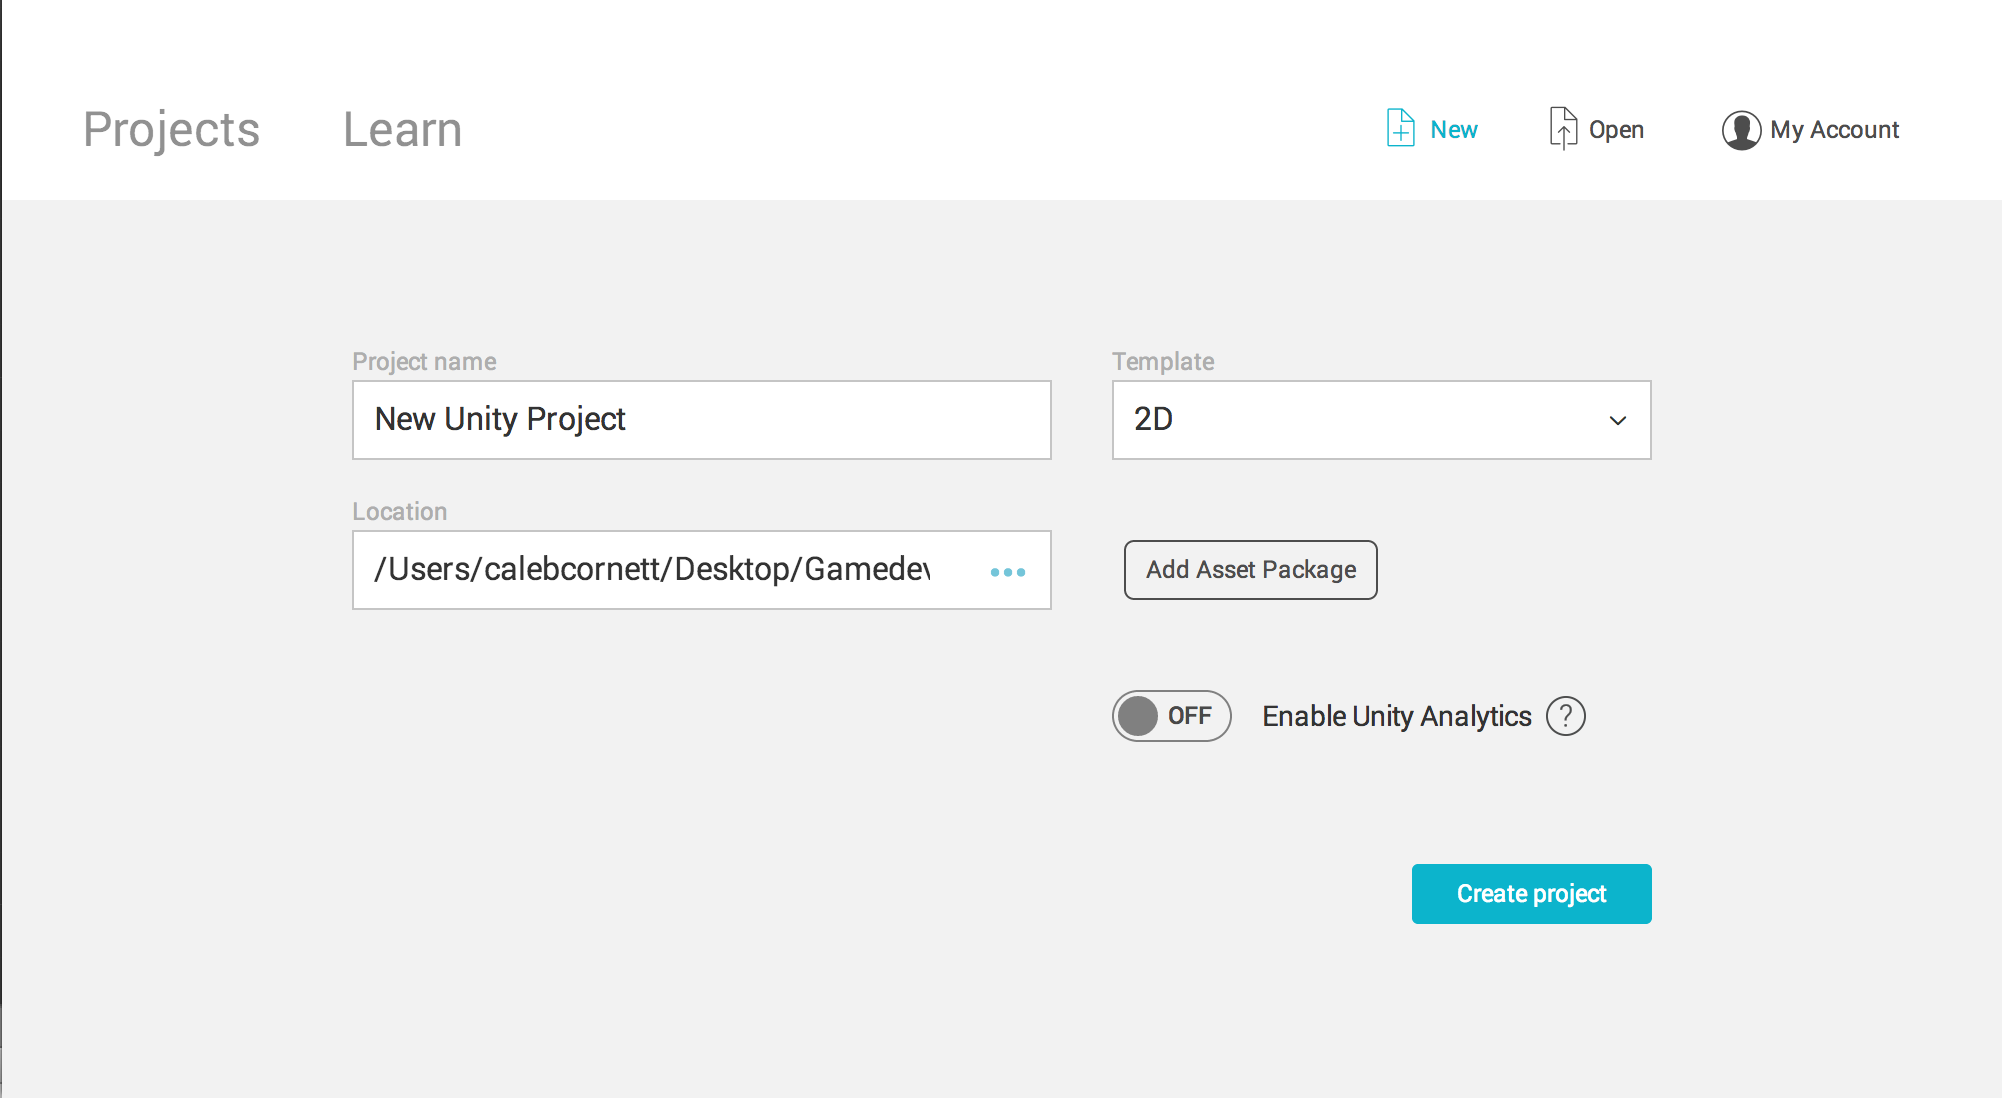
From the welcome screen, click
Projects. (If the Unity editor is already open, clickFile>New Projectinstead.) -
Click 'New'. Then you should see something like this:
-
Name the Project something like 'Pong Game'.
-
Make sure you choose the 2D Template.
-
Set the slider for
Enable Unity AnalyticstoOff. -
Click
Create Project. And that's it!
Once the project has been created, you should see a 2D grid appear in the Scene view.
Setting up Unity in 2D mode does several things. First off, it sets up our game camera so that everything is viewed from a 2D perspective. It also tells Unity to import images as Sprites instead of Textures. You'll see how this helps us in just a bit.
Remember that Unity Pong assets file that we downloaded? Now's a great time to unzip that file. Once you do, you'll see a folder called unitypong-assets, which will contain a set of images, fonts, and other assets that we'll be using today. Select all of these files, then click + drag them into the Project pane at the bottom of your Unity window. It should now look something like this:
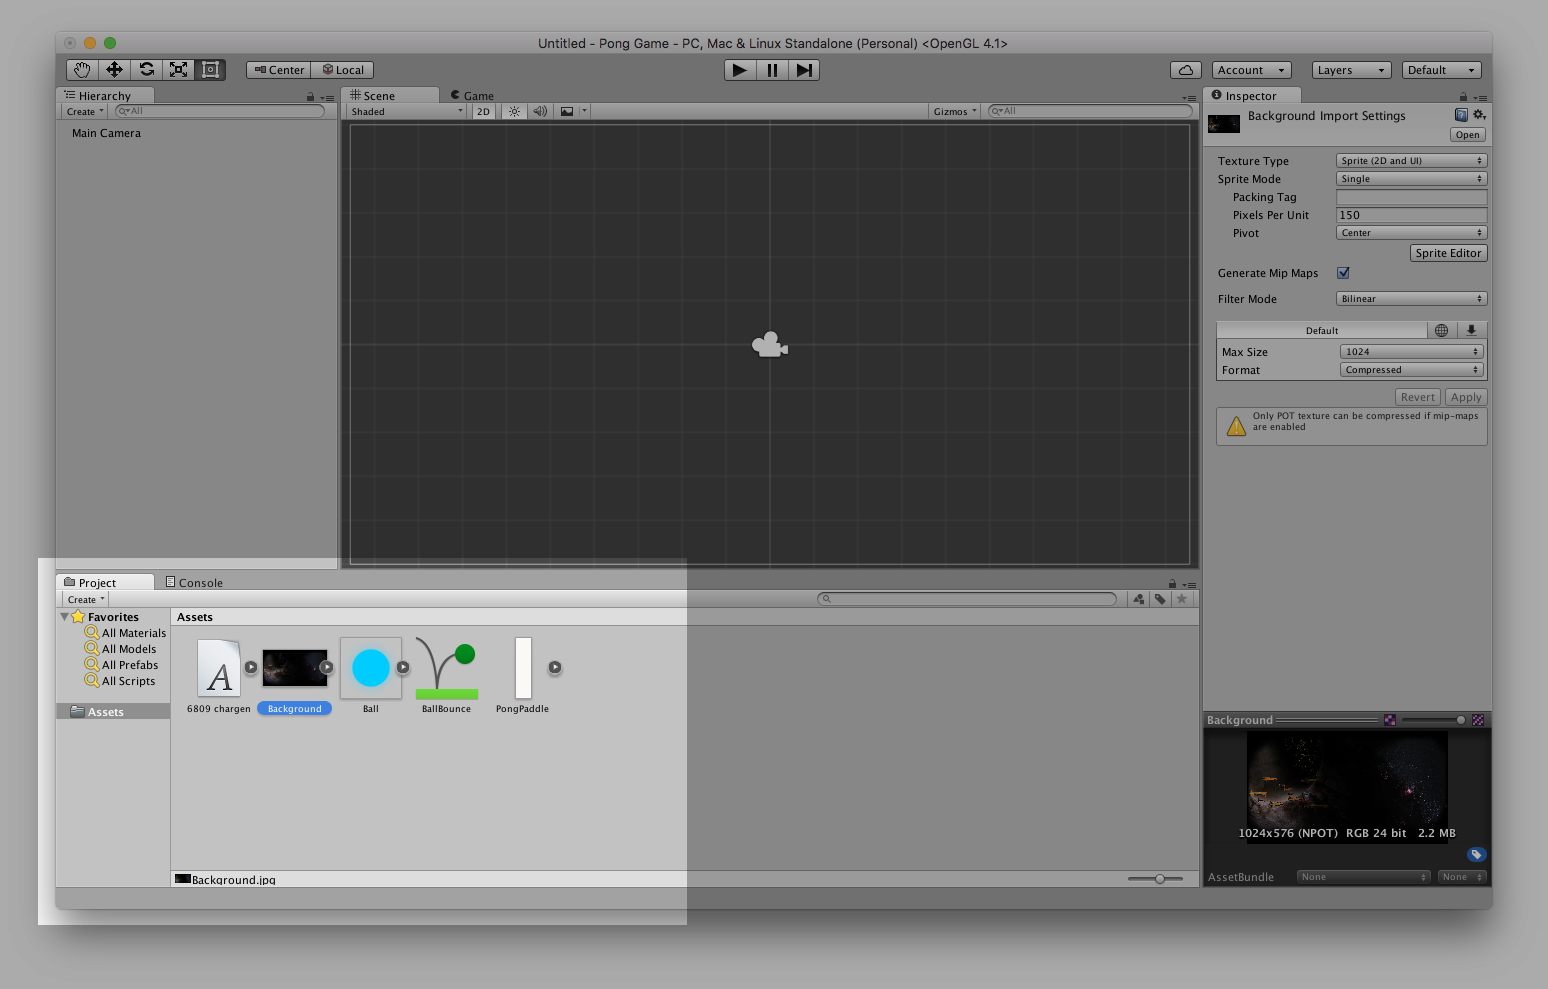
Click and drag the Background image from the Project pane into the Hierarchy pane, just below Main Camera. It should appear in your Scene view, and be centered by default. If it's not centered, use the Inspector pane to set its Transform Position to (0, 0, 0).
Select your Background, now in the Hierarchy pane, and you should see it show up in the Inspector pane like this:
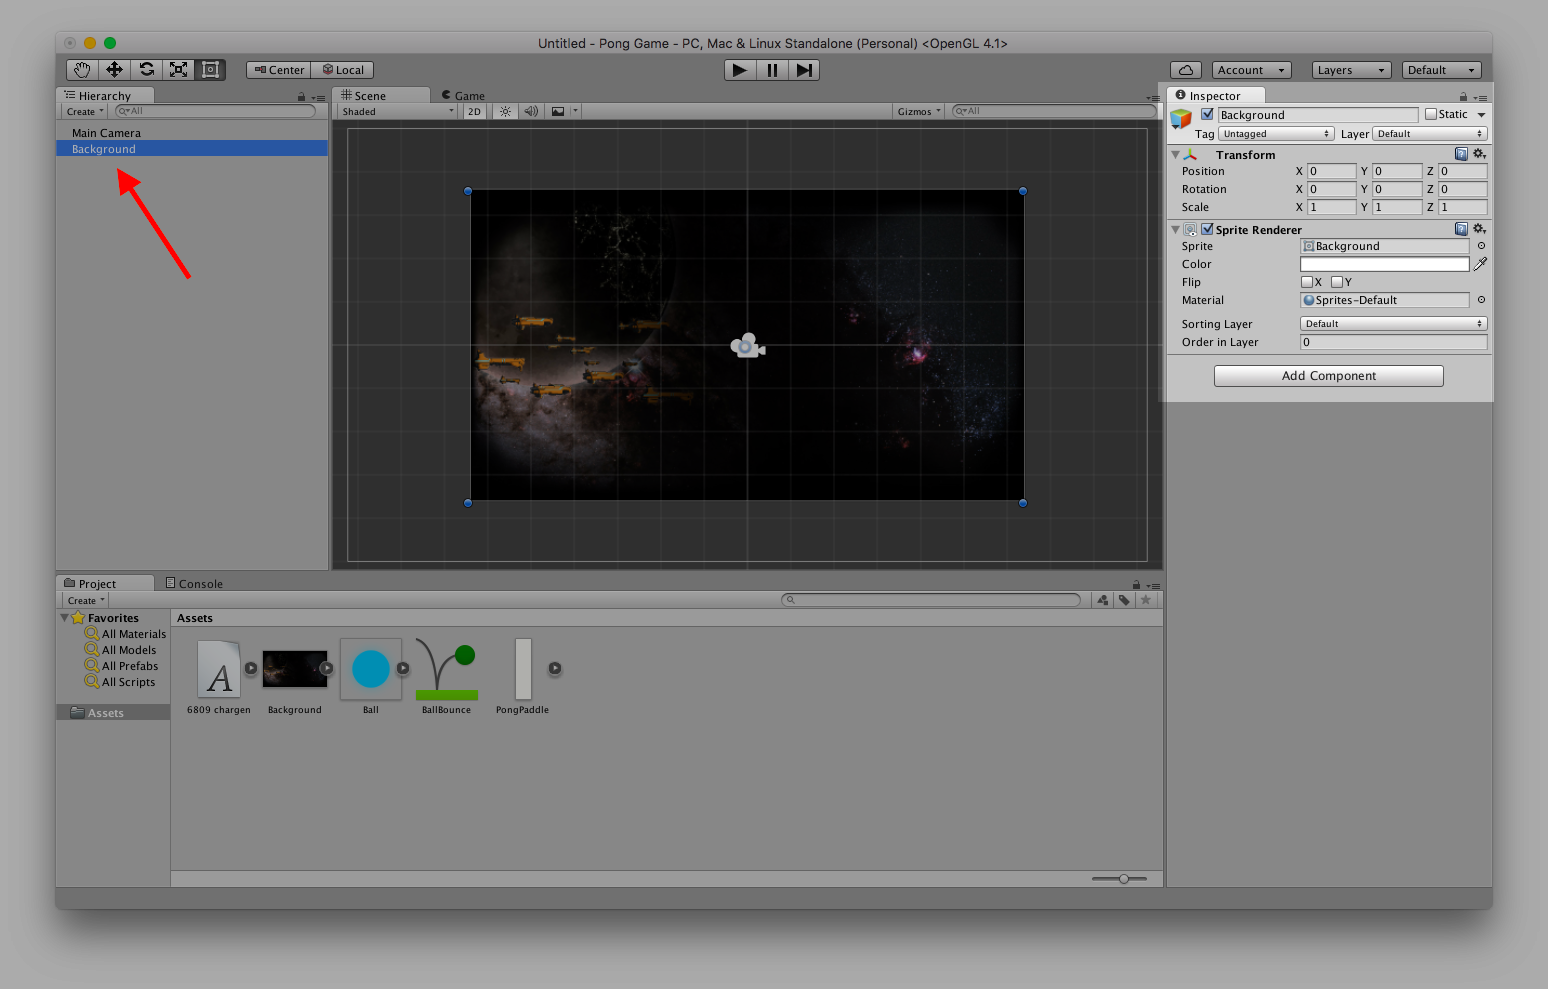
First, up at the top of the Inspector under Transform, change its scale to (0.75, 0.75, 1). This will make it look better in our game. Now look at the Sprite Renderer component. We want to make sure the background actually renders behind our other sprites, and does not accidentally appear on top of them. Go to Sorting Layer, and click Add Sorting Layer. The Inspector pane should now look like this:
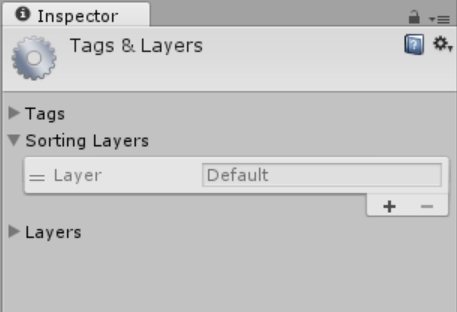
Click the + icon to add our new layer. Change its name from 'New Layer' to 'Background', then click and drag our new layer above the Default layer. This makes it so that anything on the Background sorting layer will appear behind anything on the Default layer, which is exactly what we want.
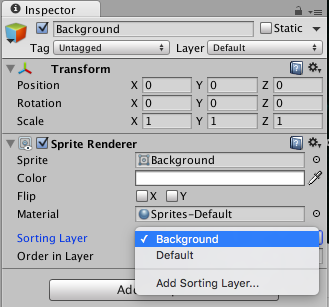
Now re-select your Background object in the Hierarchy pane so that it will show up in the Inspector again. In the Sprite Renderer component, click the dropdown menu for Sorting Layer and choose our new Background layer. Your Inspector should look like this:
Next, we need to make some changes to the Main Camera so that our game will look nicer.
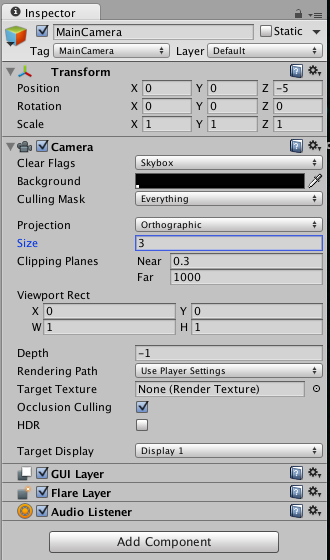
Select the Main Camera object in your Hierarchy pane. The camera object controls how we see the game world (or "Scene", in Unity terms). When we're playing our Pong game, it's actually possible that our background won't be big enough to cover the whole screen. We need to make two small changes in our Main Camera to take care of that.
In the Inspector, under the Camera component, change the Size to 3. This will zoom in slightly on our background. Next, click on the Background property of the Camera. This lets us change the color that will be visible on the edges of our screen if the background isn't big enough. In the color picker, choose the color black, with RGBA values of (0,0,0,0). Then the Camera component in the Inspector should look like this:
All right! Now is a great time to save our progress. Press Ctrl+S (or Cmd+S on macOS) to save the changes made to your current Scene (by default, called SampleScene in the Scenes folder in the Project window).
Step Two: The Paddles
The next step is to make our paddles. Find the image called PongPaddle within your Project pane.
Now click and drag the paddle image onto the scene in the Scene view. A PongPaddle object should appear in your Hierarchy menu.
Click the PongPaddle in the Hierarchy. Over in the Inspector, rename it to Paddle1 and click the Tag dropdown and select Player. (More on this later.) Set Position to (X, Y, Z) = (-4, 0, 0) and Scale to (0.5, 1.5, 1). It should look like this in the Inspector:
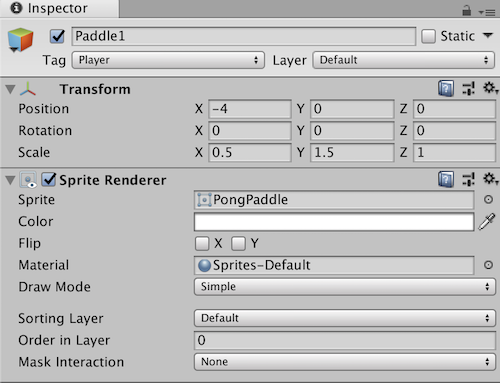
All we're doing here is making sure that the paddle is positioned where we want it. The Sorting Layer and other settings don't matter this time because we want this object to be drawn on top, which is what Unity defaults to.
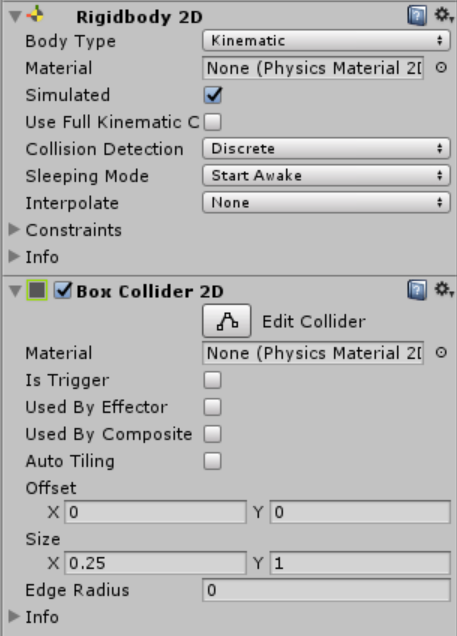
Next we're going to add two components to the Player object. Click on the Add Component button, and then on Physics 2D. Once you've done that add both a Box Collider 2D and a Rigidbody 2D. The Box Collider 2D is to make sure the ball will bounce off your paddle, and the Rigidbody 2D is there so we can move the paddle around.
Note: It's important to use Physics, Box Collider, and Rigidbody 2D here because 3D versions of those exist - that's not what we want in our 2D game.
Now, we're going to make a few changes to the Rigidbody 2D component. Unity has a great, realistic physics system built in that calculates the effects of gravity, friction, and other forces on any object that has a Rigidbody 2D component. That system is often very handy, but we don't want to use it for our paddles. Our paddles aren't exactly realistic -- they're just kind of floating in space and they only move when we tell them to. Thankfully Unity gives us a way to tell our Rigidbody 2D to only move when we tell it to. We just have to click the Body Type dropdown menu and select Kinematic.
Your Inspector should now look like this:
Now we want to do the hard part: add a Script for movement for our paddles. I'm going to share the code below. I recommend typing each line. It might seem quicker to copy and paste code, but typing it yourself really does help you understand it.
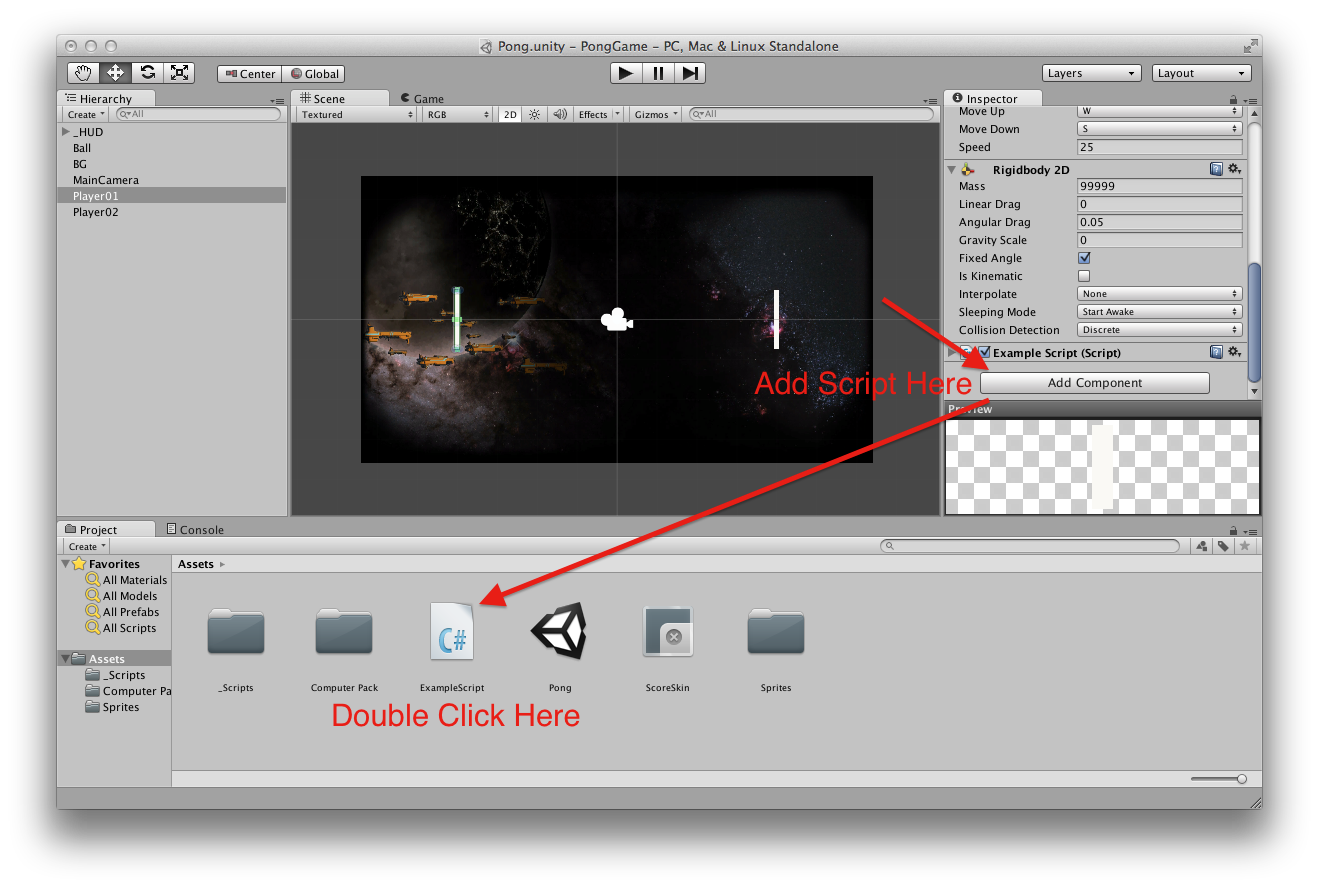
To add a script, make sure that Paddle1 is still selected in your Hierarchy pane, then go to Add Component > New Script. Call this script PlayerControls, then click Create and Add. The script should now appear as a component and in the Project pane.
Double click the script icon to open it up in Visual Studio. (Visual Studio is Unity's default Integrated Development Environment (or IDE) - essentially, it's the program we use to write Unity scripts.)
Code Breakdown
In short, the first three lines are packages of pre-written code we want to tell our program it can use.
using System.Collections;
using System.Collections.Generic;
using UnityEngine;
The next line is the class name, the name of our file. It's the same thing that we named our Component.
public class PlayerControls : MonoBehaviour {
The next few lines are variables we need to write ourselves. The first two lines we add will denote the keys that we'll press to move the paddles (W goes up, S goes down), and the next one is the speed of the paddle. The boundY variable is the highest position that we want our paddle to go. This keeps it from moving off the edges of the screen. The last variable is a reference to our Rigidbody that we'll use later.
public KeyCode moveUp = KeyCode.W;
public KeyCode moveDown = KeyCode.S;
public float speed = 10.0f;
public float boundY = 2.25f;
private Rigidbody2D rb2d;
By making these variables 'public', we can adjust them through our Unity interface as well. If we have variables we don't want other developers to see in the Unity interface, we should call them 'private'.
Start() is a function that is called when we first launch our game. We'll use it to do some initial setup, such as setting up our Rigidbody2D:
void Start () {
    rb2d = GetComponent<Rigidbody2D>();
}
Update() is a function that is called once per frame. We'll use it to tell us what button is being pressed, and then move the paddle accordingly, or, if neither button is pressed, keep the paddle still. Lastly we'll bound the paddle vertically between +boundY and -boundY, which will keep it inside the game screen at all times.
void Update () {
    var vel = rb2d.velocity;
    if (Input.GetKey(moveUp)) {
        vel.y = speed;
    }
    else if (Input.GetKey(moveDown)) {
        vel.y = -speed;
    }
    else {
        vel.y = 0;
    }
    rb2d.velocity = vel;

    var pos = transform.position;
    if (pos.y > boundY) {
        pos.y = boundY;
    }
    else if (pos.y < -boundY) {
        pos.y = -boundY;
    }
    transform.position = pos;
}
NOTE: Make sure that you name your functions the same thing that I do. For instance, Unity knows to run the Update() function once every frame, because it is called Update(). If you called it anything else (for instance, update() with a lowercase 'u' or a misspelling like Updaate()), it will not work. When you're writing code, you have to be exact or the computer might misunderstand what you want it to do.
Make sure you save your script in Visual Studio. Now, when we go back to Unity, we should have a paddle that moves. To test our game, click the play button (►) at the top of the screen. Use the W and S keys to move. Does it work? Awesome!
Now, it's important to note something here. You have just entered 'Play Mode'. This is a really neat feature in Unity that lets you not only test your game but also make changes to it while you're playing! You'll know you're in Play Mode when the editor gets darker and your play button looks like this:

Try clicking the Paddle1 object in the Hierarchy and changing the position of the paddle in the Inspector while the game is running in Play Mode. This is super handy for trying out new ideas in real time. But I have to warn you:
The changes you make during Play Mode do not stay when you close Play Mode.
In other words, always make sure you have stopped Play Mode (by pressing the play button (►) again) before you make significant changes to the game. Otherwise all your recent work will be erased whenever you stop testing the game. Trust me, that's no fun.
Exit Play Mode, and click on our Paddle1 object. Under the Inspector pane, you should see a place to change the key bindings for up and down, the speed that it moves at, and the bounding value for the paddle's position. Mess around with those as you please.
The next step is to make a second paddle. All we need to do is right-click Paddle1 in the Hierarchy menu, and choose Duplicate from the menu that appears when we right click. Rename it to be Paddle2.
Select Paddle2 and change its key bindings (I recommend using 'Up Arrow' for up and 'Down Arrow' for down), and move it to be the opposite location on the board - change its Transform position to (4, 0, 0). Paddle1 should be on the left, Paddle2 on the right. You should have something that looks like this now:
Run your game and see if you can move both paddles separately. If so, move on - if not, go back and double check to make sure you didn't miss anything. Your completed C# script should look like this: PlayerControls.cs
Step Three: The Ball
Our Ball will be a little more complicated than the Paddles, but that's because it has more more to do! It has to bounce around the screen, detect scoring, and interact with paddles.
The first step is going to be finding the Ball image in the Project pane. Click and drag the Ball into the Hierarchy, same as our Paddles. There should now be an object in the Hierarchy pane named Ball. Click on it, then head over to the Inspector pane.
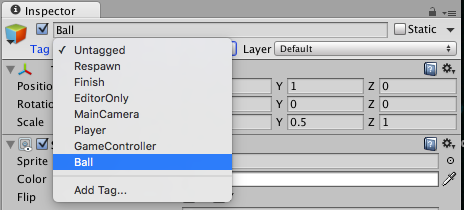
First, we need to add a custom Tag. Tags are Unity's way of identifying unique game objects, and it's really simple to use them to find game objects in scripts. At the top of the Inspector, click on Tag > Add Tag... and the Inspector will change to show Tags & Layers. This should look familiar -- this is the same window we used earlier to add our Sorting Layer! Except now, we need to click the + icon to add a new Tag. Call it Ball.
Now, click on the Ball object again in the Hierarchy. Go up to the Tag field and select Ball from the dropdown menu. It should look like this:
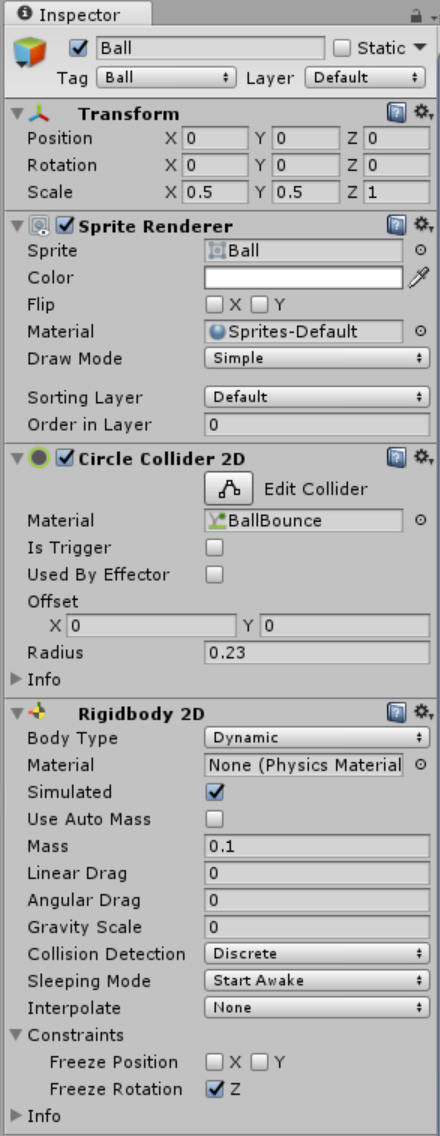
Change the scale of our ball to (0.5, 0.5, 1). A smaller ball helps make the game feel faster and more fun.
Next we need to add similar components that we did to the paddle. Click the Add Component button, then in Physics 2D, let's add Circle Collider 2D and of course Rigidbody 2D. In the Circle Collider, change the Radius to 0.23. That way the collider wraps around the ball much tighter.
We also want to apply a Physics 2D Material. Select the BallBounce Material from the Project pane and look at the Inspector. You'll see the friction value is 0, and the bounce factor is 1. That way our ball doesn't experience friction from anything, including our paddles and wall. The bounciness factor means that it also doesn't lose any speed. It bounces back with the exact same speed it hit the object with.
To apply the material, select Ball in the Inspector, then click and drag the BallBounce material to the Circle Collider 2D box. We also need to adjust several settings in Rigidbody 2D so we can get our desired ball behavior. It should look like this at the end:
But of course, to actually get the Ball to move, we need a script. With Ball still selected in your Hierarchy, click Add Component > New Script. This time we'll call the script BallControl. Double click on the new BallControl script to open it in Visual Studio.
Code Breakdown
First, as always, we import our packages and confirm that our class name matches our filename.
using System.Collections;
using System.Collections.Generic;
using UnityEngine;

public class BallControl : MonoBehaviour {
We need to declare a variable that we'll use later.
private Rigidbody2D rb2d;
We also need a GoBall() function, that will choose a random direction (left or right), then make the ball start to move.
void GoBall(){
    float rand = Random.Range(0, 2);
    if(rand < 1){
        rb2d.AddForce(new Vector2(20, -15));
    } else {
        rb2d.AddForce(new Vector2(-20, -15));
    }
}
In our Start() function, we'll initialize our rb2d variable. Then we'll call the GoBall() function, using Invoke(), which allows us to wait before execution. This will wait two seconds to give players time to get ready before the ball starts moving.
void Start () {
    rb2d = GetComponent<Rigidbody2D>();
    Invoke("GoBall", 2);
}
ResetBall() and ResartGame() are two functions used by other scripts which we will write later. ResetBall() is used when a win condition is met. It stops the ball, and resets its position to the center of the board.
void ResetBall(){
    rb2d.velocity = Vector2.zero;
    transform.position = Vector2.zero;
}
RestartGame() is used when our restart button is pushed. We'll add that button later. This function uses ResetBall() to center the ball on the board. Then it uses Invoke() to wait 1 second, then start the ball moving again.
void RestartGame(){
    ResetBall();
    Invoke("GoBall", 1);
}
OnCollisionEnter2D() waits until we collide with a paddle, then adjusts the velocity appropriately using both the speed of the ball and of the paddle.
void OnCollisionEnter2D (Collision2D coll) {
    if(coll.collider.CompareTag("Player")){
        Vector2 vel;
        vel.x = rb2d.velocity.x;
        vel.y = (rb2d.velocity.y / 2) + (coll.collider.attachedRigidbody.velocity.y / 3);
        rb2d.velocity = vel;
    }
}
Let's recap. We have two paddles that work, and now a ball that bounces around realistically. The completed script we just added should look like this: BallControl.cs. The game should have two paddles and a ball, ready for us to play!
Step Four: The Walls
You may have noticed by now that your ball can fly off the screen. We need to make some walls.
Let's first make a game object to contain our walls. Make sure nothing is selected in the Hierarchy pane, then right click some empty space in the Hierarchy and choose Create Empty. It will create a plain ol' empty game object, which we will name Walls. We don't need to change anything except to make sure that it has a position of (0,0,0).
Now to make an actual wall. In the Hierarchy pane, right click on the Walls object we just made and choose Create Empty. This will make a new game object that is a "child" of the Walls object. For our purposes, having our walls as children of 'Walls' will help us keep the hierarchy nice and clear, since we can click the little arrow next to Walls whenever we don't want to see each individual wall object. The idea of 'child' game objects is actually very powerful and does more than just organize things, but we won't go into it much in this tutorial.
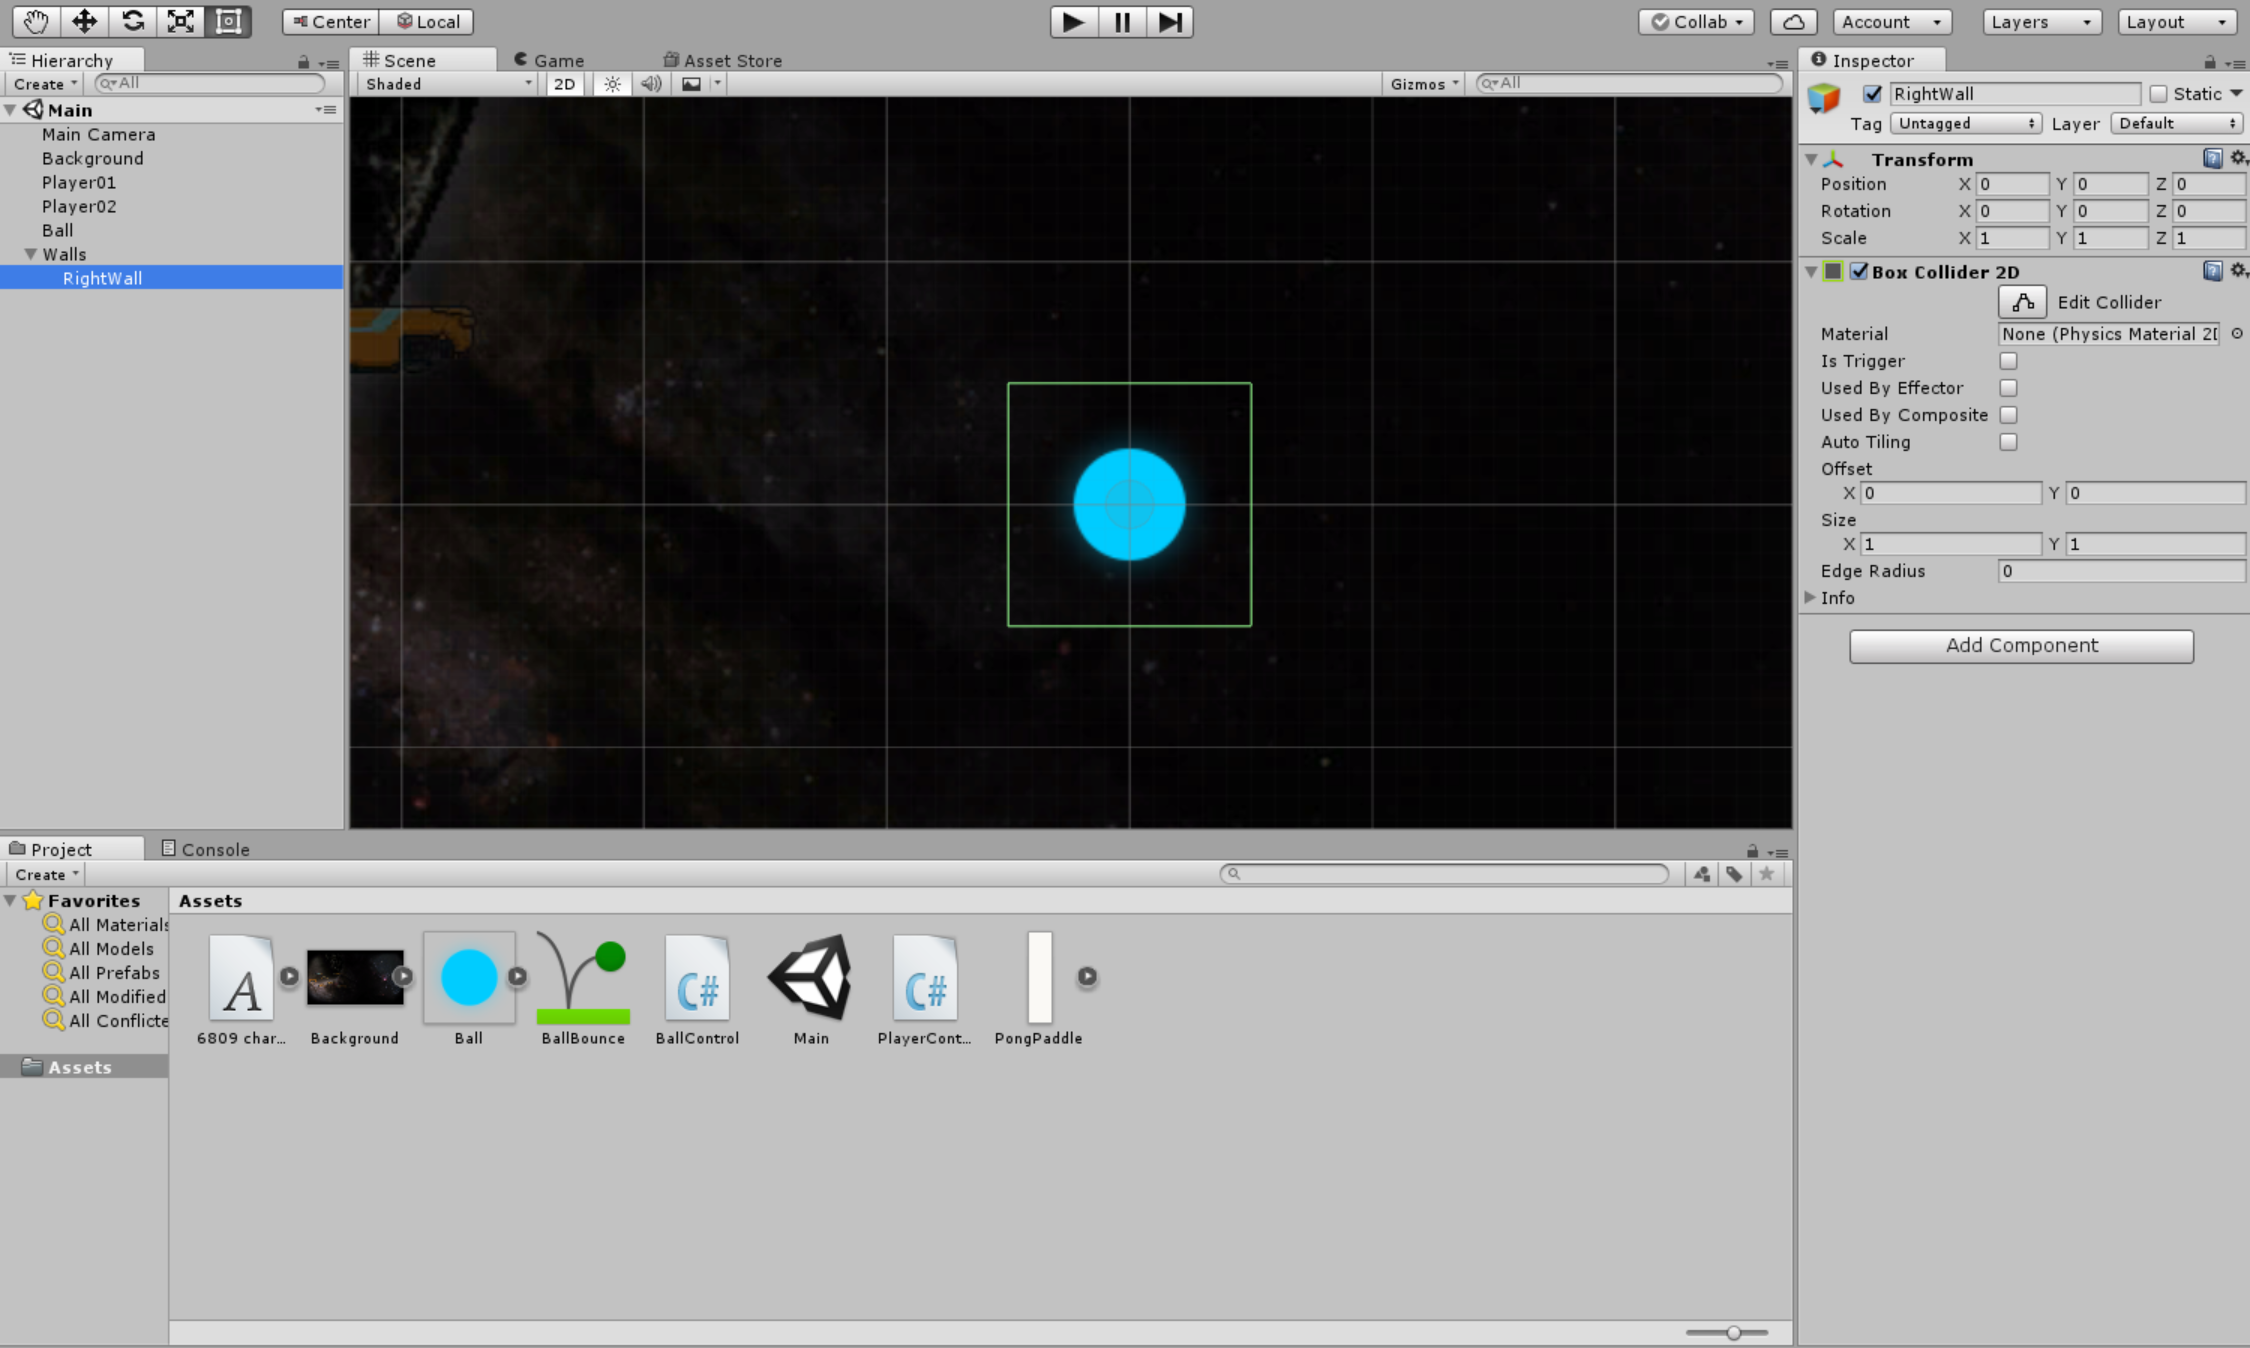
Anyway, call this new child object RightWall. Also make sure you go to Add Component and add a Box Collider 2D. That way the ball will bounce off of the wall object, just like we want!
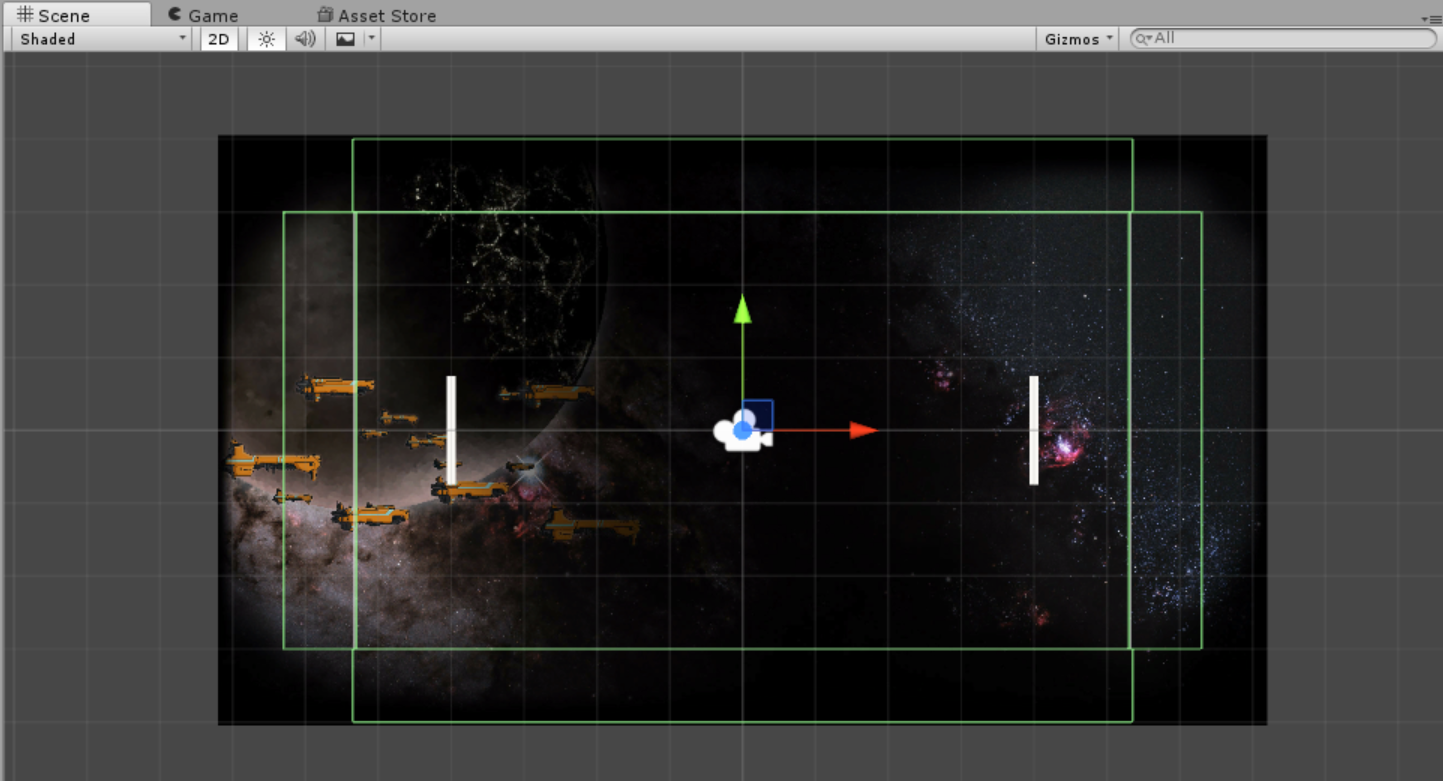
Now duplicate our new wall object 3 times. Call those duplicates LeftWall, TopWall, and BottomWall. Now we need to move and size those walls so they are in the right spot in our game view - right now, they're just points sitting in the middle of our board. We need to make them look like walls.
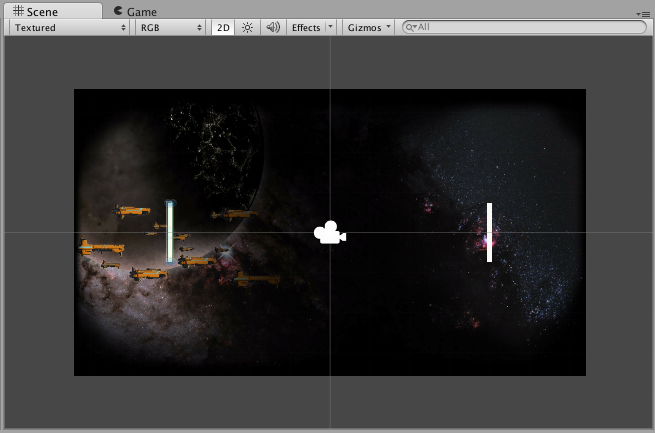
For the RightWall, set its Position to (5.8, 0, 0) and its Scale to (1, 6, 1). This will make it nice and tall. The LeftWall is the same, except its X Position is -5.8. (The numbers might be different on your computer -- basically, just make sure your screen looks like the screenshot below, with the walls on the outside edges of each side of the camera view.)
TopWall should be positioned at (0, 3.5, 0) with a scale of (10.7, 1, 1), and BottomWall has the same scale but with a Y Position of -3.5. If you click on the parent 'Walls' object, you should now see this in the Scene view:
One cool thing: you can now hit Play (►), and the ball will bounce off the walls! Next comes an important, but slightly harder part. We need to make this an actual game, not just a ball bouncing around. We need a score system, a way to display the score, some win condition, and a reset button. That's right. It's time for…
Step Five: The Scoring User Interface
First things first, we need a game object for our HUD (or Heads-Up Display). Right-click an empty space in the Hierarchy pane (not on the Walls game object!) and choose Create Empty. Call the new object HUD, center its position at (0, 0, 0), and add a new script to the HUD object called GameManager.
This is going to be a fairly long script, but it's really important for our game!
Code Breakdown
First, as always, we import our packages and declare our class.
using System.Collections;
using System.Collections.Generic;
using UnityEngine;

public class GameManager : MonoBehaviour {
Next we make four variables. The first two variables are just integers to keep track of the scores for the two players. The next is a GUI object. 'GUI' stands for graphical user interface. This object is going to be responsible for displaying all our different buttons and graphics. We'll make this skin object in Unity after we finish here. The last variable is a reference to our ball object.
public static int PlayerScore1 = 0;
public static int PlayerScore2 = 0;

public GUISkin layout;

GameObject theBall;
Then comes the Start() function, which we use when the game first starts.
void Start () {
    theBall = GameObject.FindGameObjectWithTag("Ball");
}
Next is the Score() function. It will get called by another script we write in just a minute, that detects when the ball hits the side walls.
public static void Score (string wallID) {
    if (wallID == "RightWall")
    {
        PlayerScore1++;
    } else
    {
        PlayerScore2++;
    }
}
The OnGUI() function takes care of displaying the score and the reset button functionality. Then, it checks every time something happens if someone has won yet, and triggers the function ResetBall() if someone has.
void OnGUI () {
    GUI.skin = layout;
    GUI.Label(new Rect(Screen.width / 2 - 150 - 12, 20, 100, 100), "" + PlayerScore1);
    GUI.Label(new Rect(Screen.width / 2 + 150 + 12, 20, 100, 100), "" + PlayerScore2);

    if (GUI.Button(new Rect(Screen.width / 2 - 60, 35, 120, 53), "RESTART"))
    {
        PlayerScore1 = 0;
        PlayerScore2 = 0;
        theBall.SendMessage("RestartGame", 0.5f, SendMessageOptions.RequireReceiver);
    }

    if (PlayerScore1 == 10)
    {
        GUI.Label(new Rect(Screen.width / 2 - 150, 200, 2000, 1000), "PLAYER ONE WINS");
        theBall.SendMessage("ResetBall", null, SendMessageOptions.RequireReceiver);
    } else if (PlayerScore2 == 10)
    {
        GUI.Label(new Rect(Screen.width / 2 - 150, 200, 2000, 1000), "PLAYER TWO WINS");
        theBall.SendMessage("ResetBall", null, SendMessageOptions.RequireReceiver);
    }
}
The 'SendMessage' call is something we've been using a lot in this chunk of code - it will trigger any function that matches the name that we send it in a class we specify. So when we say theBall.SendMessage("ResetBall"), we tell the program to access the 'BallControl' class and trigger the ResetBall() method. Here's the completed script: GameManager.cs
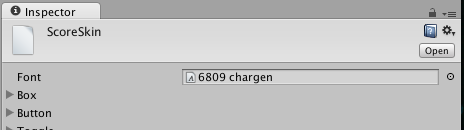
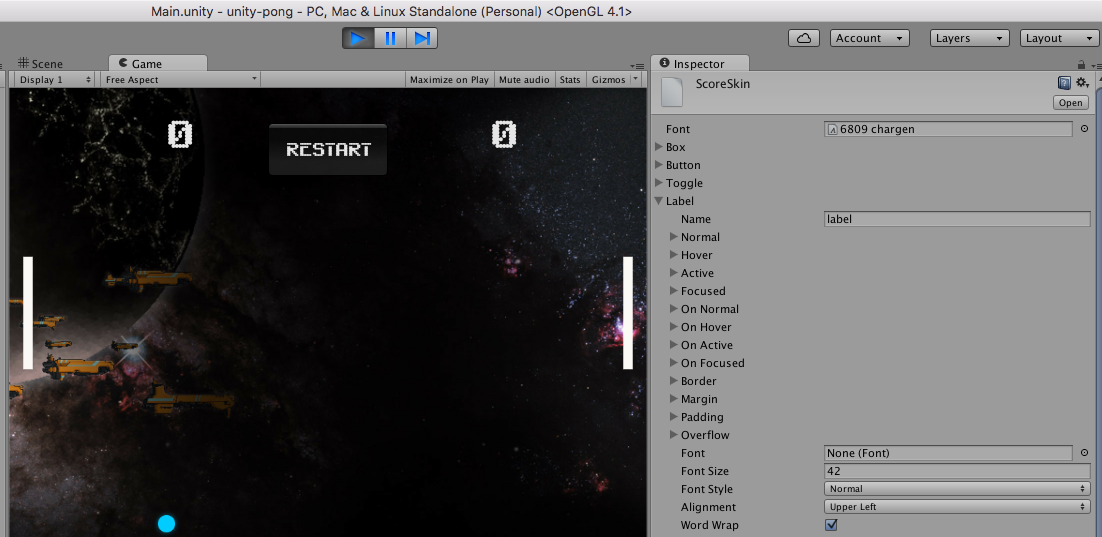
Ok cool. Looking at the HUD, we now see there's one new variable under this script that needs filling. It's asking for a 'Skin.' We need to make that in Unity. If you look in your Assets folder, you should see a file that we downloaded that is a special font called '6809 Chargen'.
In your Project pane, right-click and create a GUI Skin called ScoreSkin. Click on that Skin, and you should see a variable field called 'Font' at the top of the Inspector pane. Click + drag our font to that variable slot.
If you scroll down and look under the dropdown menus for 'Label' and 'Button' you can also change the size of your text, etc. Play around with size until it looks good. I set Font Sizes for my Label and Button to 42 and 20, respectively. In the end, my HUD's Game Manager (Script) looks like this:

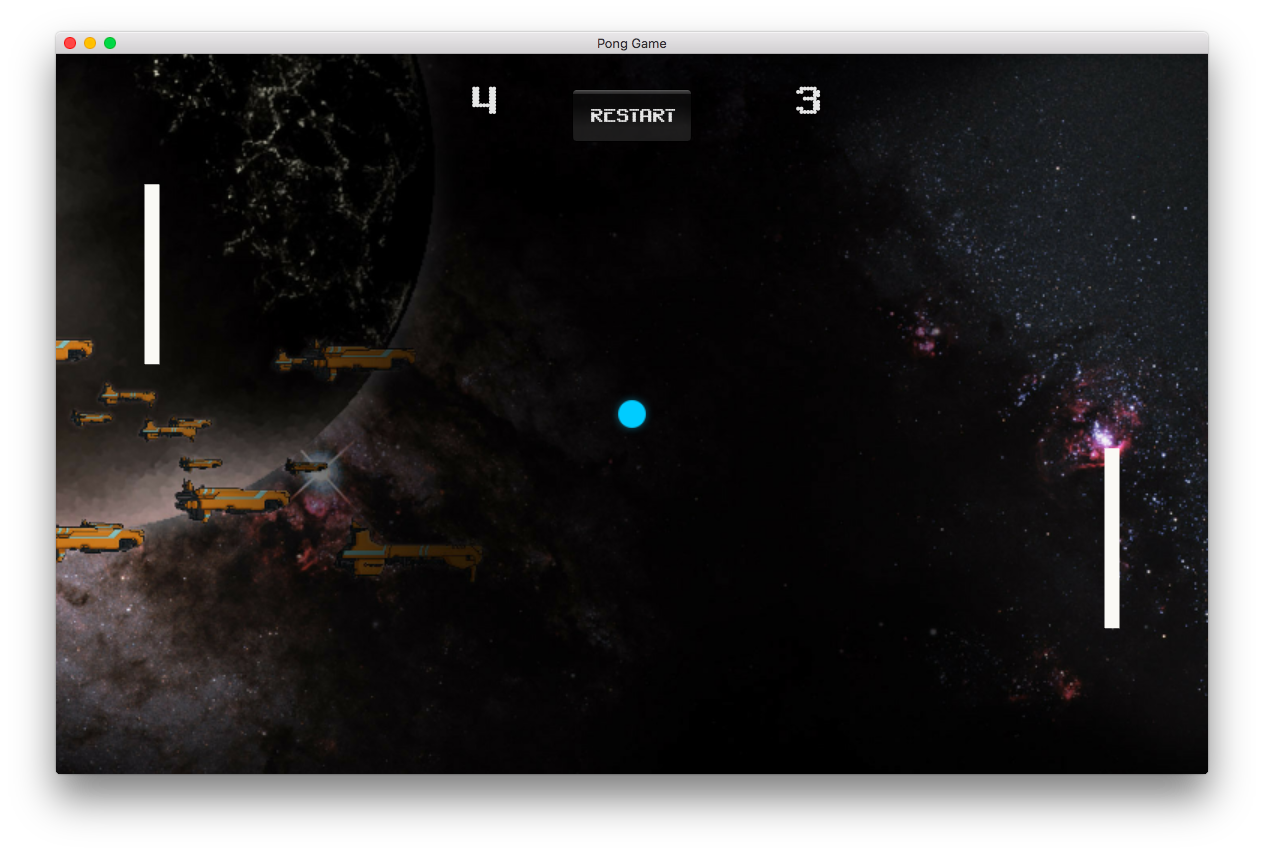
Awesome! Now you should, when you play, see something like this:
Cool. Now let's make sure that the game knows when we do score. To do that, we need to add a script to the LeftWall and RightWall objects under the HUD dropdown. It's the same script so it should be pretty easy to do. First, we'll go to Add Component > New Script on the LeftWall, and name this new script SideWalls.
Code Breakdown
After we import our packages, we just need to write one function. This function detects when something is colliding with our left or right walls. If it's the ball, we call the score method in GameManager, and reset the ball to the middle.
using UnityEngine;
using System.Collections;

public class SideWalls : MonoBehaviour {

    void OnTriggerEnter2D (Collider2D hitInfo) {
        if (hitInfo.name == "Ball")
        {
            string wallName = transform.name;
            GameManager.Score(wallName);
            hitInfo.gameObject.SendMessage("RestartGame", 1.0f, SendMessageOptions.RequireReceiver);
        }
    }
}
You already added the script to LeftWall, and now, since it's written, go to Add Component > Scripts on RightWall. Choose the Script we just wrote. Here's the completed script: SideWalls.cs
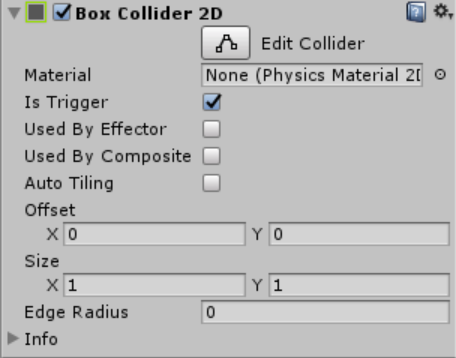
Now, in order for Unity to call our OnTriggerEnter2D method, we have to make sure both the LeftWall and RightWall have the Is Trigger checkbox selected on their Box Colliders in the Inspector pane. This means that Unity won't treat these walls as physical walls, but rather they "trigger" something in the game (in this case, they give a player a point).
Test your game to make sure both players can score a point. If so, know what that means? We're DONE! Almost.
Last Step: Make The Game
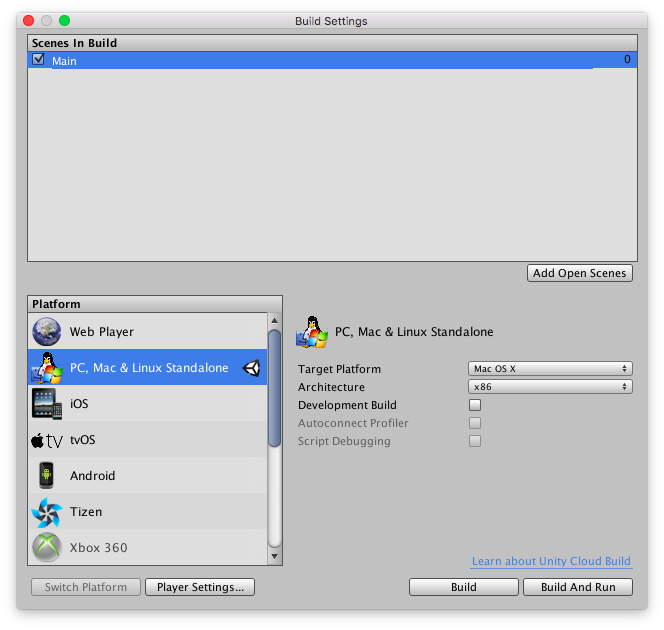
Now, we only have to make our game playable outside of Unity. To do this, go to File at the top of Unity. Go to Build Settings and then choose Mac, PC, Linux Standalone. This will make an executable (playable) file appear on our desktop. You may need to Add Open Scenes, to ensure that Main is included in the build.
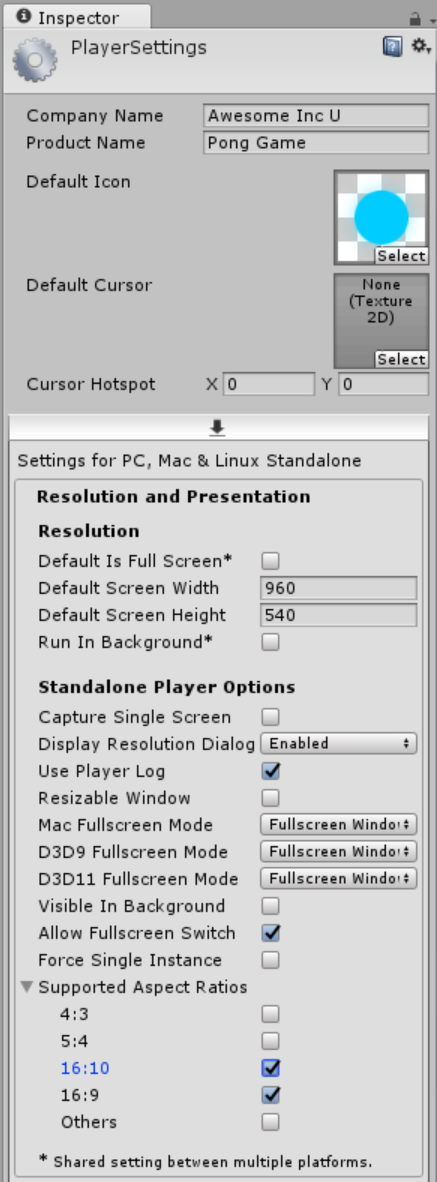
Now, click on Player Settings. This is where you should put your name on the Project, choose an icon (I chose the Ball sprite), and uncheck Default Is Full Screen. It asks for a default screen width and height. I chose 960x540 but it really doesn't matter too much. The important thing is in the Supported Aspect Ratios list. Click the little arrow and uncheck everything except 16:10 and 16:9. If we choose a different aspect ratio, it's possible we might not see our paddles. Your settings in the end should look like this:
Now, hit Build and choose where you want to save the file (I chose the desktop), and name it something (I named it Pong v1.0). Look at your desktop. Is it there? Sweet. If you want to see the completed version, here's the sample code on GitHub.
Congratulations, and enjoy your game. Thanks for going through this tutorial, and if you want to learn more about Unity or coding in general, make sure to check out the rest of Awesome Inc U online.
THANKS, AND GAME ON