Make a Website with HTML and CSS
Today, we're going to be making a website about your favorite animal. We're going to be using Mozilla Thimble, and we'll be writing our website in HTML, CSS, and JavaScript. No prior experience with web design or HTML is required. Let's get started!
STEP 0: HTML BASICS
HTML (Hypertext Markup Language) is the language we will be using to put the information on our pages such as a title, paragraph, list, etc. CSS (Cascading Style Sheets) is what we are going to be using to style our pages by doing things like changing the color, centering the content, etc. We will be looking at some already written CSS code, but we will mostly be writing code in HTML today.
Before we begin coding our website, it is important that we learn the basis of all HTML: tags. There are four main things that you need to know about tags.
-
Every element has an opening and a closing tag
__Heading__ -
All tags have "< >" around them
< >Heading< > -
All closing tags begin with a "/" inside the "<>"
< >Heading</ > -
All closing tags match their opening tags
<h1>Heading</h1>
Each tag has a meaning associated with it. For instance, "h1" is the largest heading, "p" is a paragraph, and "ul" makes an unordered list (list with bullet points). You will learn more of these tags as we code our website today, and you can always look up more tag names at w3schools.com. When you are coding your website today, make sure that every element (title, heading, paragraph, list, etc.) has an opening and a closing tag that corresponds with it, otherwise your web page might not appear exactly how you want it to.
STEP 1: SETUP
In order for us to make our website, we will need to follow the steps below to set up a code editor.
- Go to Mozilla Thimble.
- Click "Create an account" in the top right corner.
- Enter a username, email, and password.
- Click "Sign Up."
- Click "Create a new Project."
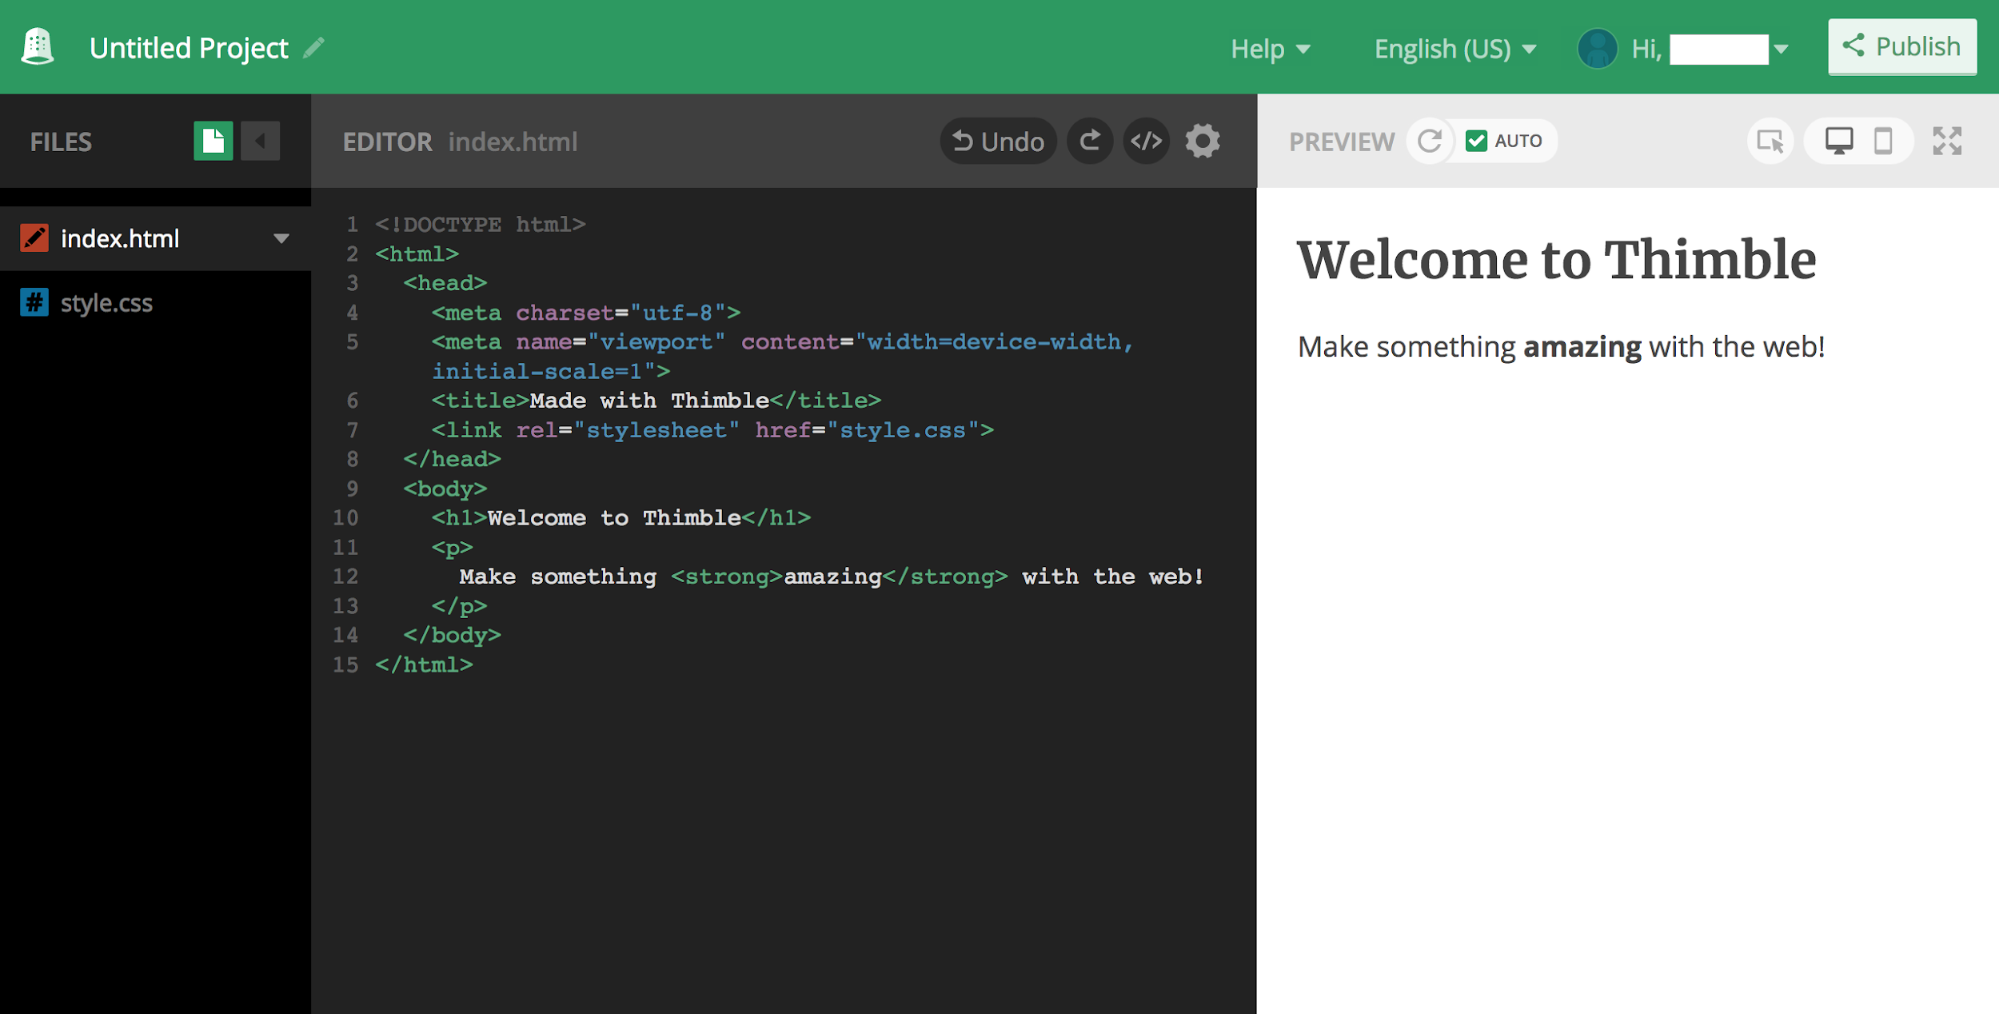
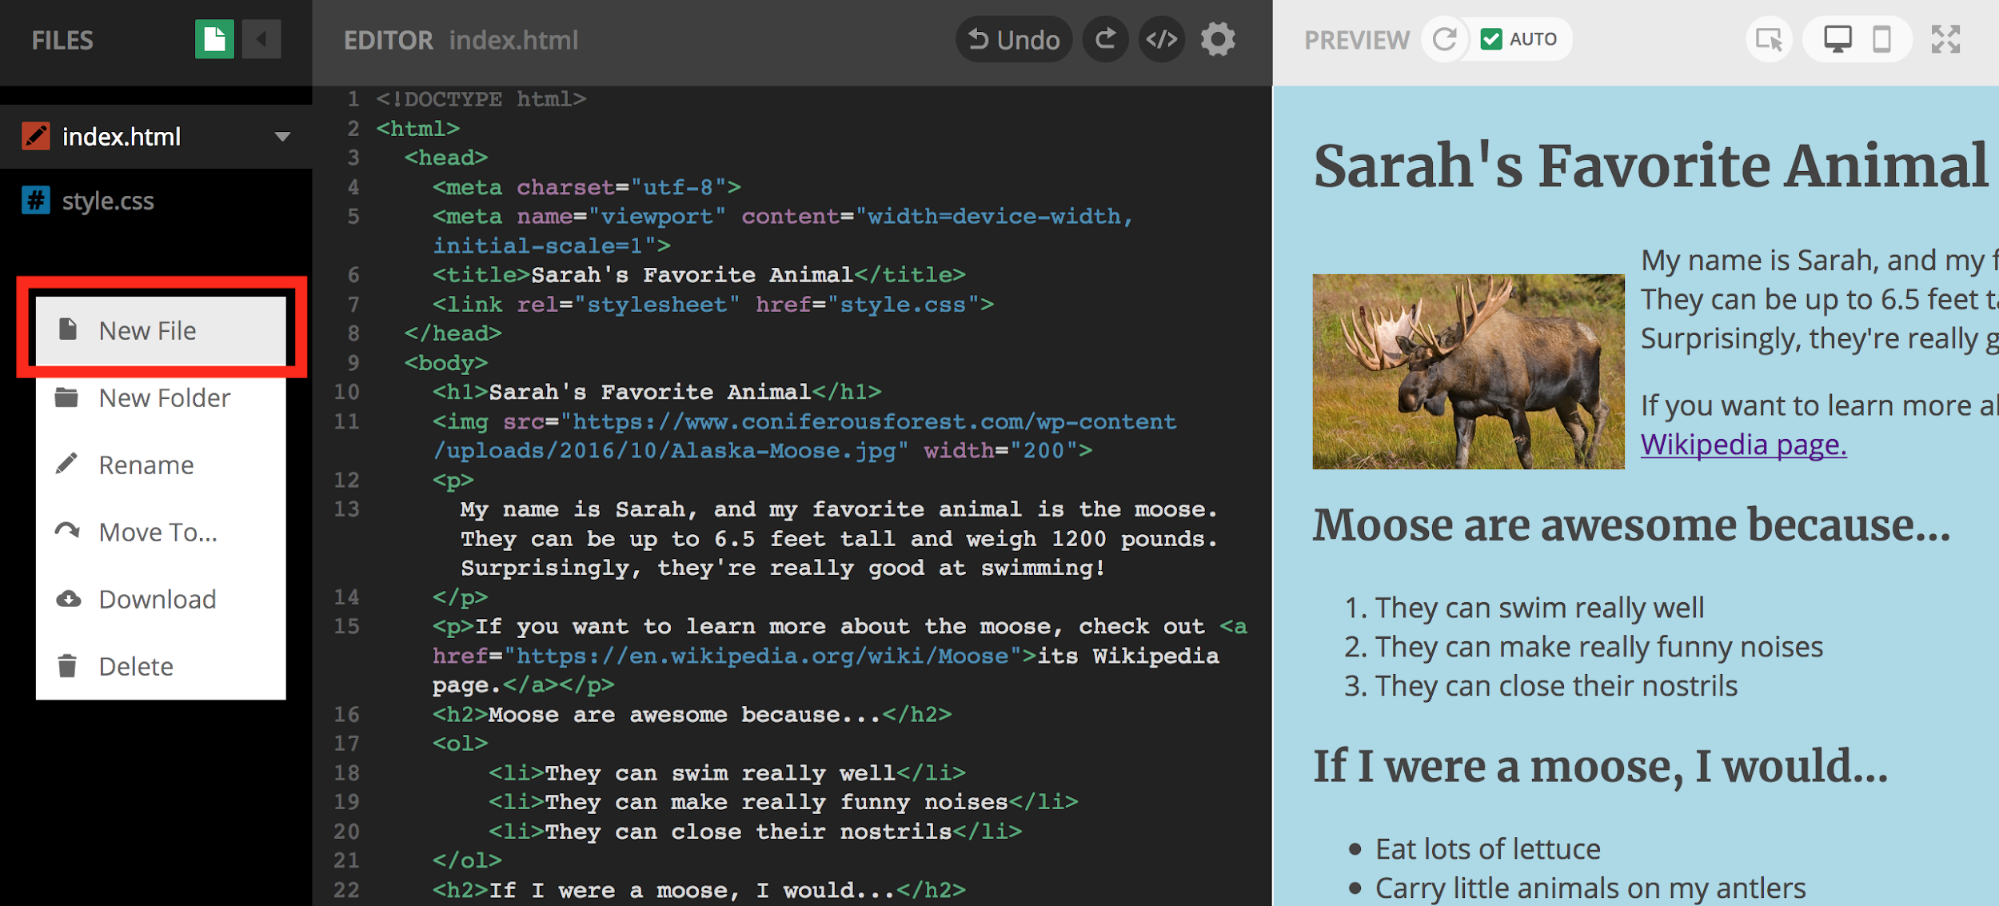
You should now be able to see the code editor on the left and the preview of the website on the right as shown below. Mozilla Thimble gives us a very basic website to start from, and it includes two pages that are shown on the bar on the left. The first page is "index.html," which is always the home page, and "style.css," which is our style sheet.
You should rename your project something about your favorite animal, so click on "Untitled Project" in the top left corner in the green bar, and type in a name like "Sarah's Favorite Animal." Then click "Save." After you've renamed your project, we need to do one more thing before we begin coding our website. Click on the gear icon ⚙ at the top of coding section and turn off "auto close tags" and "autocomplete code."
As you are going along coding your website, you may encounter some of your code turning pink. If that happens that means that you have made a syntax error. A syntax error means that you typed something in wrong. For example, you could have typed out an opening tag but forgot to type the closing tag. Or maybe you typed the closing tag, but you forgot the forward slash at the beginning of it. Just keep your eyes out for pink text, and if you see any, try to find the error and fix it before going on. Now we're all ready to start coding!
STEP 2: HOME PAGE
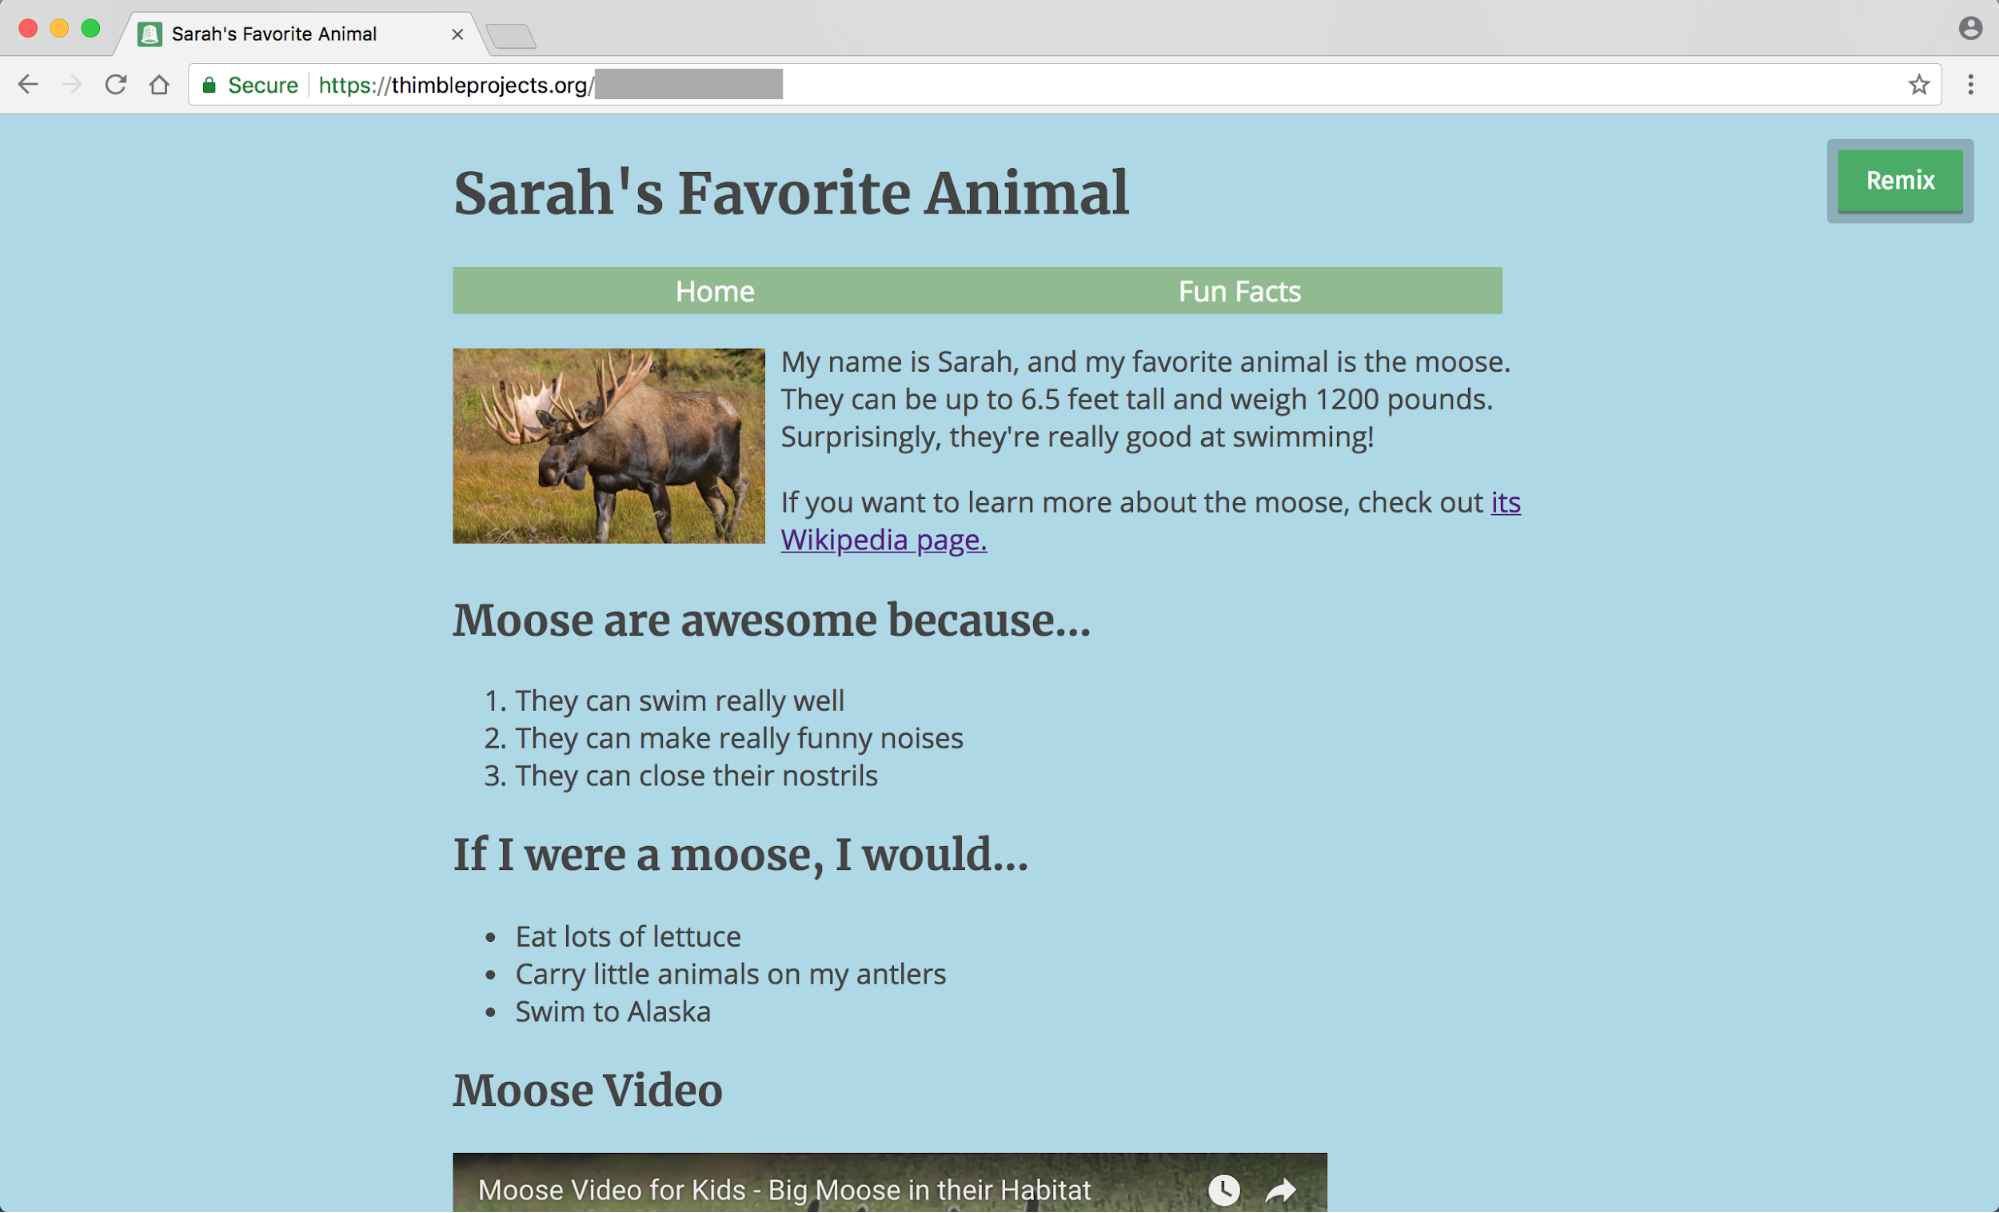
Every website needs a home page, and it can also have other pages. We will be making two pages: a Home page and a Fun Facts page that will display random facts about your animal. We are going to start by making the home page. Remember that we said that "index.html" is always the home page, so that is the page we are going to be editing first. Make sure that "index.html" is highlighted in the left bar indicating that "index.html" is the page that is being shown.
Title
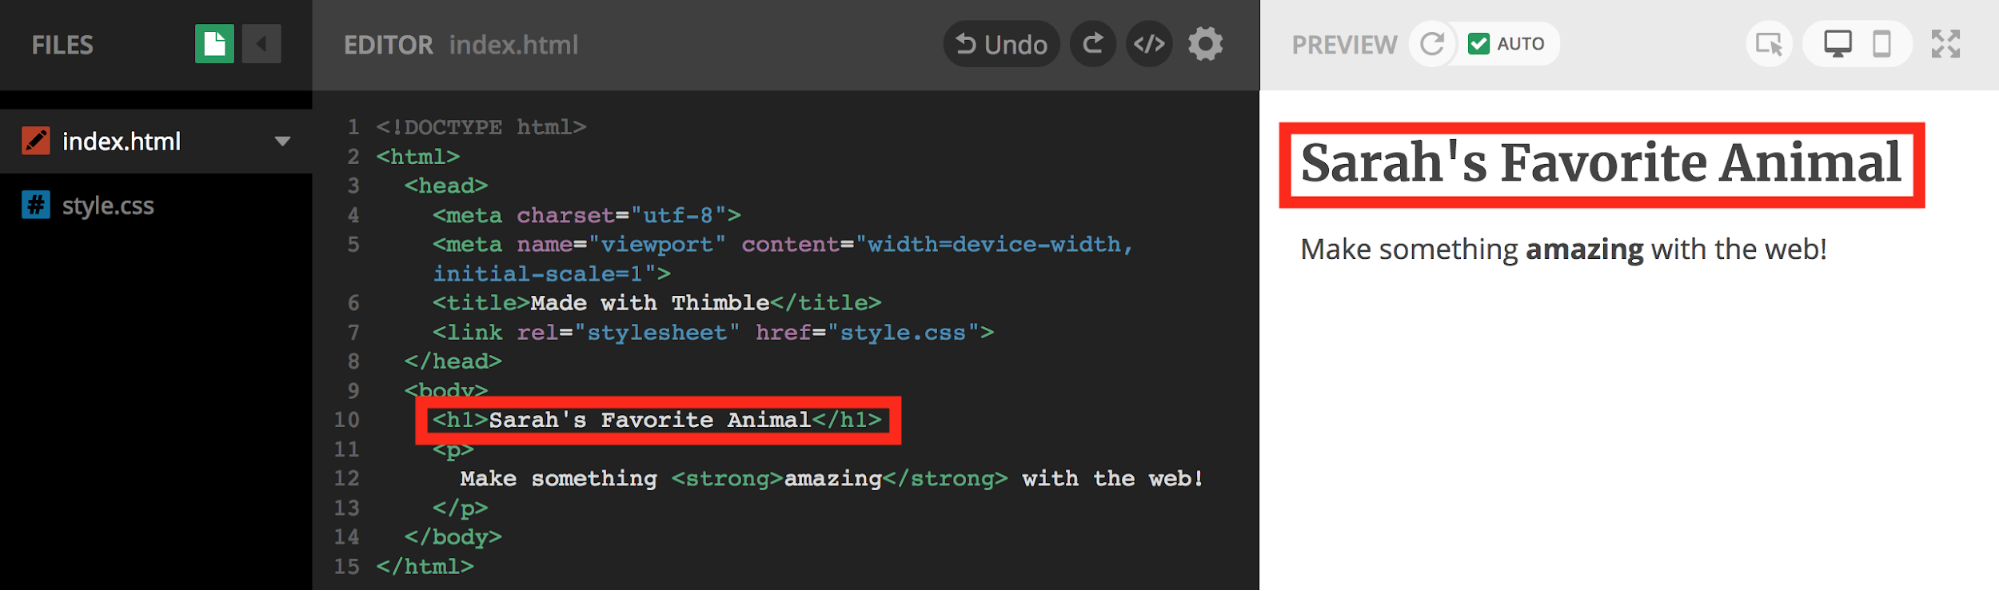
The first thing we should do is change the title of the Website, and as we said earlier, <h1> is the tag that makes text big enough to be a title. Nicely enough, they already have an <h1> tag with a title inside of it, so all we have to do is change that text. Pick a title that makes sense with your favorite animal. As you are typing, you should see the title changing on the right side of your screen where the website preview is located. If you don't see this change, click on the reload button ⟳ on the top of the website preview section, and your edit should appear.
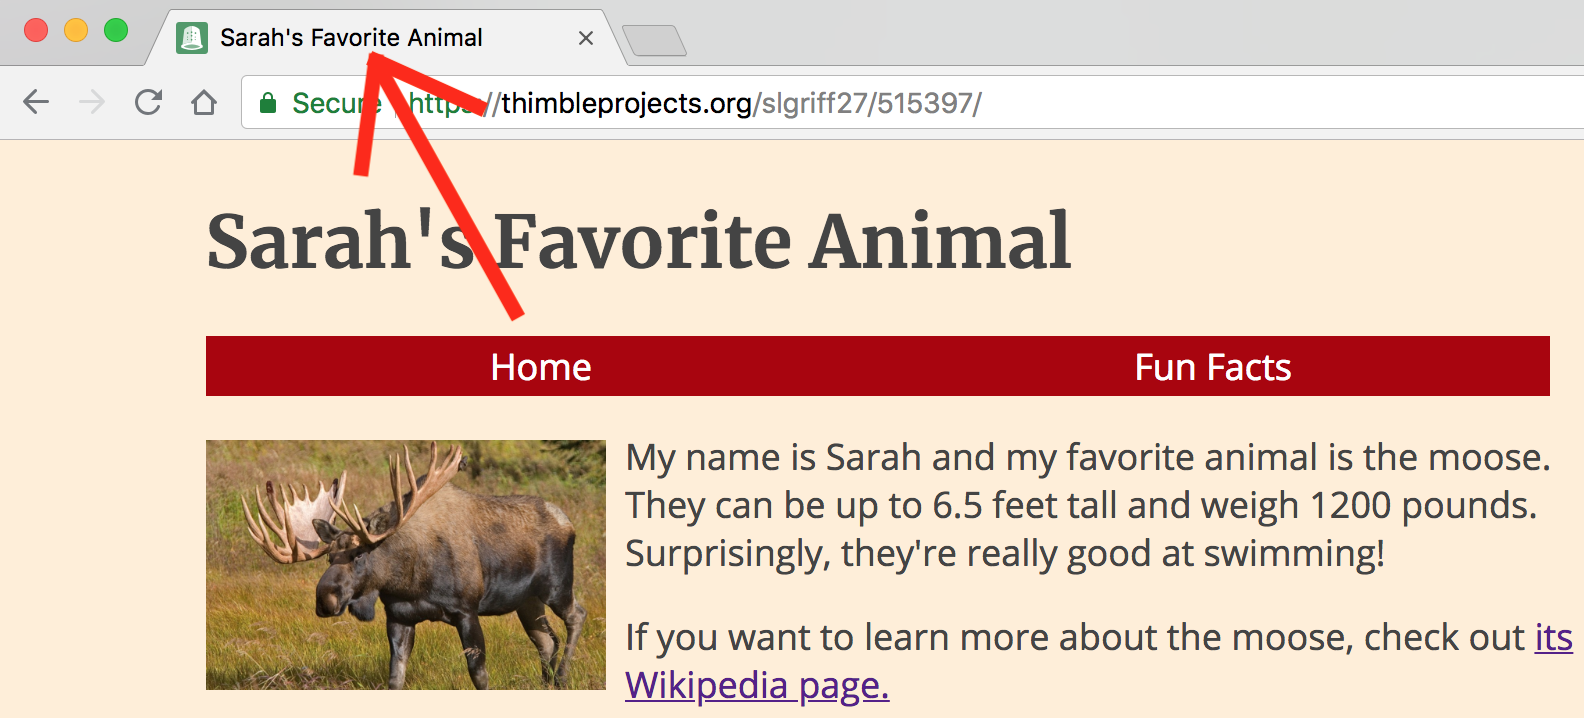
After changing the title, we should change the text inside the <title> tag above. This tag holds the text that goes in the browser tab. We don't want it to say "Made with Thimble." We would rather have it say something more helpful, perhaps the same thing that you put for the title of your website.
<title>Sarah's Favorite Animal</title>
You won't see anything change, but the tab in your web browser will look like the tab shown below once you finish your website.
Paragraph
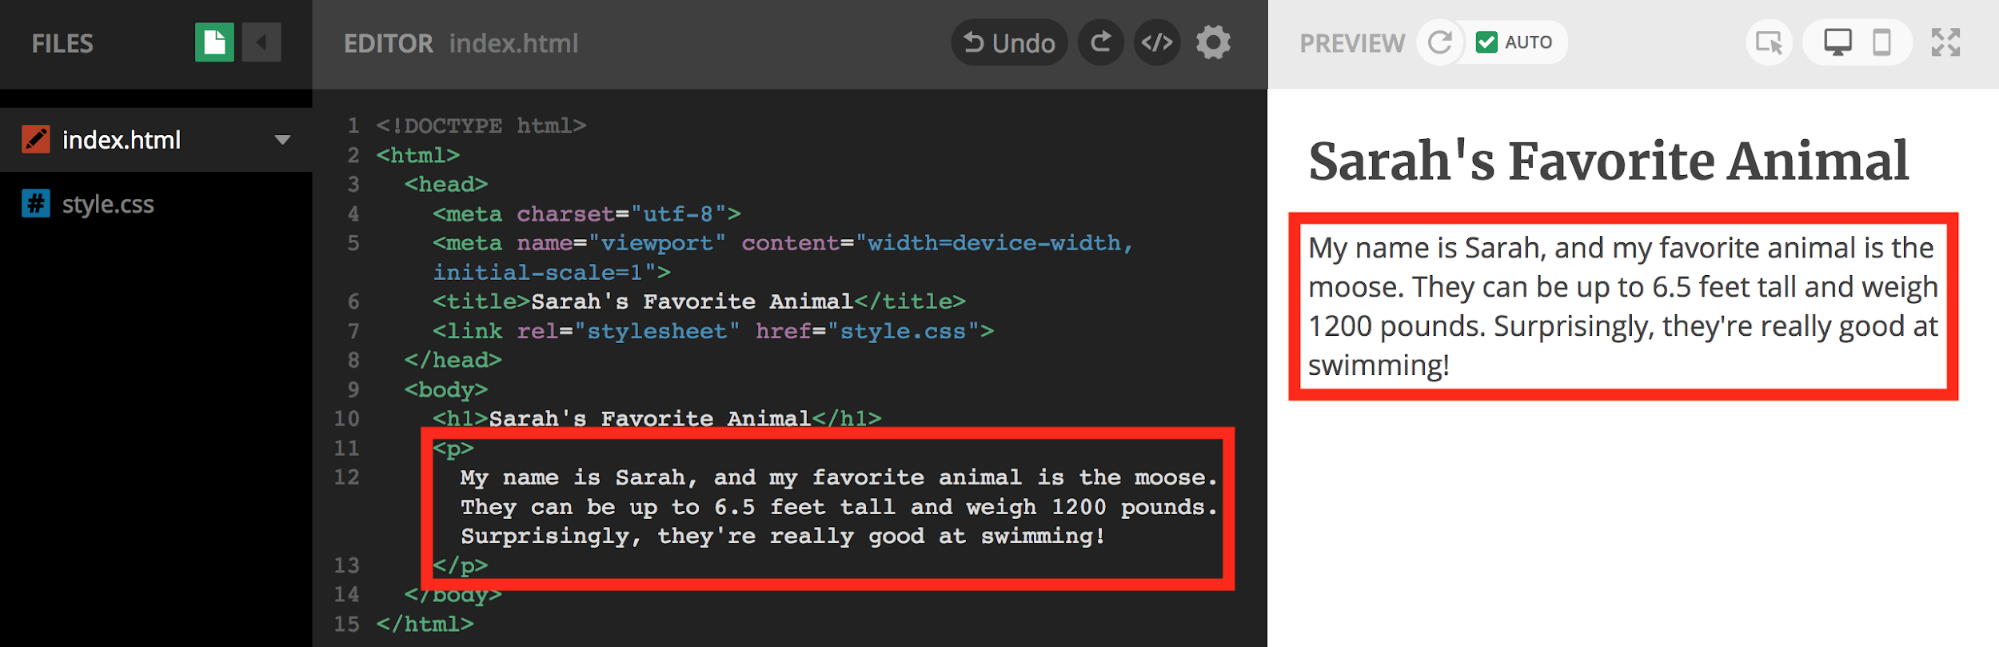
The next thing we want to edit is the paragraph. The tag for a paragraph is <p>, and Thimble has already made a paragraph. We don't want it to say "Make something amazing with the web!", so delete all of the text in between the opening paragraph tag <p> and the closing paragraph tag </p>. Then write a paragraph that describes your favorite animal. Make sure that your paragraph is inside the opening and closing paragraph tags (<p>paragraph</p>).
Image
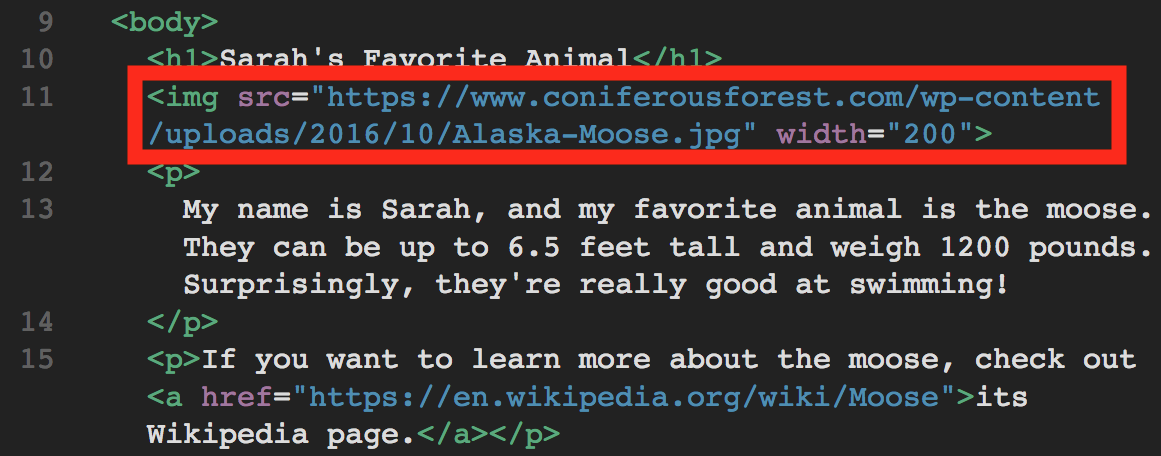
By now, you have edited all you can of the template that Thimble gives you, so we are going to start adding elements of our own! We have a title and a description of our animal, but we don't know what this animal looks like yet. We're going to add an image of our animal before the paragraph, so add a line in between the title and the paragraph. Add the line of code below, and we will finish filling it in after that.
<img src="">
Notice that there is no closing tag to the opening image tag, which violates our rule that every HTML element must have an opening and a closing tag. This just happens to be one of the few exceptions to that rule.
The "img" tag stands for image, and the "src" attribute of this tag stands for source. The source of an image is where you got the image from, which is often in the form of a URL, or Uniform Resource Locator. We are going to insert the URL for the image in between the quotation marks to specify the source of the image.
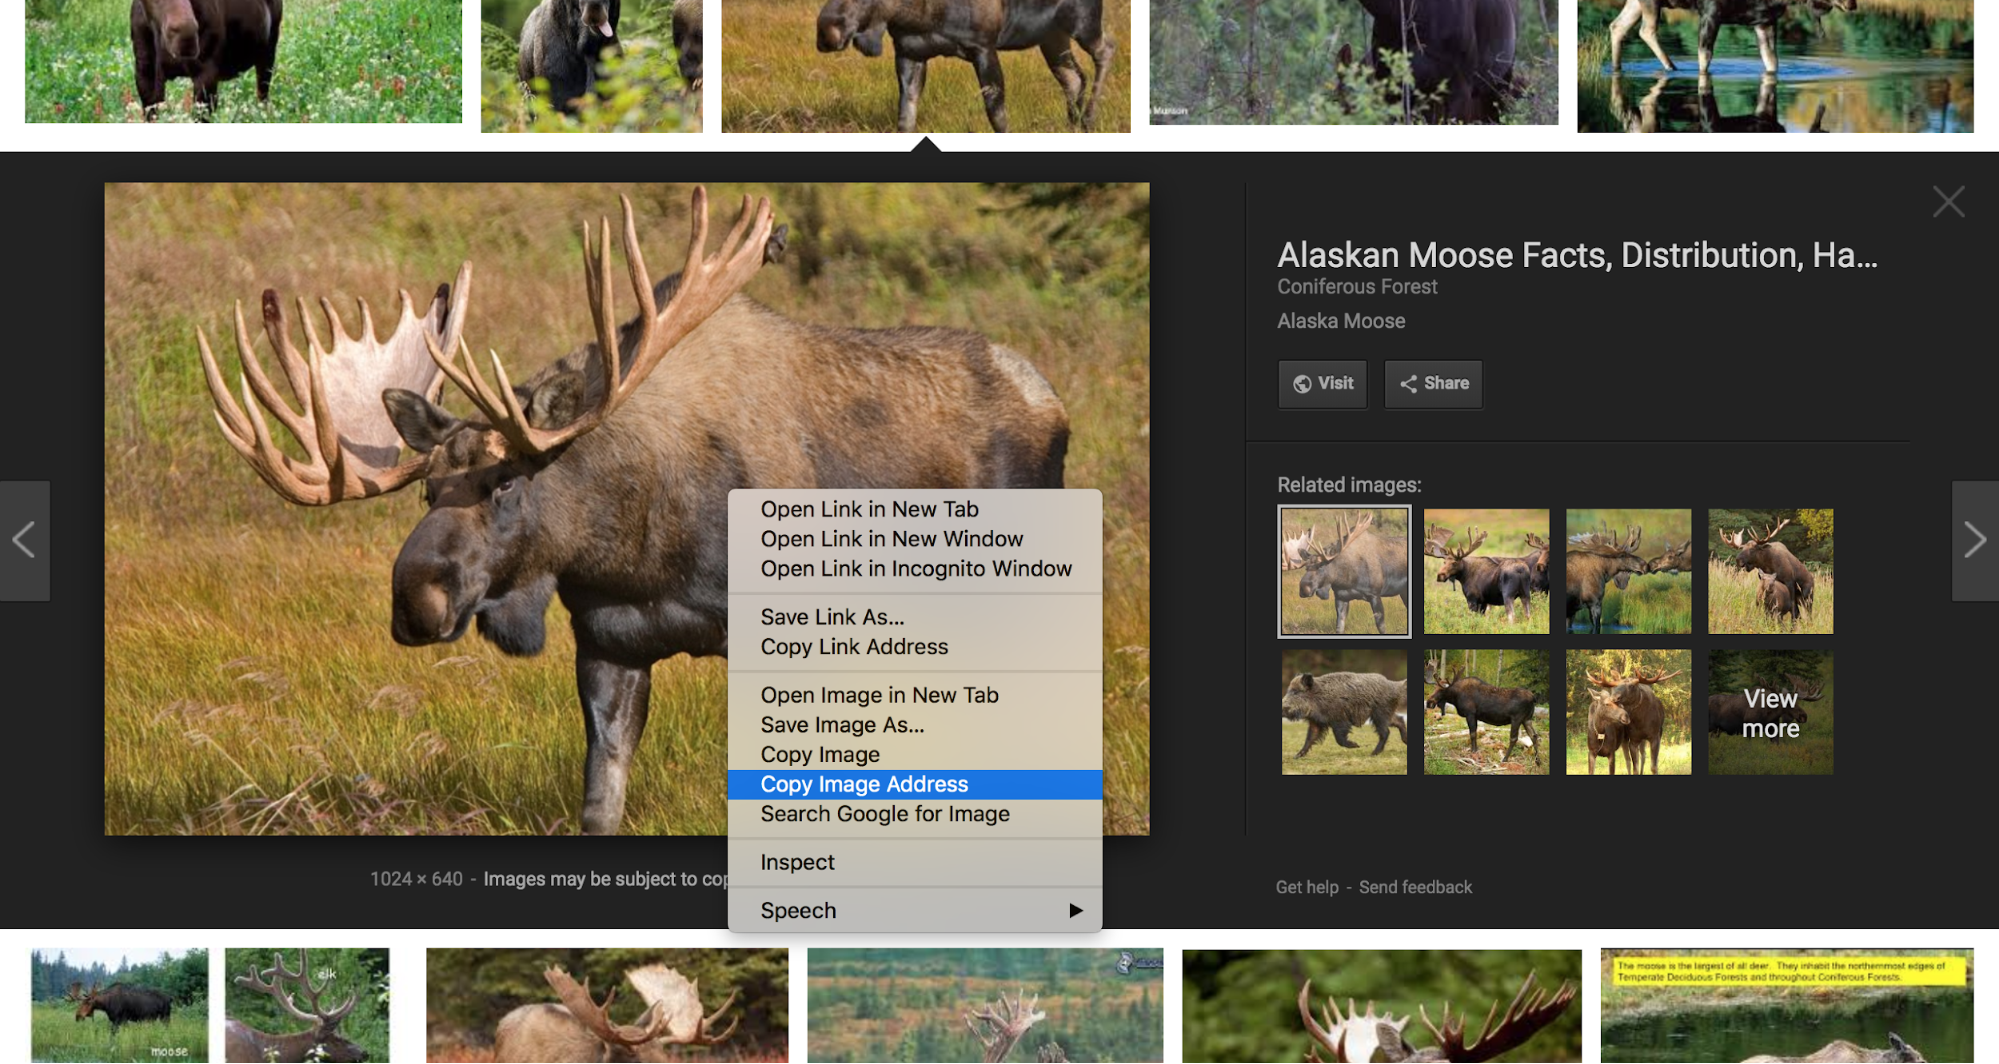
Now we need to find an image of our animal, so go Google Images and search for an image of your animal by typing the name of your animal or something similar. Once you have found an image you like, click on the image, and it should become larger. Right click on the image and select "Copy Image Address."
Copying the image address will copy the link that points to this image (the source of the image). Now go back to Thimble and paste the link in between the quotation marks inside the image tag. To paste on a Mac, type ⌘ Command+V, and for any other kind of machine, type Control+V.
Your image should now appear on your screen, but if it does not, there is a good chance that that particular image will not be able to be embedded into a website. If your image does not appear, delete the link that you just pasted into the image tag, go back to Google Images, find a different image, copy that image's link address, and paste it into your image tag.

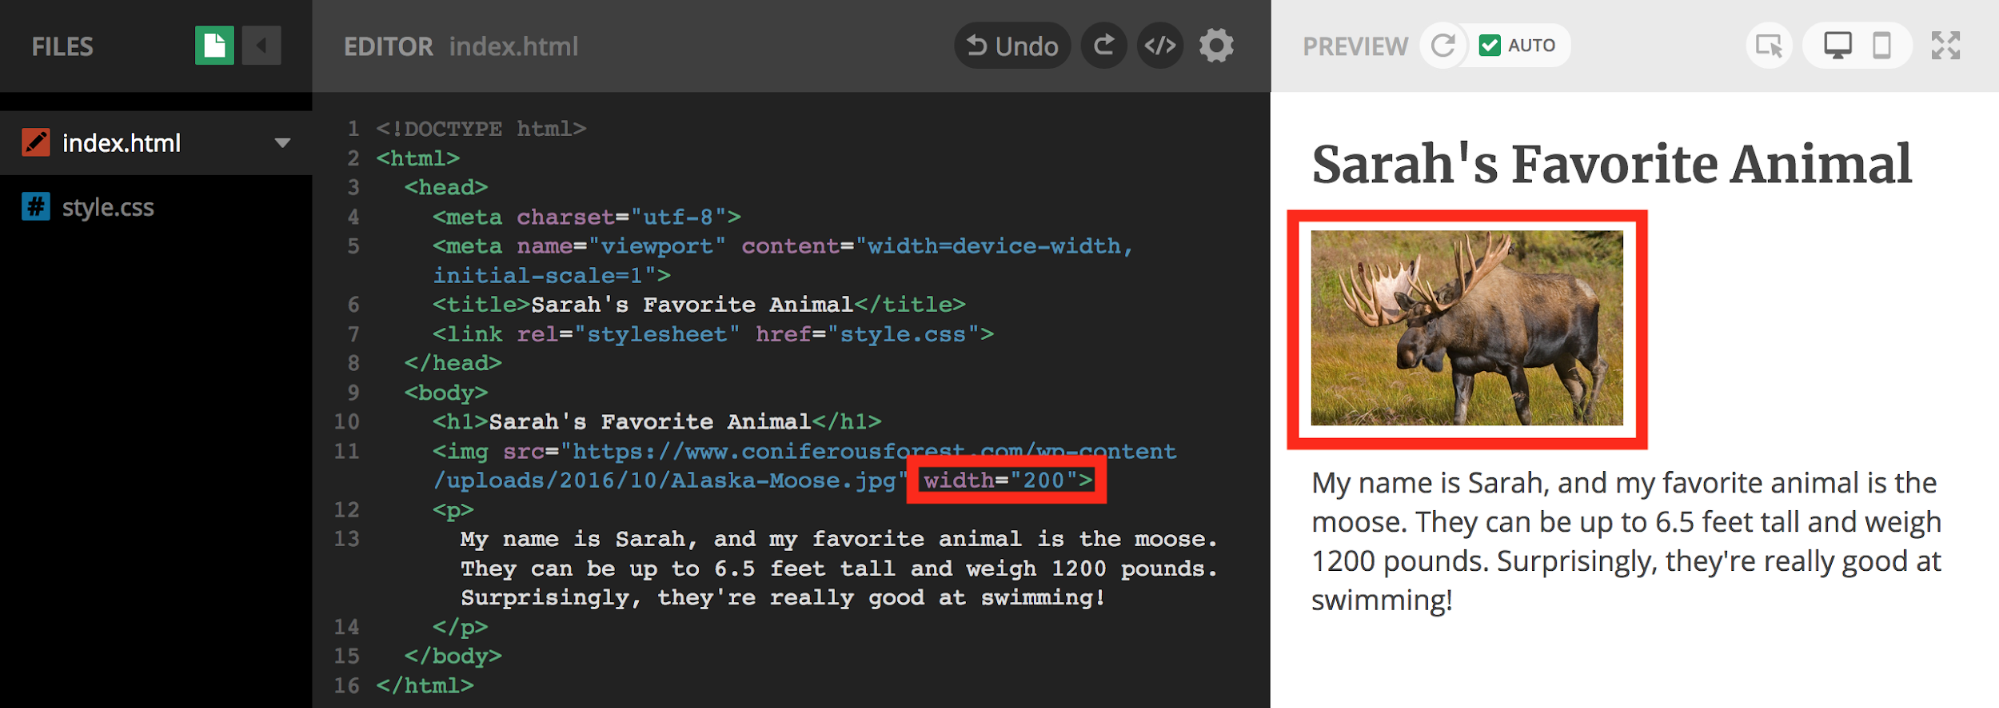
As you can see, your image might be way too big or way too small. Fortunately, we can change the size of the image to be whatever we would like! Before the closing angle bracket > of the image tag, add a space and the code below.
width="200"
The 200 refers to the width of the image in pixels. A pixel is a tiny dot of color on your computer, and many of those tiny dots together make up the picture and everything else that is displayed on your screen. You can change the number 200 to a different number of pixels until you find the width of the image that you would like.
Link
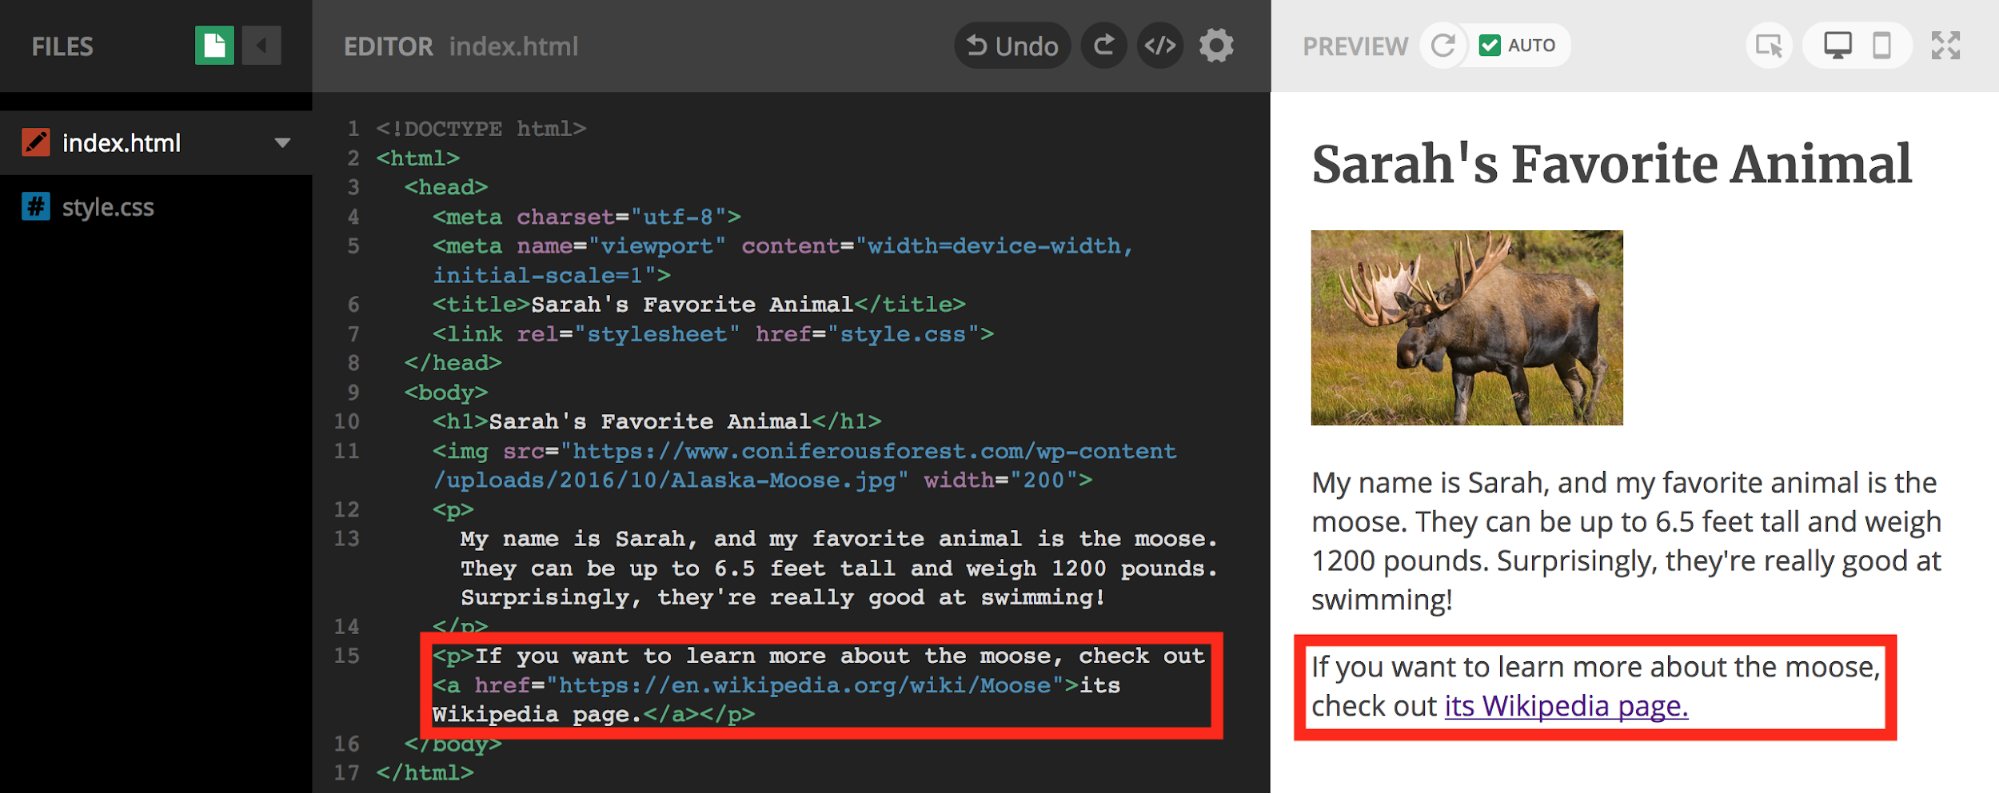
Since we won't have time to write down all the information about our animal on our website, it would be a good idea to insert a link to another page that has much more information about our animal. Let's start by writing a sentence that will help the users of your website know where to go to find more information about your animal. Add a new line for this sentence after the paragraph you wrote that describes your animal. Then write the code below onto that new line, inserting the name of your animal in the blank.
<p>If you want to learn more about the _______, check out <a href="">its Wikipedia page.</a></p>
We made a new paragraph with the <p> tag, and then we nested another tag inside of the <p> tag. This tag is the "a" tag, which stands for anchor, but the more important thing to note is the attribute inside of the "a" tag. The attribute "href" stands for hypertext reference, and just like "src" with our image, this hypertext reference is going to refer the user to the link once they click on the words inside the "a" tag. In other words, it will take them to that web page, so we need to find a link to fill into the quotation marks after the "href."
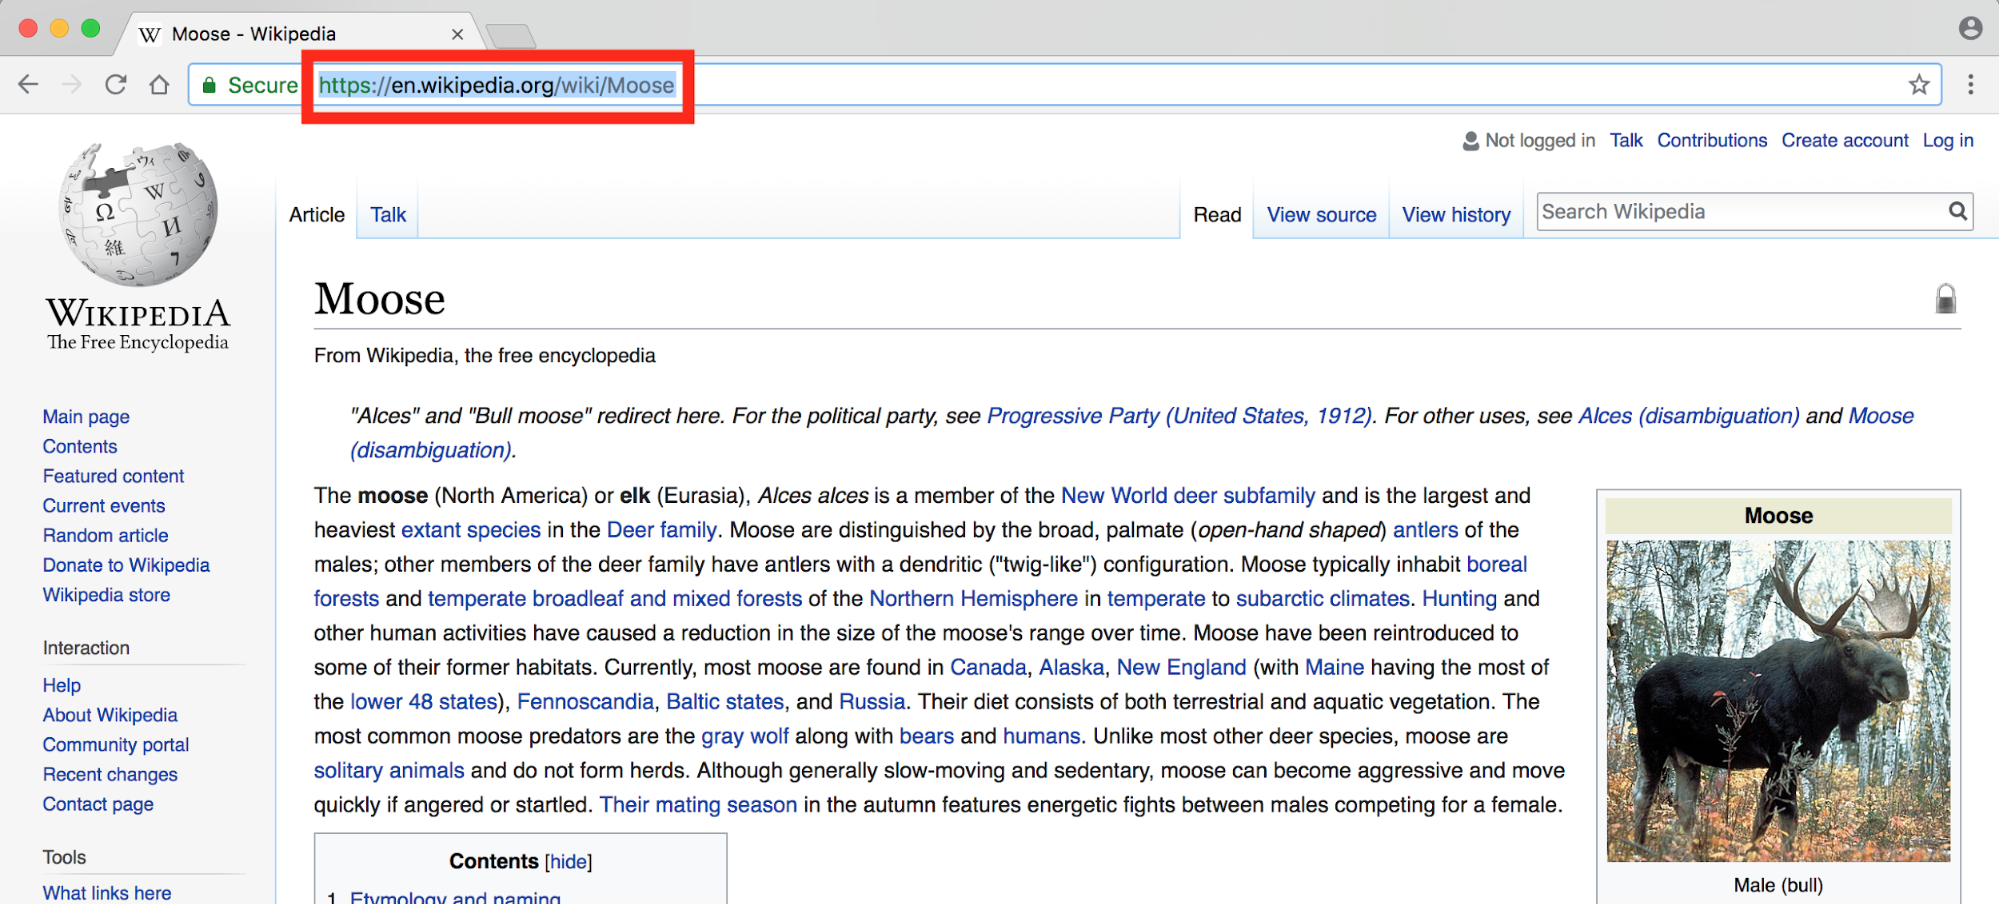
Go to another tab on your web browser and search for "[your animal] Wikipedia." In most cases, the Wikipedia page for your animal will be the first link that pops up. Click on that link, highlight the URL on the top left part of the browser, and copy it. To copy on a Mac, type ⌘ Command+C, and for any other kind of machine, type Control+C.
Then go back to Thimble and paste that URL in between the quotation marks in the "a" tag. Remember, to paste on a Mac, type ⌘ Command+V, and for any other kind of machine, type Control+V. Now if you click on the words "its Wikipedia page," it should bring you right to the Wikipedia page of your animal.
Lists
Even though you are linking your users to another page with more information about your animal, that doesn't mean you can't add any more information to your website. You can add elements such as lists about your favorite things about your animals. You can't find that information anywhere else on the internet!
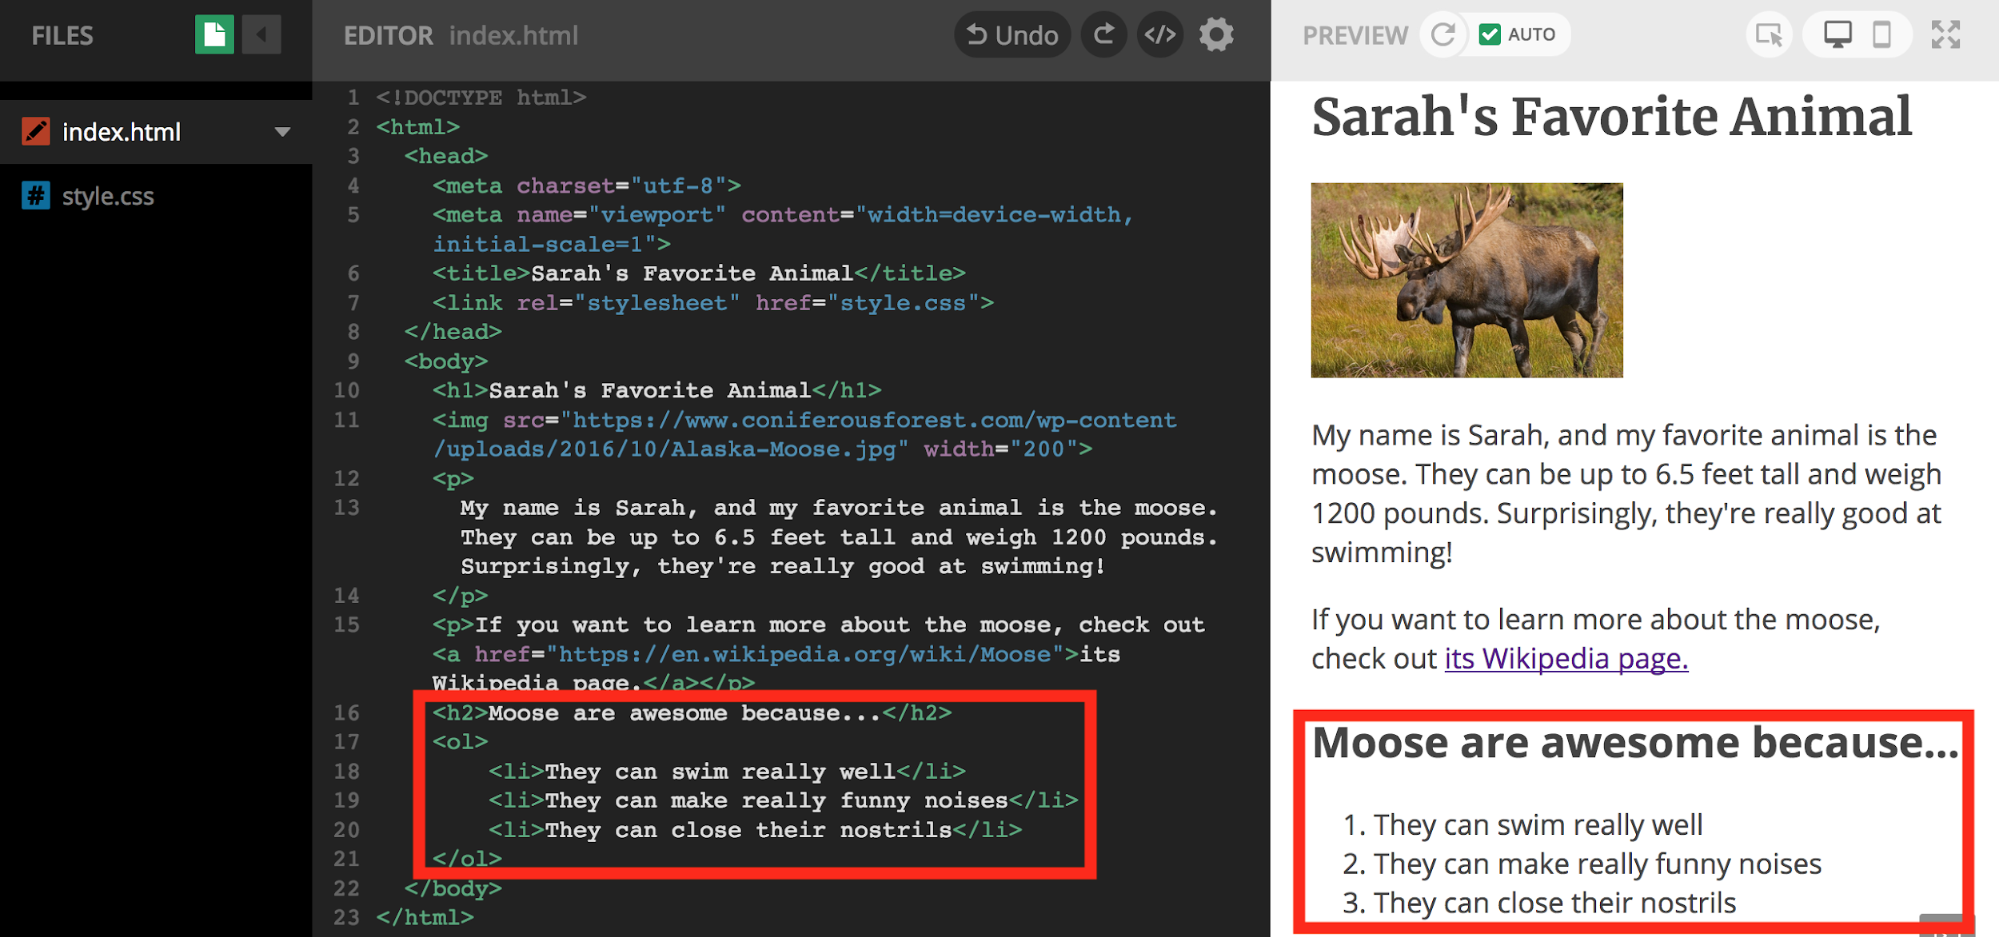
Let's make the first list about why you think your animal is awesome, but before we make the list, we should make a title for it. We don't want this title to be as large as the title for our website, and if you remember, the tag for the title of our website was "h1." That is the biggest heading, and the next biggest heading is "h2." As the numbers after the "h" get bigger, the size of the heading gets smaller, so we are going to want the title of our list to be "h2." It's not too big or too small, so add a new line after the paragraph with the Wikipedia link that we just finished. Then type the line below, and insert the name of your animal in the blank.
<h2>______ are awesome because...</h2>
You should now see your title appear under the paragraphs you wrote before. Now we need to add the list of awesome things about your animal. Before we add it, we first need to learn about the two types of lists, which are ordered and unordered lists. Ordered lists are made with numbers, and unordered lists are made with bullet points. The first example below is an ordered list because there are numbers ordering the items in the list. The second example below is an unordered list because nothing is ordering the items in the list.
Ordered List
- First thing
- Second thing
- Third thing
Unordered List
- First thing
- Second thing
- Third thing
We're going to make one list of each type, and the first one we are going to make will be an ordered list. The tag for an ordered list is is <ol> because "o" and "l" are the first letters of Ordered List. Let's put the opening and closing "ol" tags down underneath our title from the start to make sure we don't forget later. Put a new line between the opening and closing "ol" tags.
<ol>

</ol>
Now we need to add our list items, which are the actual lines of text in our list. The tag for list items is <li> for the same reason as <ol> (List Item). In the line between the "ol" tags, add your list item using the "li" tag.
<ol>
	<li>They can swim really well</li>
</ol>
After you write in the first thing you think is awesome about your animal, you should see it appear on your website with a number 1. before it. You didn't have to write the 1. because your web browser knows that this is an ordered list, which has numbers. To make our next list items, highlight your first list item including the "li" tags, copy it (Control+C or ⌘ Command+C), add a new line under it, paste it (Control+V or ⌘ Command+V), and do that one more time. You should now have three of the same list item listed as 1, 2, and 3. Now all you have to do is change the text in between the "li" tags on the last two list items to two other awesome things about your animal. When you are done, you should have an ordered list with awesome things about your animal.
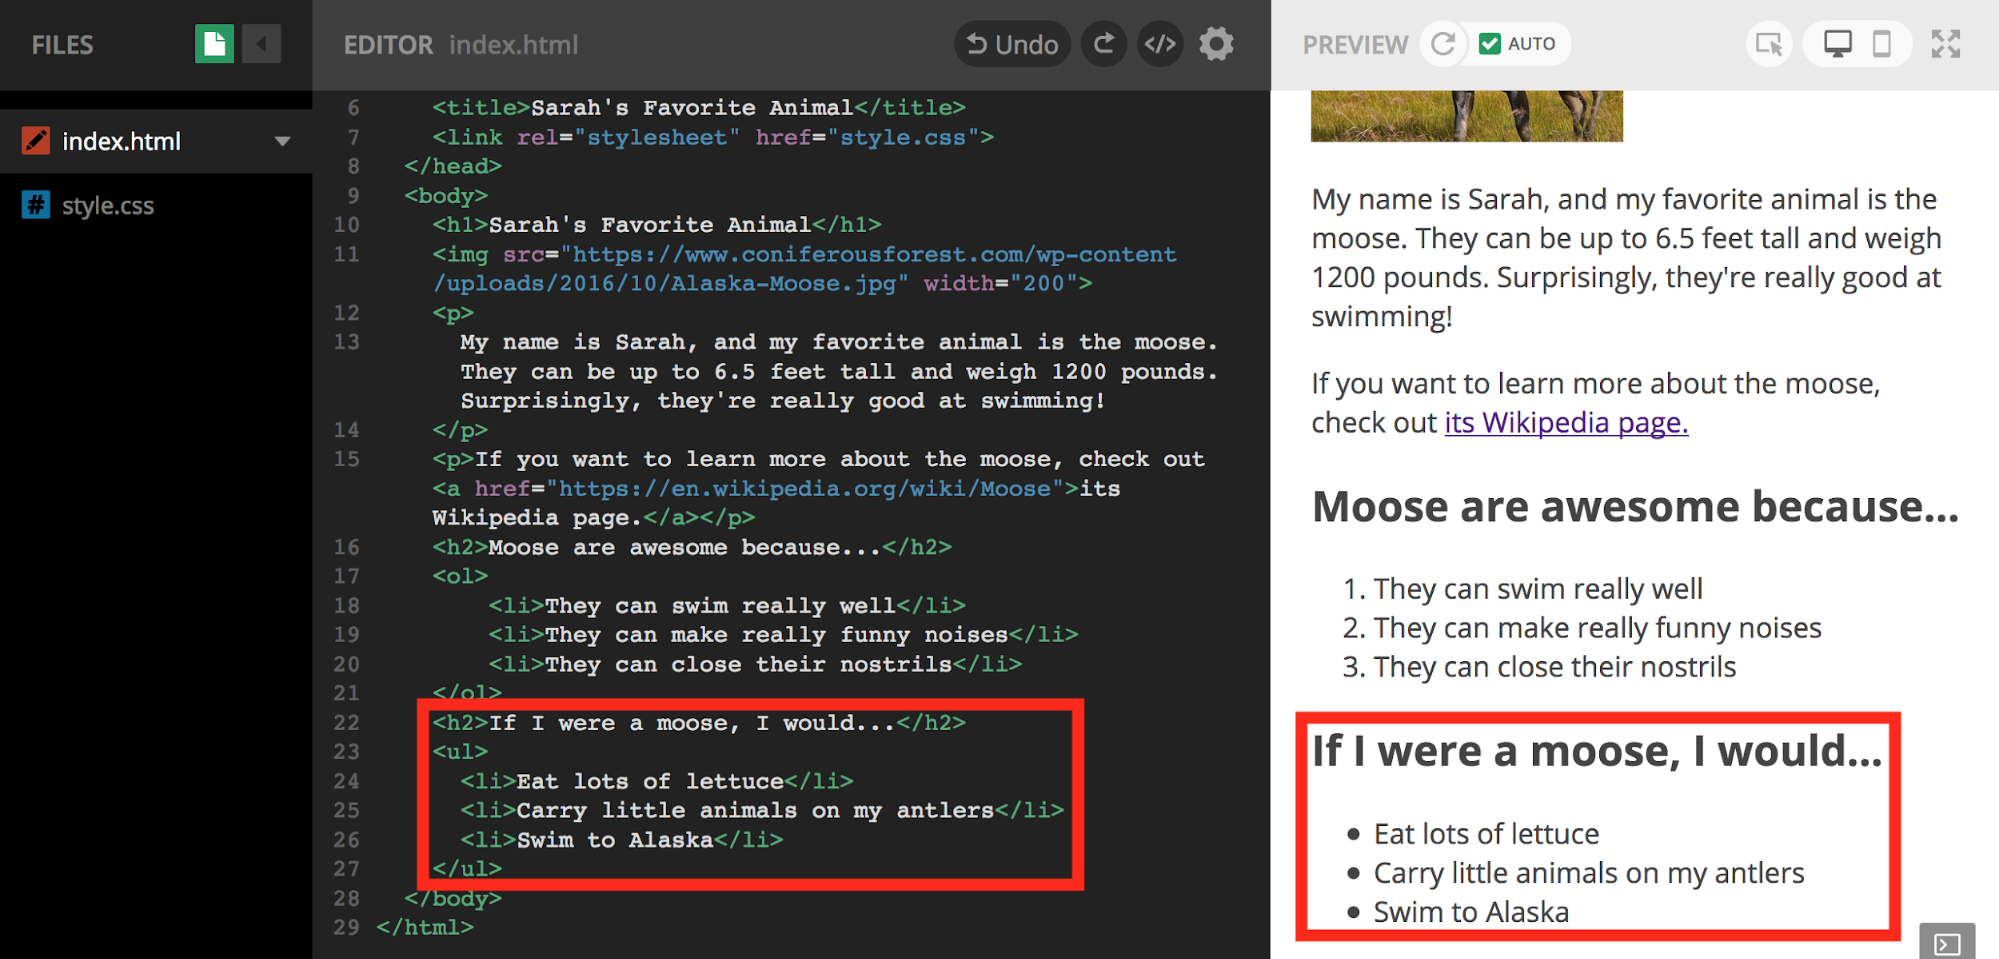
Now we are going to add an unordered list, so we should first put a title in for this list. Add a new line after our last list (after the </ol>), and type the line below, filling in the name of your animal in the blank.
<h2>If I were a ______, I would...</h2>
Instead of typing out a whole new list, we can use the one we just made as a template for the next list. Add a new line after the second title, and highlight the list we made before starting and ending with the "ol" tags. Copy it (Control+C or ⌘ Command+C), and paste it (Control+V or ⌘ Command+V) in the new line under the second title. Now two of the same list should appear on your website.
We want to change this list to be an unordered list instead of an ordered list, so the tag for an unordered list is <ul> (Unordered List) instead of <ol>. Change the opening AND closing "ol" tags to by "ul" tags. The "li" tags can stay the same, but change the information inside the "li" tags to be things you would do if you were your animal. When you are done, you should have an unordered list with bullet points.
Video
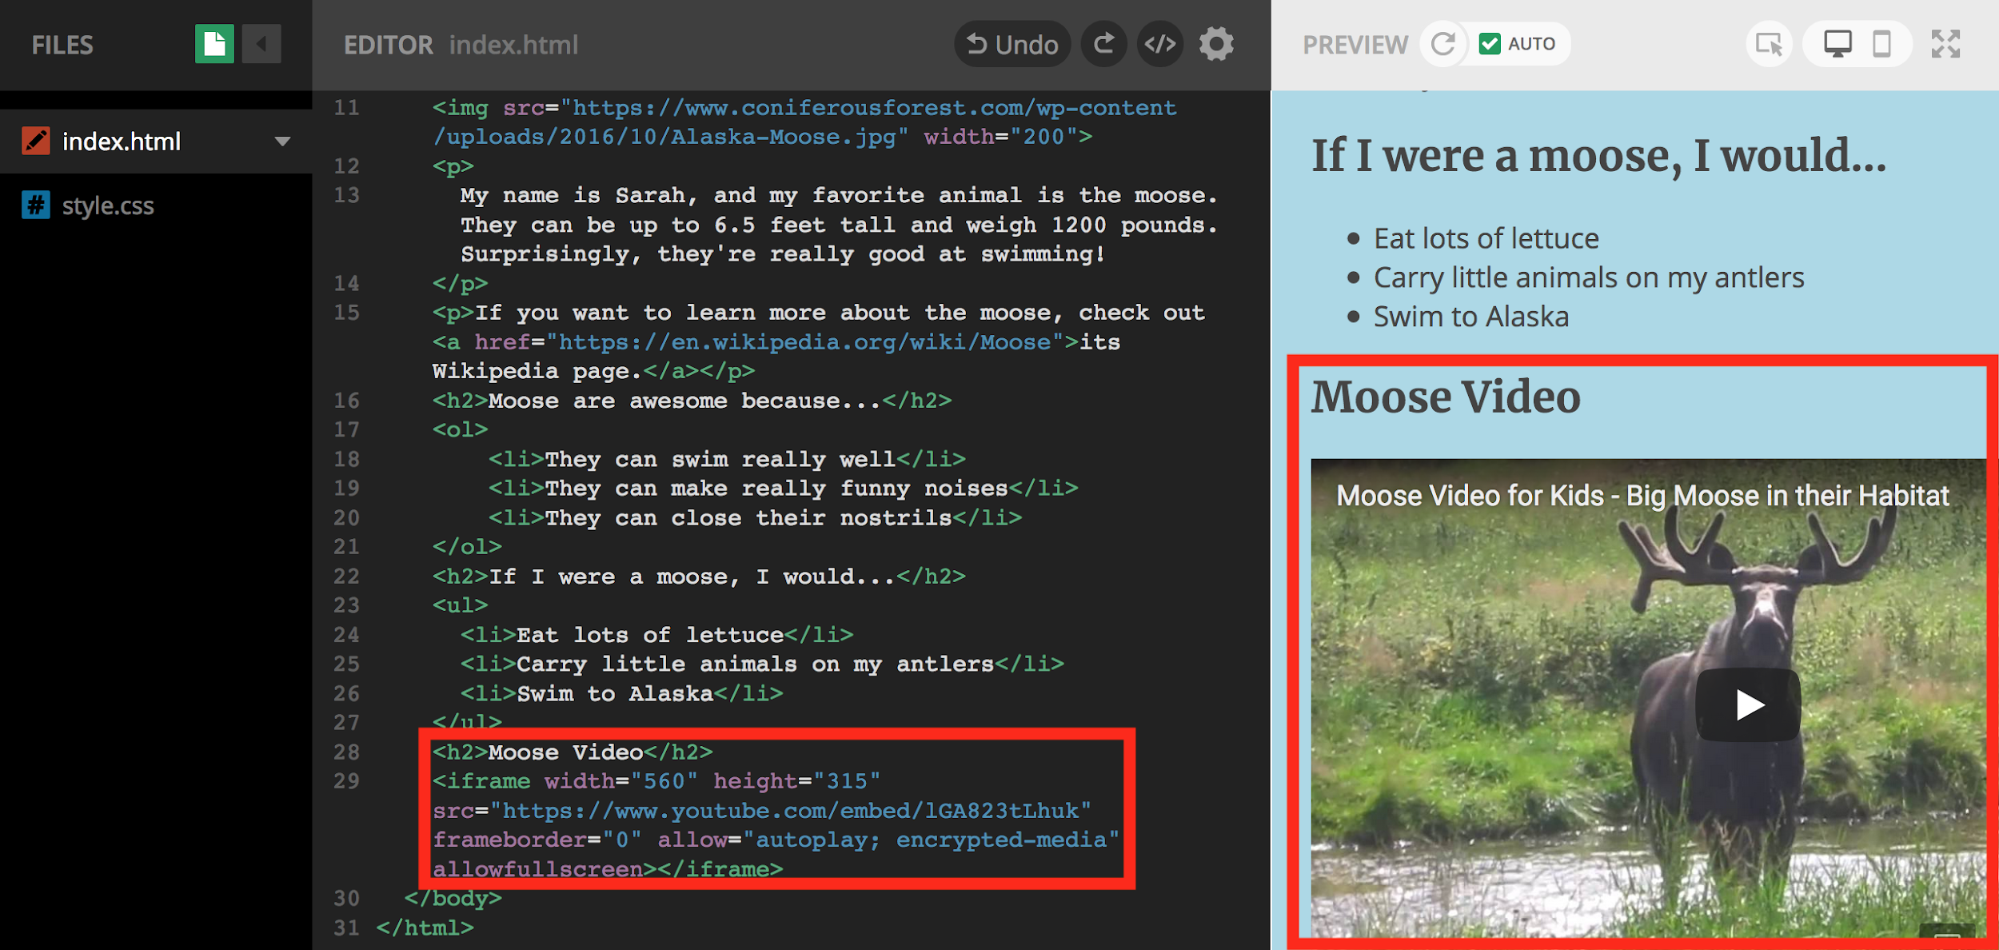
The next element we are going to add is a video of your animal, so add a new line under the unordered list you just made. We want a title for our video, but again, we don't want the heading to be as big as the title of the website. Let's type an <h2> tag and then the title you want for your video. The simplest thing you can put is <h2>______ Video</h2> where you fill in the name of your animal in the blank.
Next, go to youtube.com, and search for a video of your animal. Once you've found the video you want to put on your website, click on the "Share" button right below the video on the right side. Then click "Embed" on the left side of the pop-up. The HTML code for the video should appear on the right side of the pop-up now. It is an "iframe" tag, which is the tag used to embed a video. Highlight everything from the opening "iframe" tag to the closing "iframe" tag, and copy it.
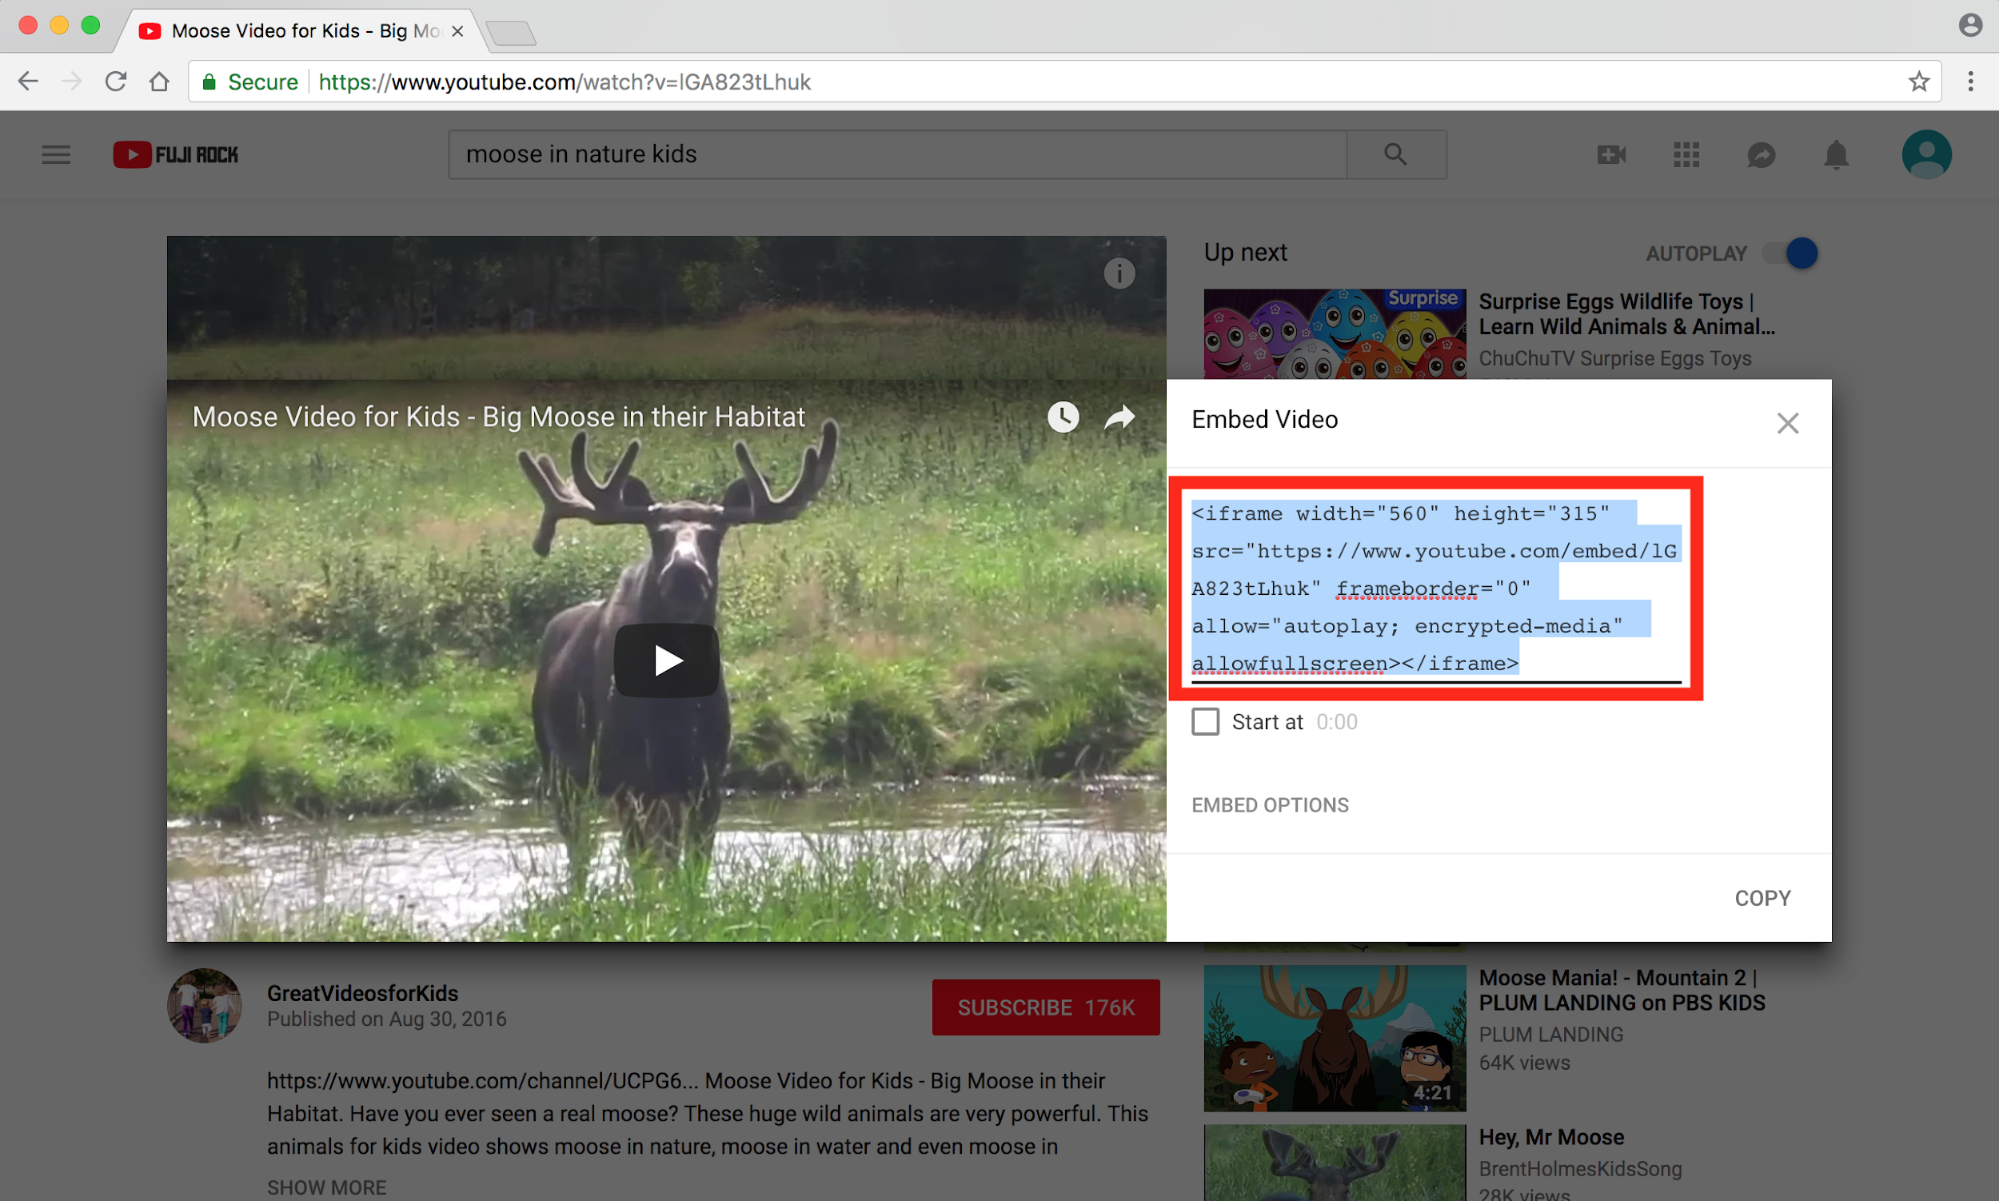
Go back to Thimble, and paste the "iframe" tag you just copied right after the title of the video you made. Your video should now appear on your website, and you will be able to play it on the screen of your website.
CSS
We've put a lot of content on one of our two pages using HTML, but it still looks very plain. There are no custom colors, fonts, spacing, etc. on our website. If you remember back to the beginning of our tutorial, we said we would be putting the information on our website using HTML, and then we would style it using CSS. It's time to add some styling!
Go to the leftmost bar where it lists the files you have, and click on "style.css." Type Control+A or ⌘ Command+A to highlight all of the code on the page. Then type backspace or delete so that it deletes all of the code on the page. Now we want to go copy this CSS code so that you won't have to write it all out yourself. Once you get to the page with the CSS code, type Control+A or ⌘ Command+A to highlight all of the text on the page. Then copy it using Control+C or ⌘ Command+C. Go back to Thimble, and paste the CSS code you just copied into the blank style.css file. Now you should have some spacing, colors, and fonts that are different than before.
In the CSS file, there are a lot of sections. Each section is started by a selector such as "img" followed by an opening curly brace {, some properties and their values, and a closing curly brace }. Anything in between the opening and closing curly brace applies to the selector right before the opening curly brace. For example, the margin and float properties shown below only apply to "img."
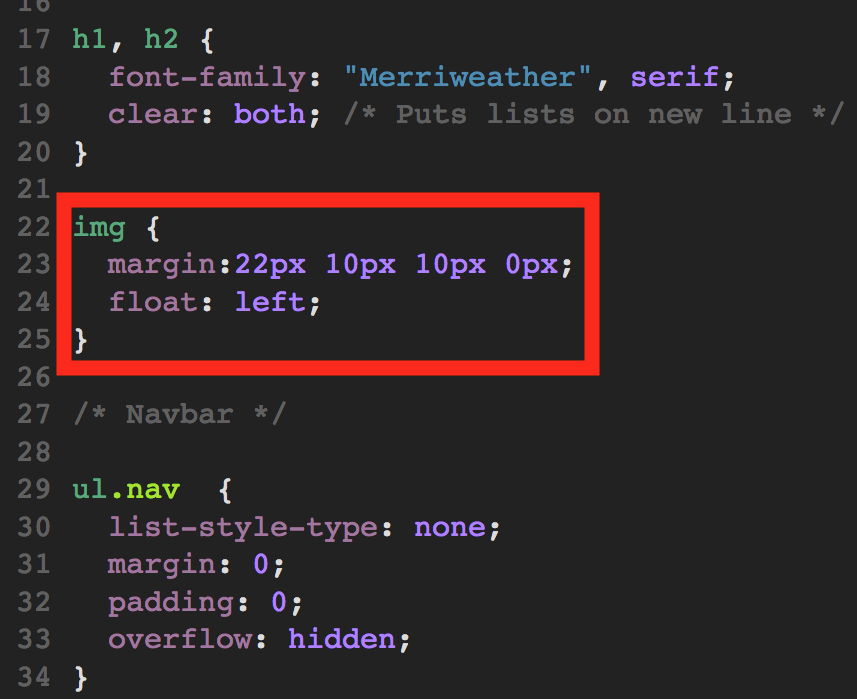
Since those margin and float properties only apply to "img," that means that those properties only apply to "img" tags in the HTML code. The only image tag we used was for the picture of our animal at the beginning of our web page. The same goes for the other selectors in the CSS file.
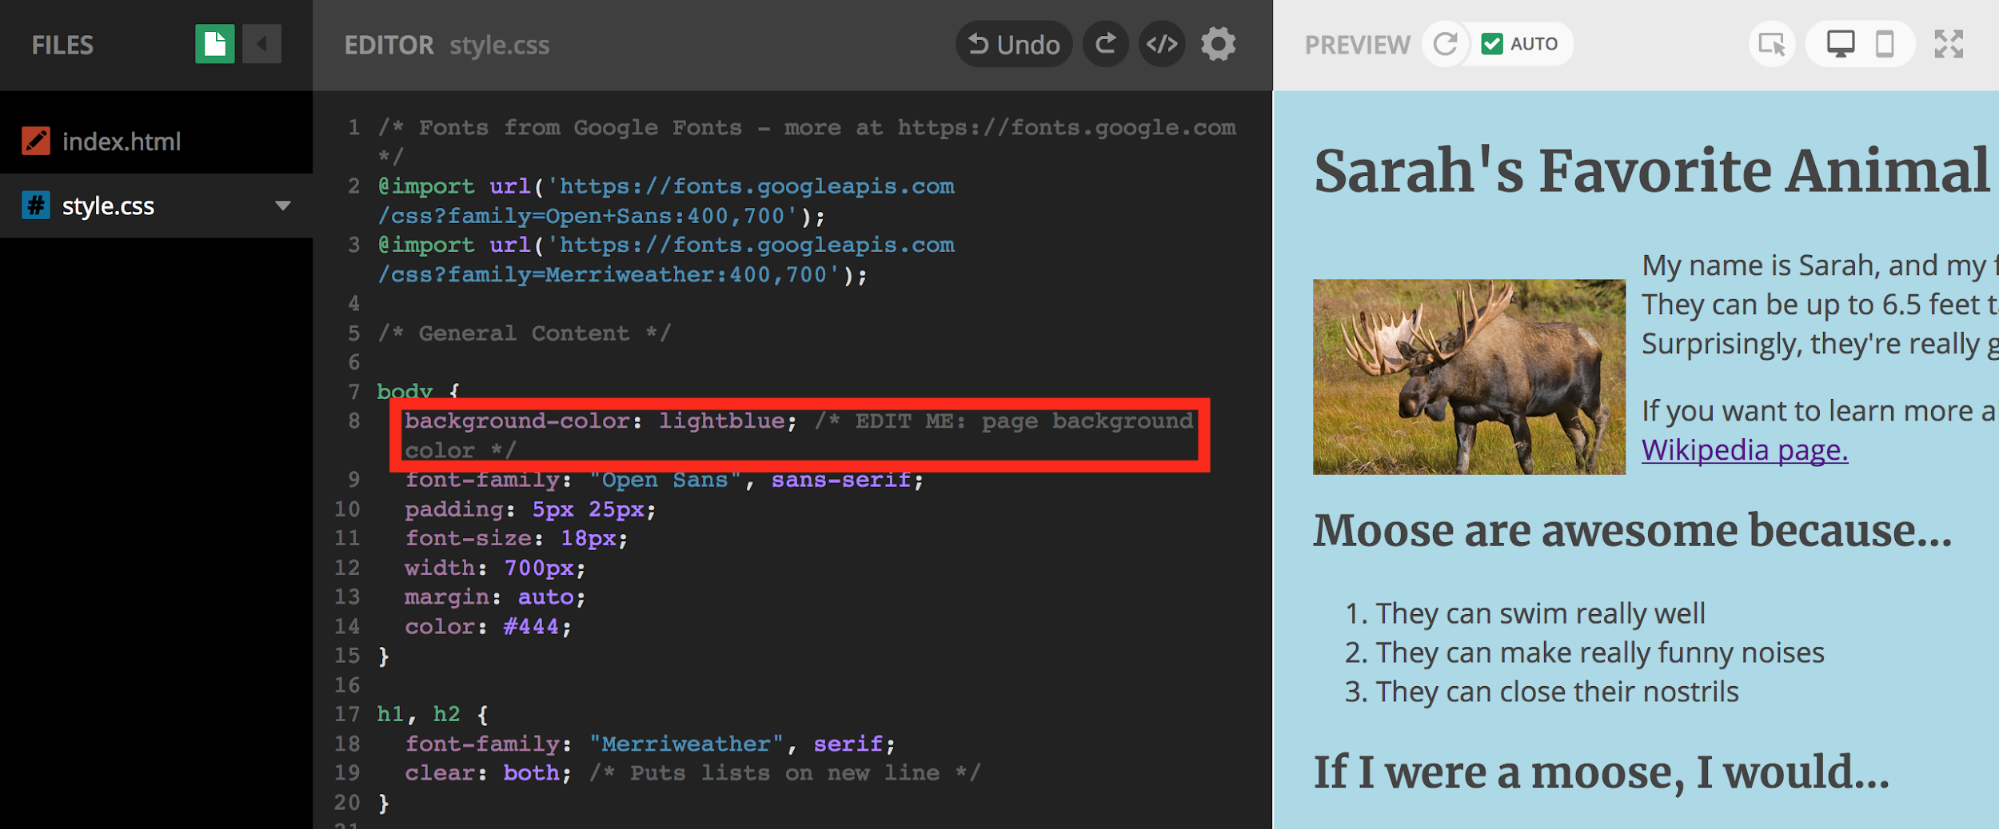
You can change, add, or delete properties in this CSS file. Assuming you haven't changed anything in the CSS file yet, go to line 8 and change the background color of your website. Right now the color it is showing is in the form of a hex value (#ffeed8), but you can type in the name of the color such as red, lightblue, etc. (/it has to be one word). Make sure you do not delete the semicolon at the end of the line. There needs to be a semicolon at the end of all the property lines.
STEP 3: FACTS PAGE
We have now successfully completed our home page! We can start making our second page called the Fun Facts page. This page is where we are going to put a button that will randomly display facts about our animal.

Setup
To create a new file for our new page, right click on the bar on the left where the files are listed, and select "New File." Then name the file "facts.html." Make sure that your file has exactly that name because that will be important later.
We need to edit the <head> information to be the same as the index.html <head>, and we've learned that the easiest way to do this is to use the copy and paste commands. First highlight everything from the opening "head" tag to the closing "head" tag, and delete it. Then go to index.html by clicking on it in the left side bar, and highlight everything from the opening "head" tag to the closing "head" tag. Copy that, go to facts.html, and paste it right below the opening "html" tag.
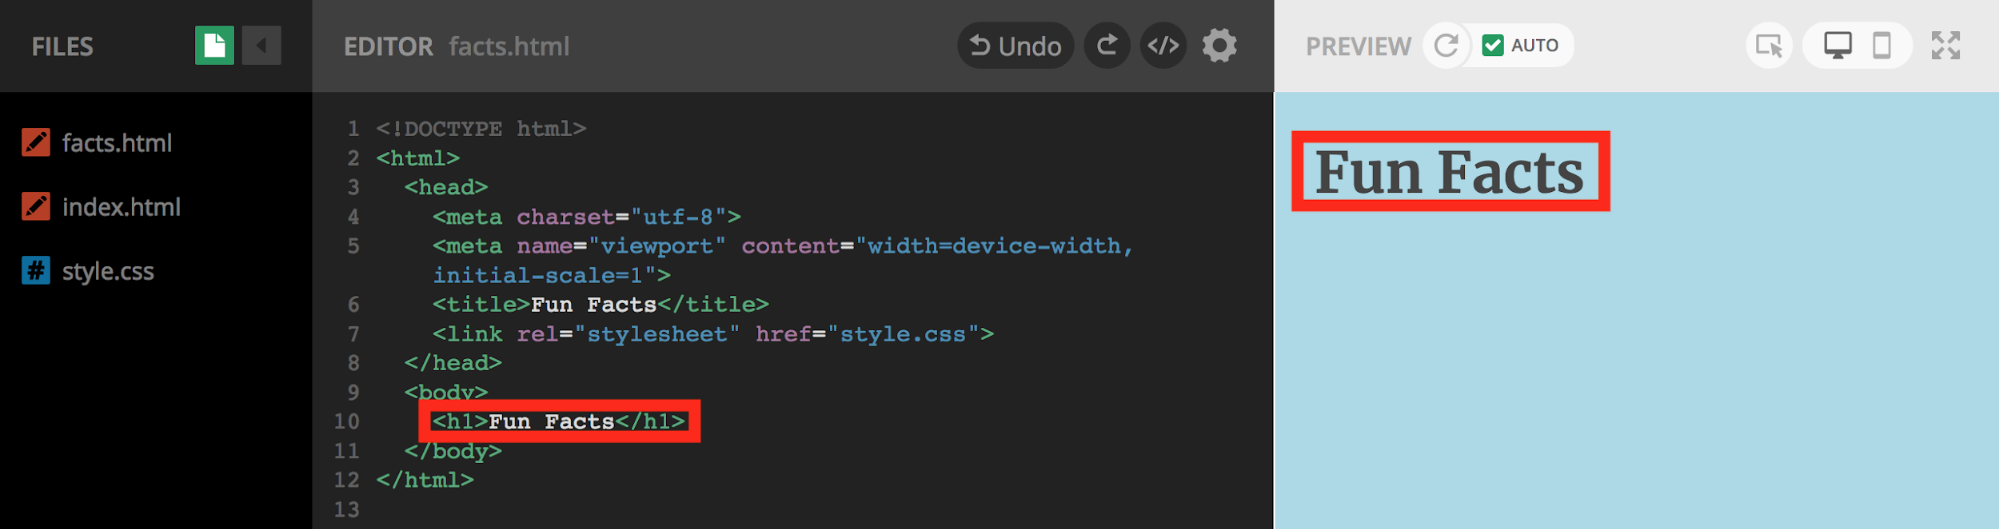
You will want to change the text inside the "title" tag to something like "Fun Facts." Remember we said that whatever was inside the "title" tag would appear in the tab on your web browser when you publish your website. After you've done all this, your facts.html page should look like the page below with the content Thimble provides as a template along with our edits.

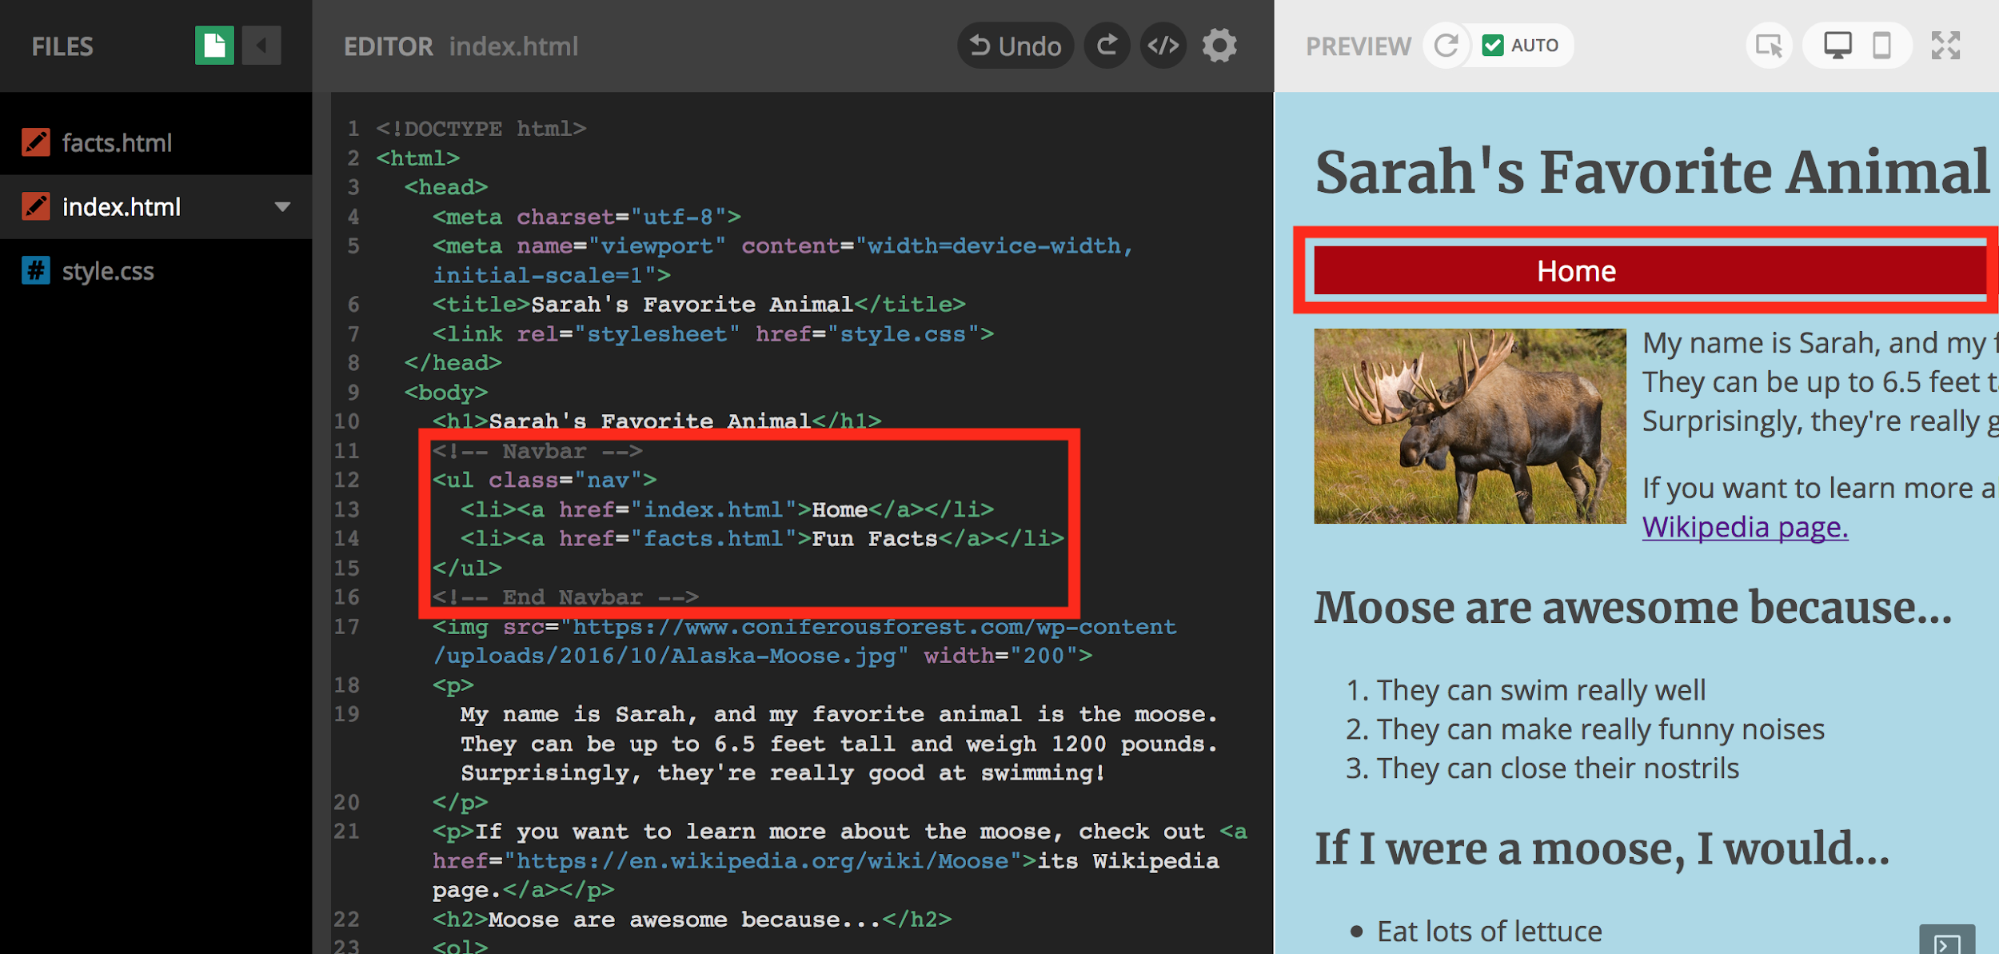
Navigation Bar
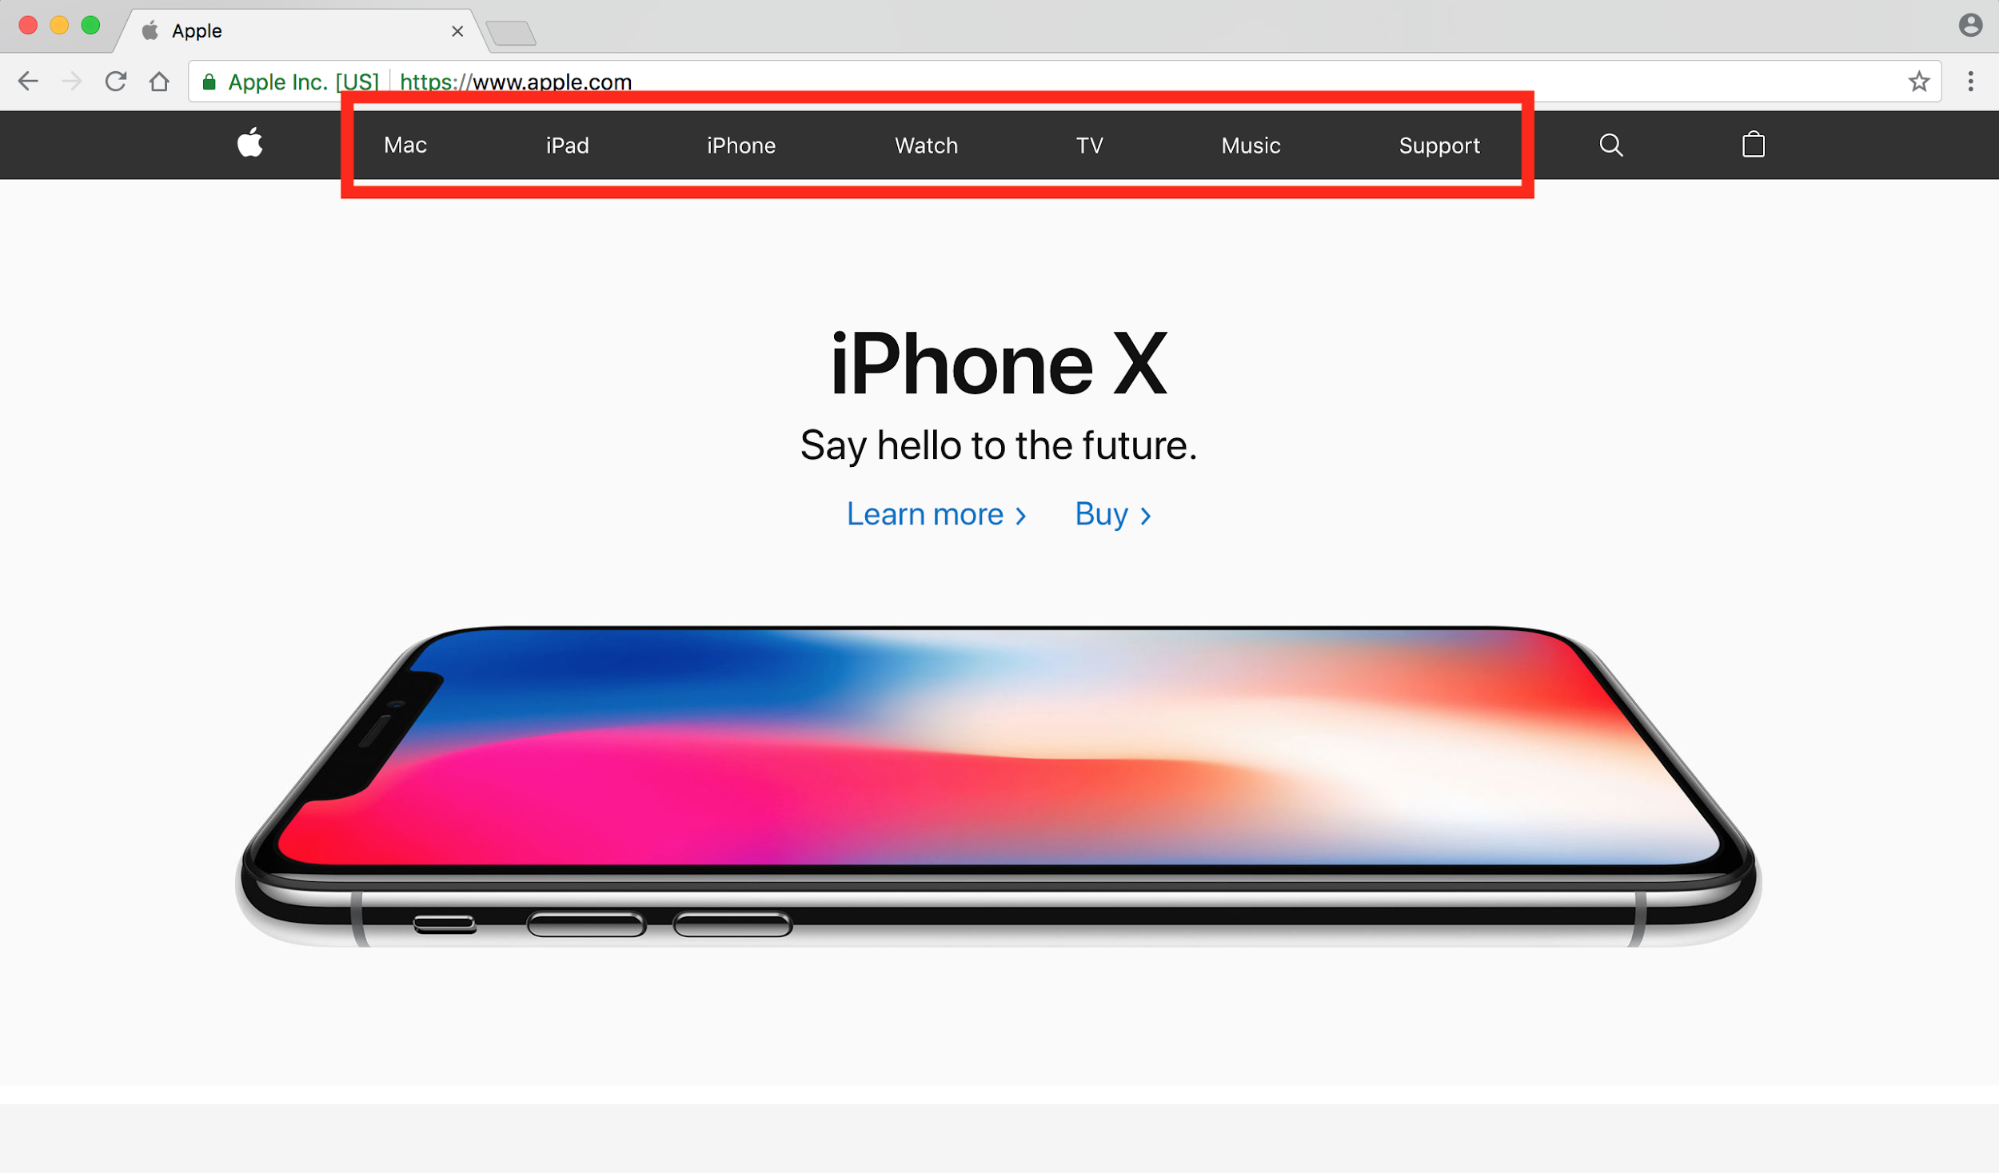
Now that we have two pages, we need a way to go between them. If you go to a website like apple.com, it has a navigation bar at the top that helps the users go between different pages. They can navigate from "Mac" to "iPad" to "iPhone" etc. We want to be able to navigate from Home to Fun Facts and back, so we will make a navigation bar to make that easier.
Before we make the navigation bar, lets give our facts.html page a title so it will be easier to see which page we are on when we navigate between the pages. On facts.html, you can take out the paragraph that they provide you with that says "Make something amazing with Brackets" and replace it with a title that says "Fun Facts." Which tag do you think you are going to use for the title of a page?
Now we can begin making the navigation bar. A navigation bar is really just a fancy looking unordered list. We've made an unordered list before, so this one will look very similar. We are going to put the navigation bar under the title of the page, so add a new line under the title of the facts.html page.
Comments
Before we begin actually coding our navigation bar, we are going to add something called a comment. A comment is something you can write in your code to help you remember and understand what the code you wrote means, but it doesn't affect how the website looks at all. We are going to add a comment before and after the navigation bar just so we remember that this is the navigation bar, and all content on the page should go after it.
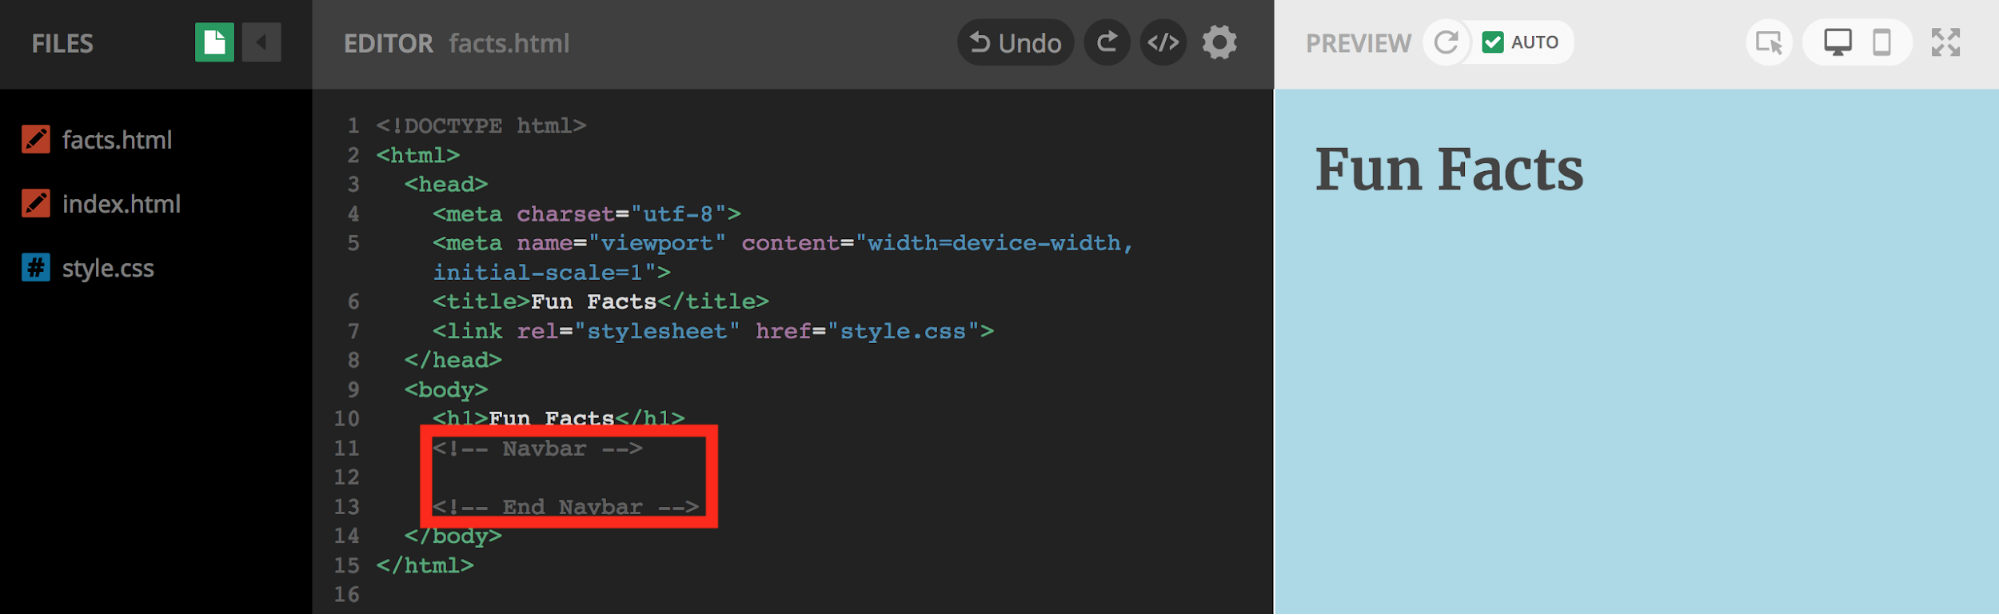
The way comments are written (the syntax) is different in every language. In HTML, they look like this: <!-- comment goes here -->. Whatever you put on the inside won't be read as code to display something on your webpage. Add a new line under your title for the fun facts page and write this:
<!-- Navbar -->

<!-- End Navbar -->
Now there is a comment at the beginning and the end of where your navigation bar is going to go to set it apart from the rest of the page.
Code
Now that we have a nice place to write the code for our navigation bar, add the opening AND closing tags for the unordered list so we don't forget later. Make sure you add these tags on the line in between the two comments. What tag does an unordered list have?
This tag is going to have a property added to it called a class. A class in computer science is similar to a class in school. Every class in school is different in some way: they have different students, different teachers, different subjects, etc. A class in computer science is a group that has properties of its own. The properties of the class we are going to add have already been defined in our style.css file. Instead of writing the normal tag for an unordered list, type the code below to add a class to our unordered list.
<ul class="nav">

</ul>
Once you have written the opening and closing tags for the unordered list, we need to add two list items, one for the Home page and one for the Fun Facts page. What tag does a list item have? Create two list items using their opening and closing tags. Our first list item should say "Home," and our second list item should say "Fun Facts."
<ul class="nav">
	<li>Home</li>
	<li>Fun Facts</li>
</ul>
We've added the list items, but they still don't take you to those pages when you click on them. That's because we haven't added links to them yet to tell them where to go when we click on them. We've added a link before when we linked to the Wikipedia page. We are going to use the same method here.
If you remember from before, the tag for a link is "a," and we used the property "href" to insert the link. In this case, our "link" isn't going to be a full URL. It's just going to be the name of the file that we want to go to when we click that list item. If we click on "Home," we want it to go to index.html, and if we click on "Fun Facts," we want it to go to facts.html. Based on that information, we would type out our links like the code below.
<ul class="nav">
    	<li><a href="index.html">Home</a></li>
    	<li><a href="facts.html">Fun Facts</a></li>
  </ul>
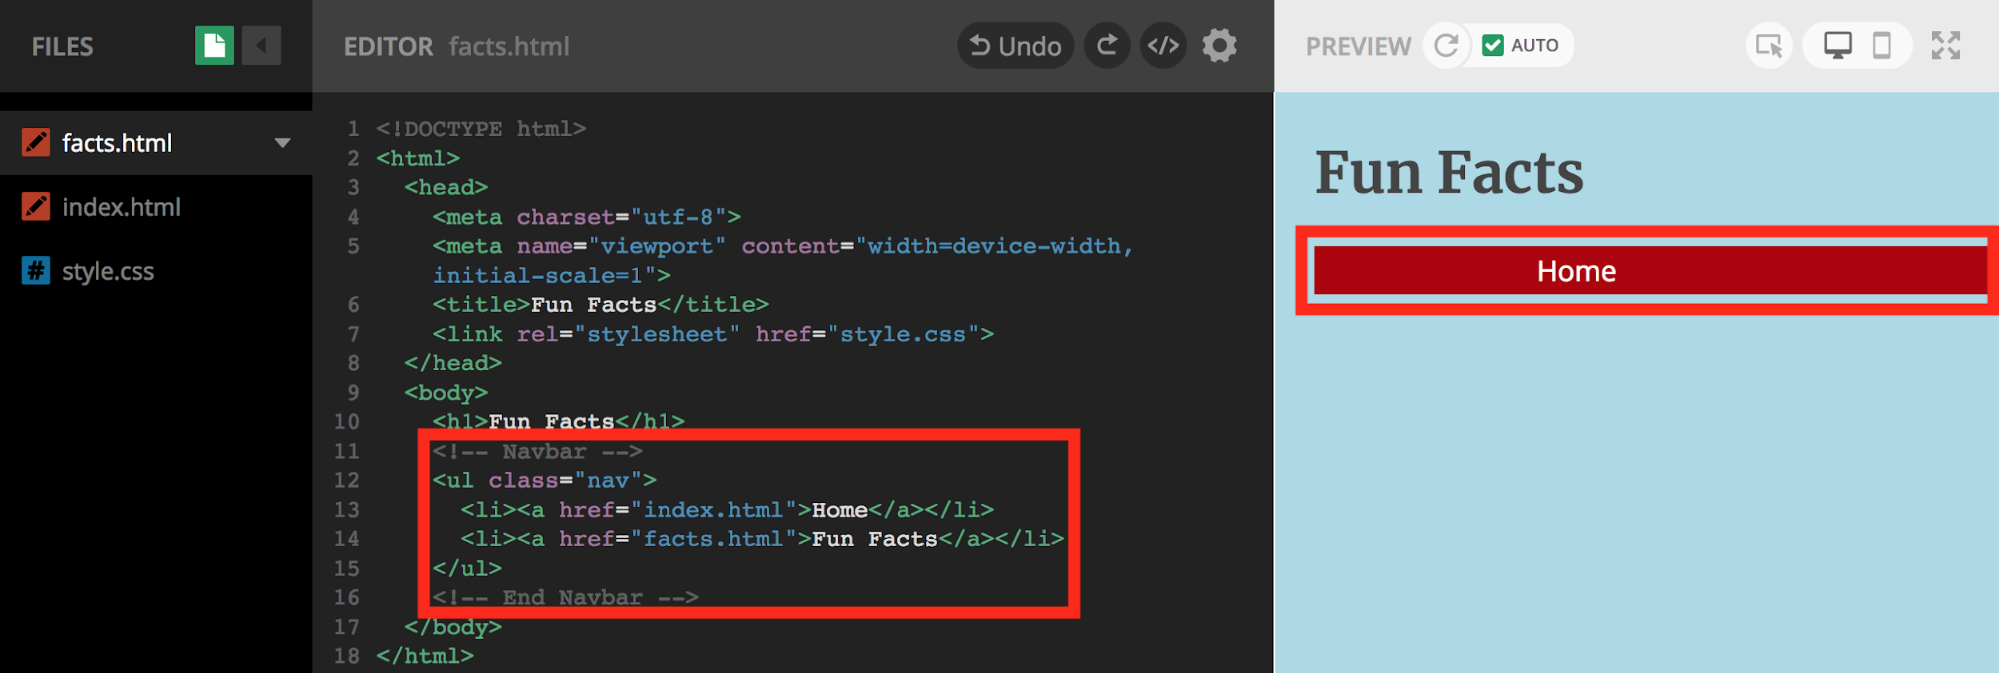
Once you have typed this out, you should see your navigation bar appear on the top of the Fun Facts page! But you might notice something that went wrong. If you click on Fun Facts, it will stay on the facts.html page, and the navigation bar is still there. However, if you click on "Home," it will go to index.html, but the navigation bar has disappeared. That is happening because we haven't put the navigation bar in index.html.
To make this easier than typing it all out again, we are going to copy and paste it. Go to facts.html, highlight everything starting with the comment that begins the nav bar and ending with the comment that ends the nav bar. Copy it (Control+C or ⌘ Command+C), then paste it (Control+V or ⌘ Command+V) in index.html right under the title of your page (under the
element). Now your navigation bar should appear on both pages!
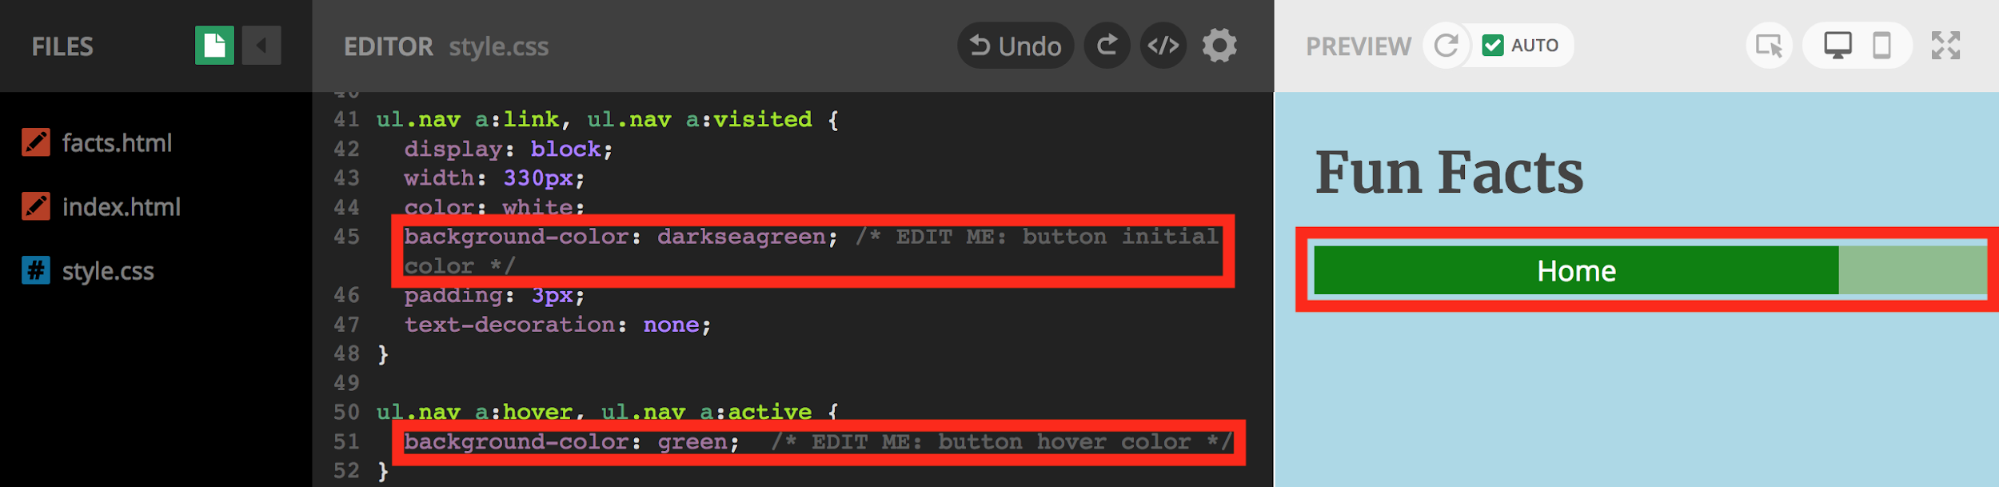
If you want to change the color of the buttons and/or of their color when you hover over them, you can just do what we did before to change the background color of the page. We changed the CSS code because we use HTML for the information and CSS for the styling. Go to style.css, and, assuming you haven't changed anything else in this file, go to line 45. This is where you should be able to change the color of the button. Line 51 is where you can change the color of the button when you hover over it. Go ahead and change those colors to go with the look and feel of your website.
Random Fact Generator
Our next step will be to make a random fact generator for our Fun Facts page. We are going to be using a language called JavaScript in order to do this. We need a JavaScript file to be able to write this code. Right click on the bar on the left where the files are listed, and select "New File." Then name the file "script.js." Make sure that your file has exactly that name because that will be important later.
Copy this JavaScript code so that you won't have to write it all out yourself. Once you get to the page with the JavaScript code, type Control+A or ⌘ Command+A to highlight all of the text on the page. Then copy it using Control+C or ⌘ Command+C. Go back to Thimble, and paste the JavaScript code you just copied into the blank script.js file. Now your new file should look like this, but nothing new will appear on your screen.
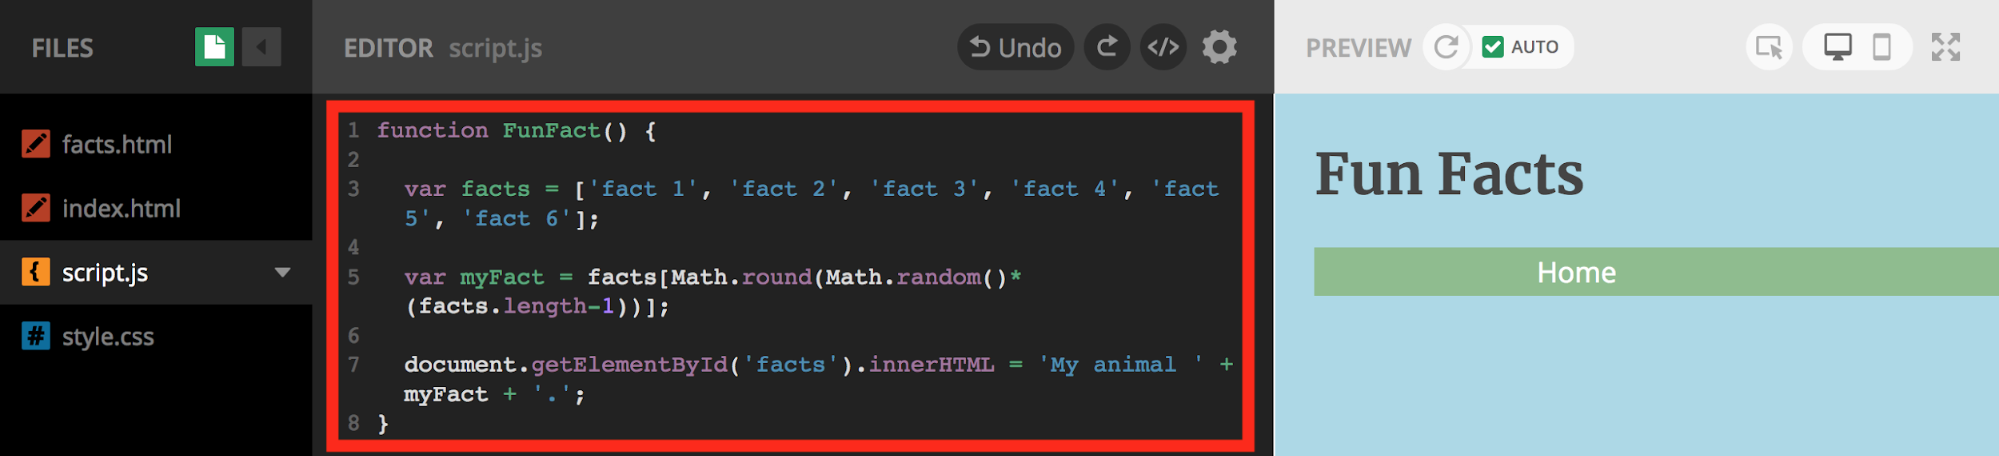
Before we go on, it is important that you understand how this JavaScript code works. The first part of the code is the word "function" followed by the name we decided to call this function. A function is a section of code that does a certain task. The code of the function starts with the opening curly brace and ends with the closing curly brace, just like what we saw in the CSS code. Also, every line has to end with a semicolon just like CSS. Everything inside those curly braces happens sequentially (one thing after another).
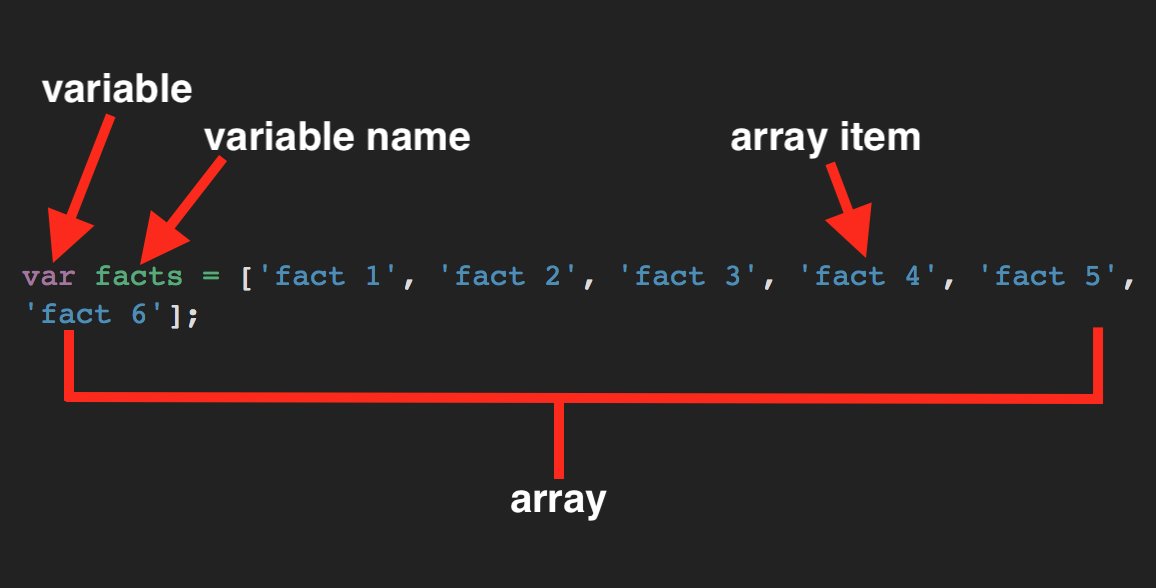
The first line defines a variable. A variable is like a box that can hold many different types of items inside. The variable could be filled with a number, a list, or so many other items. In this case we named our variable "facts," and it holds an array, which is like a list. It is a list of our fun facts. Each fact goes between single quotes, and the facts are separated by commas.
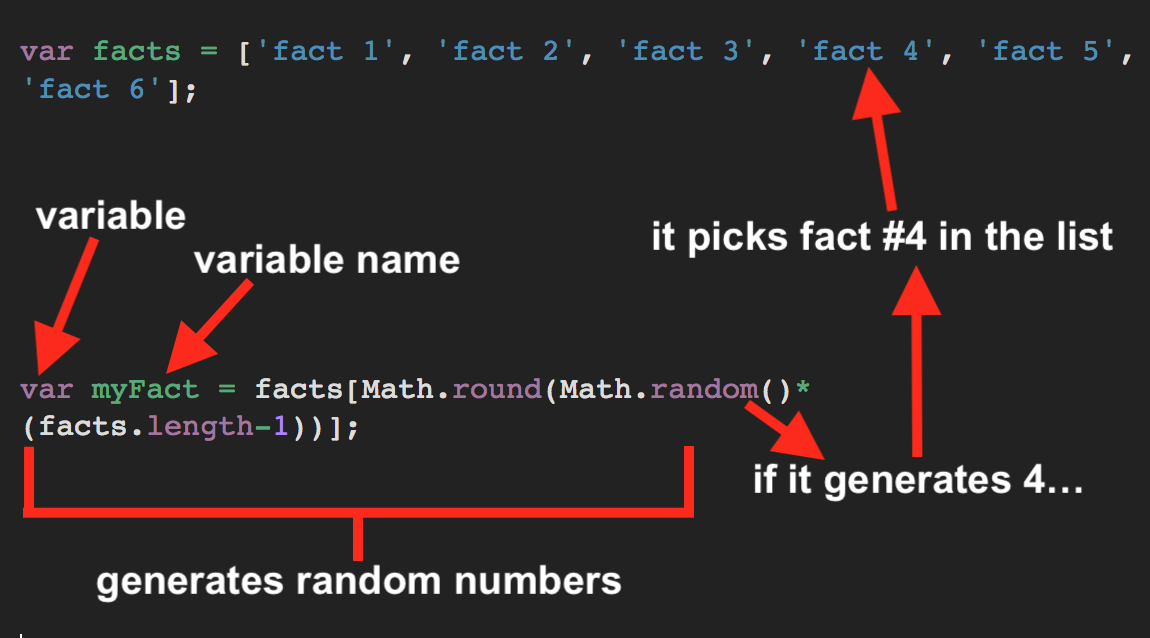
The next line defines another variable called "myFact," and this variable holds a number. The code after the name of this variable generates a random number, and that number will correspond to the fact in the list above that is in that place.
The last line constructs the sentence that will be displayed on our fun facts page. It does this by a method called concatenation. This means that you add parts together like adding beads to a necklace. You make the sentence longer and longer as you add more parts to it.

The sentence will start with "My animal". Then it adds whatever the variable "myFact" is holding, which, in our example, was our fourth fun fact. Let's say that fourth fun fact is "eats only plants." The sentence would now look like "My animal eats only plants" with no period at the end. The last part adds the period to complete the sentence. Our final sentence looks like this: "My animal eats only plants."
Now that we understand how the JavaScript works, let's start changing it to fit our own website. First, go to line 7 and change "My animal" to "The _____" with the name of your animal in the blank. This will be the beginning of all your fact sentences.
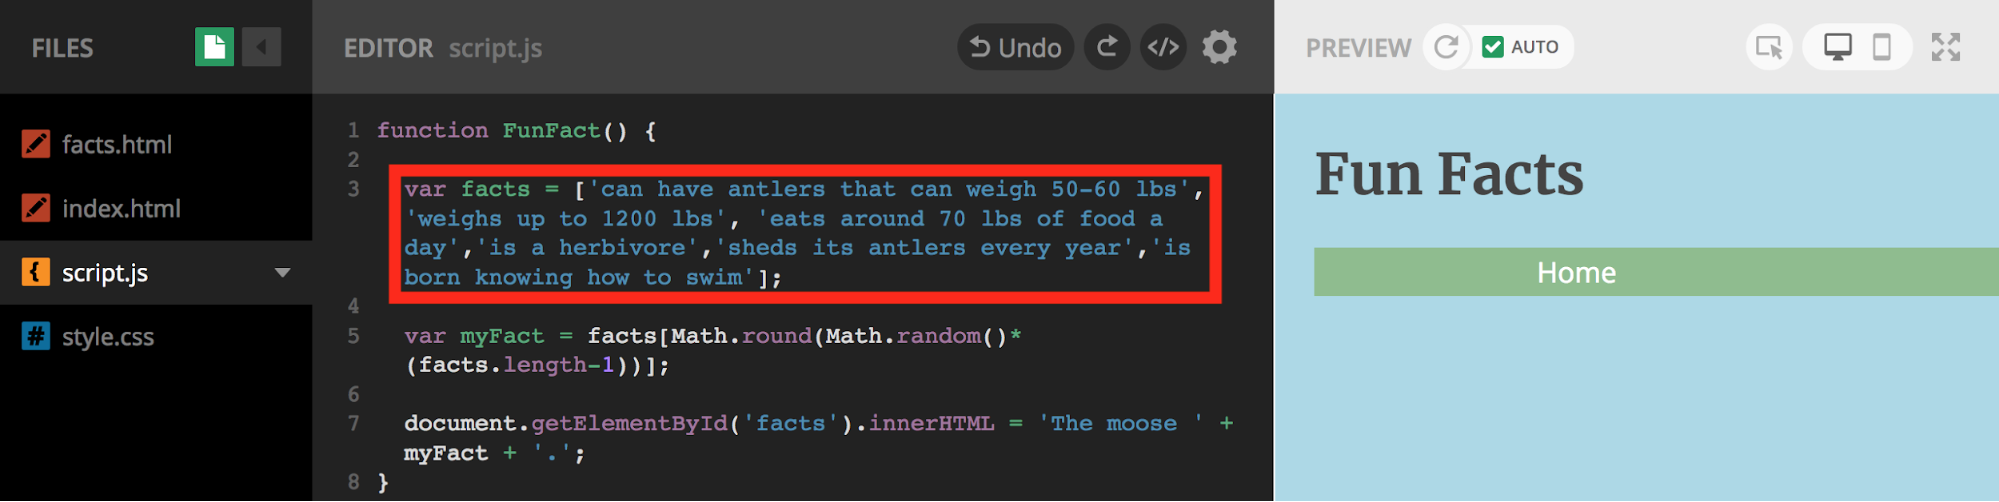
Now go to line 3 where all the facts are listed, and start changing them to be facts about your animal. Remember that "The [animal name]" is the subject of your sentences, so start each of your facts with a verb. For example, the first fact for the moose website will be 'can have antlers that can weigh 50-60 lbs' with no period at the end. The sentence that will be made with this fact is: "The moose can have antlers that can weigh 50-60 lbs." Remember this is formed from concatenating 'The moose' with 'can have antlers that can weigh 50-60 lbs' and '.'
Once you have all your facts filled in, you might think that your sentences should appear now that they can be constructed. However we haven't put anything on the facts.html page to tell it to look at script.js and display the fun facts.
Go to facts.html and add a new line right under the tag <link> and before the ending tag </head>. That <link> tag tells the facts page to look at style.css for all the style. If that line did not exist, the colors that we changed in our CSS file wouldn't actually show up on our page. That "link" tag is also on the index.html page. We are going to add a similar line to tell facts.html to look at script.js to get the randomly generated fact. In the new line you created type the following code: \
<script src="script.js" type="text/javascript"></script>
The "src" element is just like the image source we wrote before. It shows where it is supposed to look, and in this case, that is the script.js file we made.
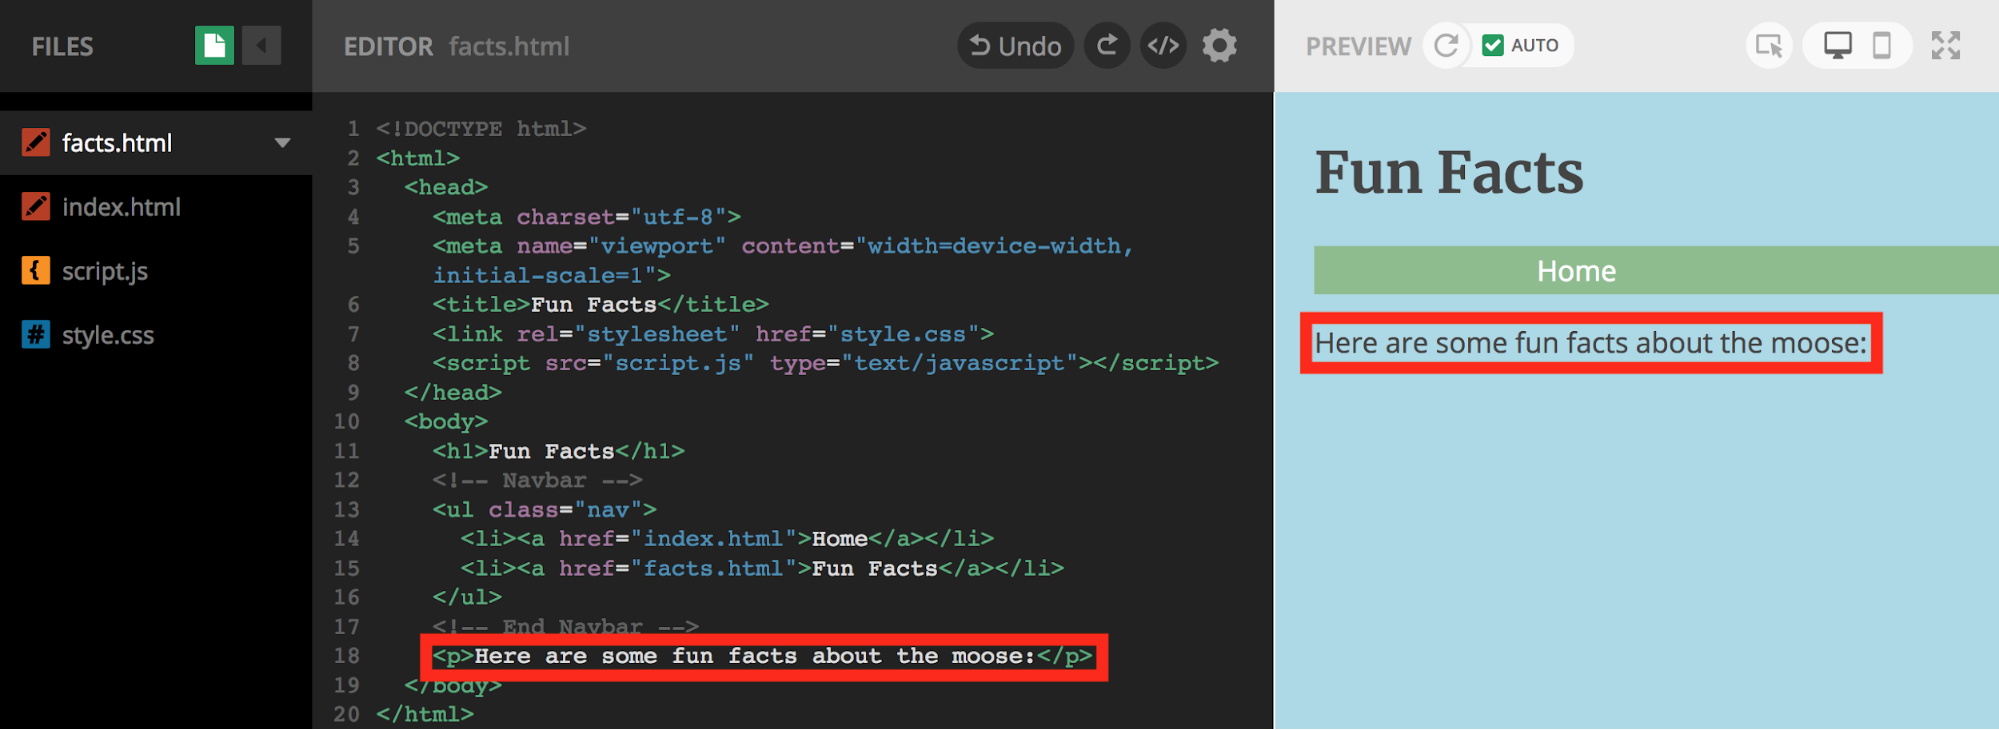
Before we make a button to generate our facts, we should add some sort of a sentence that helps the user understand what the button is for. What tag do you think we are going to use to write a sentence? We're going to use the "p" tag that stands for paragraph. Add a new line for our paragraph after the comment that ends the navbar and write the code below, filling in the blank with your animal's name.
<p>Here are some fun facts about the _______:</p>
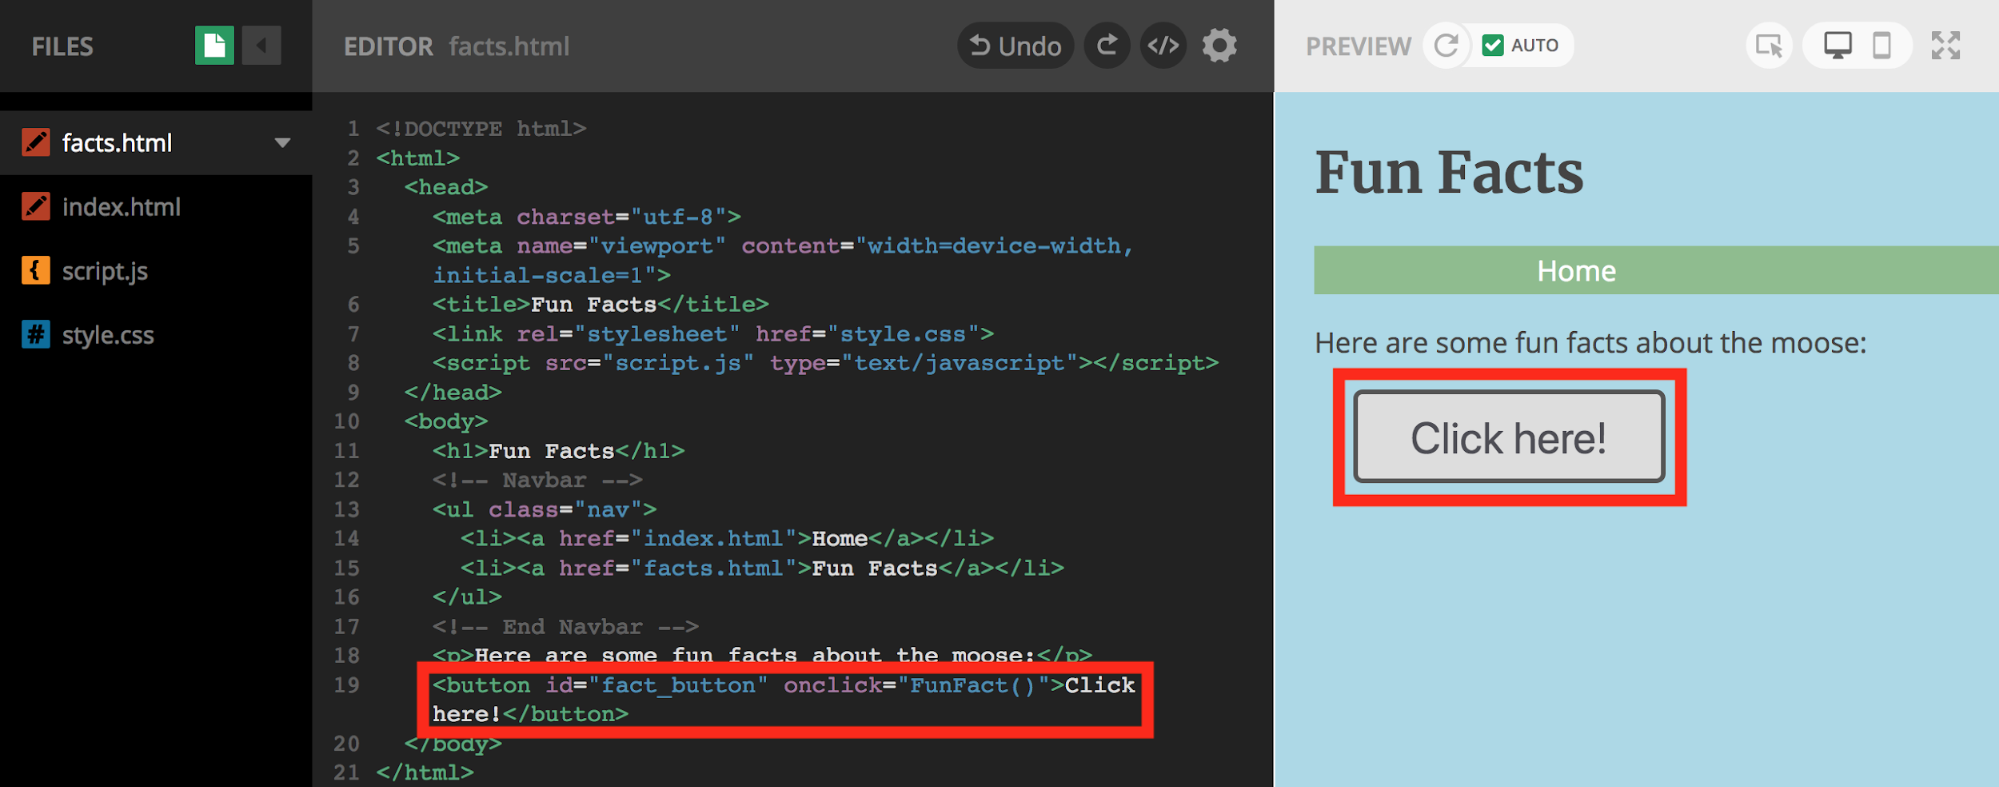
Next, we want to add the button that we will click to generate the random fact. Nicely enough, the tag for a button is "button," so type the line below.
<button id="fact_button" onclick="FunFact()">Click here!</button>
The "id" element is similar to the "class" element that we talked about before. There is a section of our CSS file for the id "fact_button," and it has certain colors and fonts that it gives that id. The more important thing to notice in this line of code is the "onclick" element. This means that when you click the button, the "FunFact()" function will be called. It will look in the script.js file to find that function, and then it will do everything in that function. This means that when you click the button it will generate a random fact.
You might notice a slight problem. When you click the button, it still doesn't display the fun fact. Instead, it brings up an error on the bottom of the screen. That is because we haven't made a placeholder with the corresponding id yet.
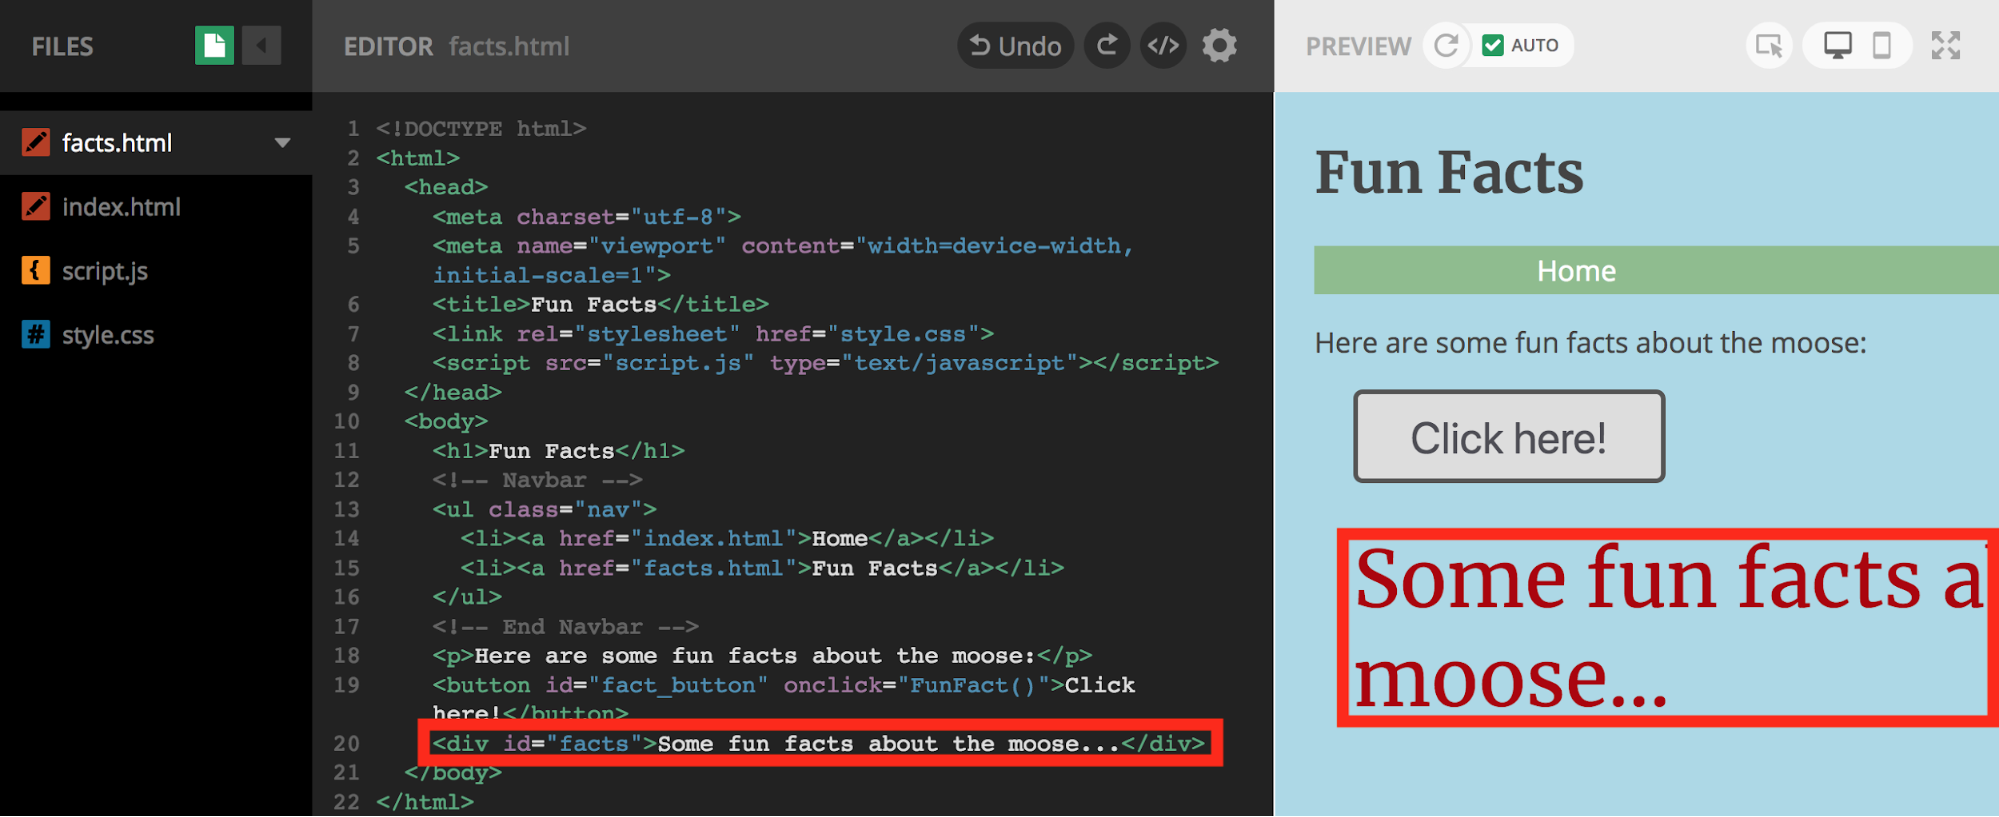
Add a new line under the "button" tag for our placeholder. We are going to add a section, or a division, for this placeholder. The tag for a division is "div." We are also adding an id that corresponds to some CSS styling. Write the code below in the line you just added, filling in the blank with your animal's name.
<div id="facts">Some fun facts about the _______...</div>
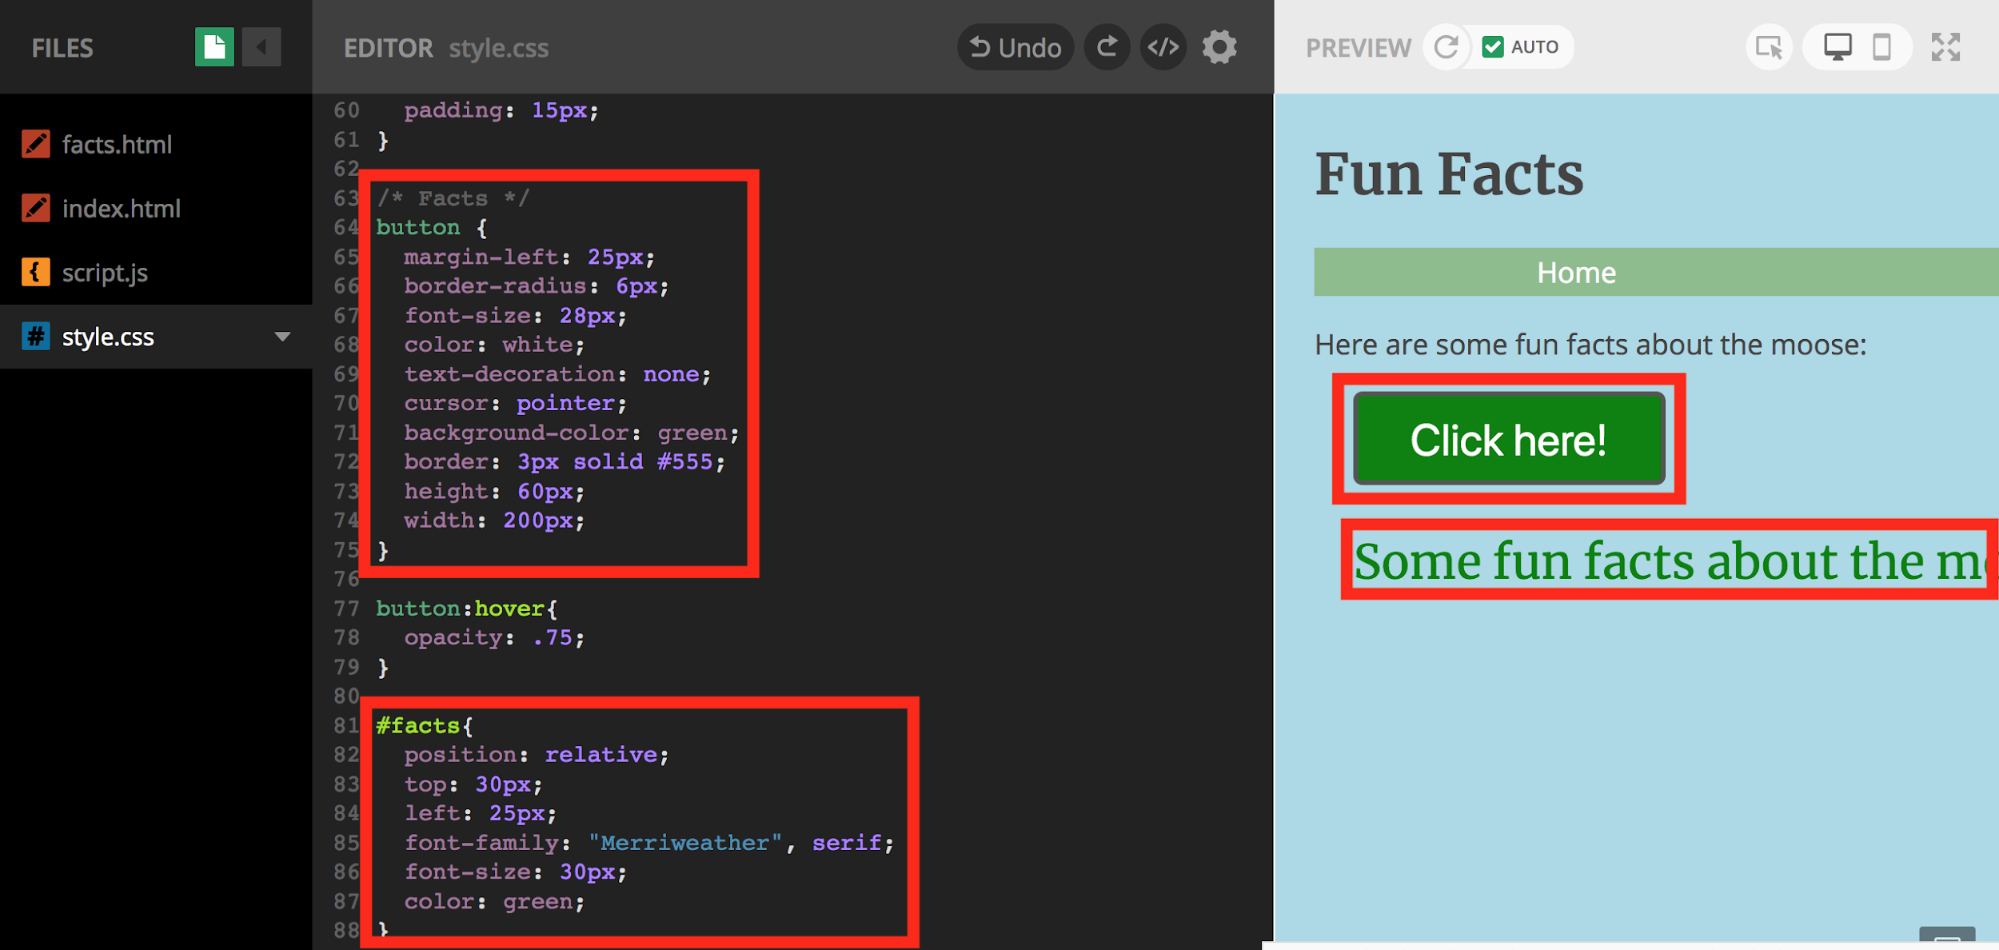
If you want to change the color or font of your fun facts, go to style.css, and find "#facts" toward the end of the file. Everything under "#facts" applies to how your fun facts will be displayed. You can also change the color or font of the button if you look for the section called "button" in the CSS file.
STEP 4: PUBLISH WEBSITE
You've finished your website now! You are welcome to make more edits to your website, research how to add more, and change things we've done, but you don't have to change anything. When you are ready to publish your website, click "Publish" in the top right corner. You can then add a description if you would like, but you don't have to. Then click "Publish" again. A link to your published website should appear, so click on that link.

Now you will see your website on the web! Anyone with the link can see it in their web browser, so it would be a good idea to copy the link to your website and save it somewhere. Then you can show all your family and friends the new website you created. Congratulations! You have now made your first website!